Instruction Manual
Page 7
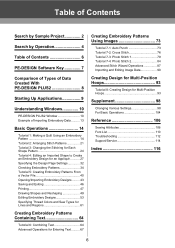
... 2 Search by Operation 4 Table of Contents 6 PE-DESIGN Software Key 7 Comparison of Types of Data Created With PE-DESIGN PLUS2 8 Starting Up Applications 9 Understanding Windows 10 PE-DESIGN PLUS2 Window 10 Example of Importing Embroidery Data .......... 13 Basic Operations 14 Tutorial 1: Making a Quilt Using an Embroidery Pattern 14 Tutorial 2: Arranging Stitch Patterns 21 Tutorial 3: Changing the Stitching for Each Shape Pattern...
... 2 Search by Operation 4 Table of Contents 6 PE-DESIGN Software Key 7 Comparison of Types of Data Created With PE-DESIGN PLUS2 8 Starting Up Applications 9 Understanding Windows 10 PE-DESIGN PLUS2 Window 10 Example of Importing Embroidery Data .......... 13 Basic Operations 14 Tutorial 1: Making a Quilt Using an Embroidery Pattern 14 Tutorial 2: Arranging Stitch Patterns 21 Tutorial 3: Changing the Stitching for Each Shape Pattern...
Instruction Manual
Page 15
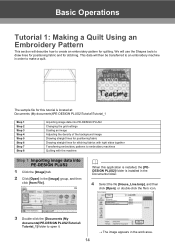
... file [House_Line.bmp], and then click [Open], or double-click the file's icon. 3 Double-click the [Documents (My documents)\PE-DESIGN PLUS2\Tutorial\ Tutorial_1] folder to open it. 14 The image appears in the work area. We will use the Shapes tools to draw... fabric and for quilting. b When this application is installed, the [PEDESIGN PLUS2] folder is located at: Documents (My documents)\PE-DESIGN PLUS2\Tutorial\Tutorial_1 Step 1 Step 2 Step 3 Step 4 Step 5 Step 6 Step 7 Step 8 Importing image data into PE-DESIGN PLUS2 1 Click the [Image] tab. 2 Click [Open] in order to ...
... file [House_Line.bmp], and then click [Open], or double-click the file's icon. 3 Double-click the [Documents (My documents)\PE-DESIGN PLUS2\Tutorial\ Tutorial_1] folder to open it. 14 The image appears in the work area. We will use the Shapes tools to draw... fabric and for quilting. b When this application is installed, the [PEDESIGN PLUS2] folder is located at: Documents (My documents)\PE-DESIGN PLUS2\Tutorial\Tutorial_1 Step 1 Step 2 Step 3 Step 4 Step 5 Step 6 Step 7 Step 8 Importing image data into PE-DESIGN PLUS2 1 Click the [Image] tab. 2 Click [Open] in order to ...
Instruction Manual
Page 16
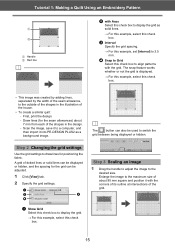
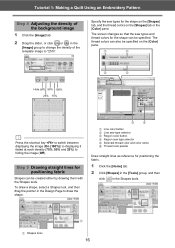
Tutorial 1: Making a Quilt Using an Embroidery Pattern 1 2 1 Handle 2 Red line b b with the grid. Step ... tab. 2 Specify the grid settings. A grid of the shapes in the illustration of the grid. 15 First, print the design. - Scan the image, save it to the maximum size of about 7 mm from each of dotted lines or solid lines ...Drag the handle to adjust the image to the outside of the shapes in the design. - Draw lines (for the seam allowances) about 95 mm square and position it into PE-DESIGN PLUS2 as solid lines. For this example, select this check box. Enlarge ...
Tutorial 1: Making a Quilt Using an Embroidery Pattern 1 2 1 Handle 2 Red line b b with the grid. Step ... tab. 2 Specify the grid settings. A grid of the shapes in the illustration of the grid. 15 First, print the design. - Scan the image, save it to the maximum size of about 7 mm from each of dotted lines or solid lines ...Drag the handle to adjust the image to the outside of the shapes in the design. - Draw lines (for the seam allowances) about 95 mm square and position it into PE-DESIGN PLUS2 as solid lines. For this example, select this check box. Enlarge ...
Instruction Manual
Page 17
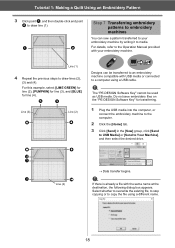
The thread colors can also be specified on the [Shapes] tab or the [Color] pane. Tutorial 1: Making a Quilt Using an Embroidery Pattern Step 4 Adjusting the density of the template image to hiding the image (Off). Specify the sew types for the ... the slider, or click or in the Shapes tools. 1 Shapes tools 1 16 To draw a shape, select a Shapes tool, and then drag the pointer in the Design Page to draw the shape. 5 6 1 Line color button 2 Line sew type selector 3 Region color button 4 Region sew type selector 5 Selected thread color and color name...
The thread colors can also be specified on the [Shapes] tab or the [Color] pane. Tutorial 1: Making a Quilt Using an Embroidery Pattern Step 4 Adjusting the density of the template image to hiding the image (Off). Specify the sew types for the ... the slider, or click or in the Shapes tools. 1 Shapes tools 1 16 To draw a shape, select a Shapes tool, and then drag the pointer in the Design Page to draw the shape. 5 6 1 Line color button 2 Line sew type selector 3 Region color button 4 Region sew type selector 5 Selected thread color and color name...
Instruction Manual
Page 18
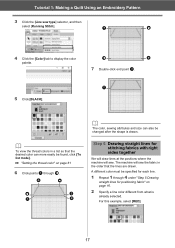
e d f a c b b The color, sewing attributes and size can more easily be found, click [To list mode]. Tutorial 1: Making a Quilt Using an Embroidery Pattern 3 Click the [Line sew type] selector, and then select [Running Stitch]. Step 6 Drawing straight lines for stitching fabrics with ...
e d f a c b b The color, sewing attributes and size can more easily be found, click [To list mode]. Tutorial 1: Making a Quilt Using an Embroidery Pattern 3 Click the [Line sew type] selector, and then select [Running Stitch]. Step 6 Drawing straight lines for stitching fabrics with ...
Instruction Manual
Page 19
Tutorial 1: Making a Quilt Using an Embroidery Pattern 3 Click point a, and then double-click end point b to the Operation Manual provided with your embroidery machine by writing it to media. For details, refer to draw line (1). h l g i Data transfer begins. e c Line (3) Line (2) f d Designs...Send] in the [Sew] group, click [Send to USB Media] or [Send to a computer using a different name. 18 a The "PE-DESIGN Software Key" cannot be transferred to an embroidery machine compatible with the same name at the destination, the following dialog box appears. k j ...
Tutorial 1: Making a Quilt Using an Embroidery Pattern 3 Click point a, and then double-click end point b to the Operation Manual provided with your embroidery machine by writing it to media. For details, refer to draw line (1). h l g i Data transfer begins. e c Line (3) Line (2) f d Designs...Send] in the [Sew] group, click [Send to USB Media] or [Send to a computer using a different name. 18 a The "PE-DESIGN Software Key" cannot be transferred to an embroidery machine compatible with the same name at the destination, the following dialog box appears. k j ...
Instruction Manual
Page 20
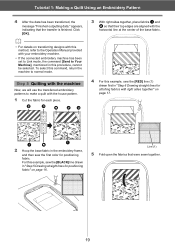
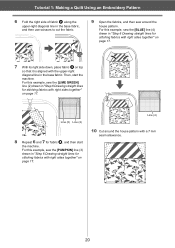
...fabrics with this example, sew the [RED] line (1) drawn first in the embroidery frame, and then sew the first color for each piece. Tutorial 1: Making a Quilt Using an Embroidery Pattern 4 After the data has been transferred, the message "Finished outputting data." To select this procedure, .... a d a 2 Hoop the base fabric in "Step 6 Drawing straight lines for positioning fabric" on page 17. b • For details on transferring designs with right sides together" on page 16. b c d b c 3 With right sides together, place fabrics a and b so that their top edges are...
...fabrics with this example, sew the [RED] line (1) drawn first in the embroidery frame, and then sew the first color for each piece. Tutorial 1: Making a Quilt Using an Embroidery Pattern 4 After the data has been transferred, the message "Finished outputting data." To select this procedure, .... a d a 2 Hoop the base fabric in "Step 6 Drawing straight lines for positioning fabric" on page 17. b • For details on transferring designs with right sides together" on page 16. b c d b c 3 With right sides together, place fabrics a and b so that their top edges are...
Instruction Manual
Page 21
... example, sew the [LIME GREEN] line (2) drawn in "Step 6 Drawing straight lines for stitching fabrics with the upper-right diagonal line in the base fabric. Tutorial 1: Making a Quilt Using an Embroidery Pattern 6 Fold the right side of fabric b along the upper-right diagonal line in the base fabric, and then use...
... example, sew the [LIME GREEN] line (2) drawn in "Step 6 Drawing straight lines for stitching fabrics with the upper-right diagonal line in the base fabric. Tutorial 1: Making a Quilt Using an Embroidery Pattern 6 Fold the right side of fabric b along the upper-right diagonal line in the base fabric, and then use...
Instruction Manual
Page 22
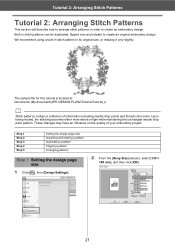
...in stitch pattern in order to create an embroidery design. Upon being resized, the stitching becomes either more dense or light while maintaining the unchanged needle drop point pattern. Tutorial 2: Arranging Stitch Patterns Tutorial 2: Arranging Stitch Patterns This section will describe how ...] selector, select [130 × 180 mm], and then click [OK]. 21 The sample file for this tutorial is located at: Documents (My documents)\PE-DESIGN PLUS2\Tutorial\Tutorial_2 b Stitch patterns contain a collection of your embroidery project. Built-in stitch patterns can be duplicated, flipped ...
...in stitch pattern in order to create an embroidery design. Upon being resized, the stitching becomes either more dense or light while maintaining the unchanged needle drop point pattern. Tutorial 2: Arranging Stitch Patterns Tutorial 2: Arranging Stitch Patterns This section will describe how ...] selector, select [130 × 180 mm], and then click [OK]. 21 The sample file for this tutorial is located at: Documents (My documents)\PE-DESIGN PLUS2\Tutorial\Tutorial_2 b Stitch patterns contain a collection of your embroidery project. Built-in stitch patterns can be duplicated, flipped ...
Instruction Manual
Page 23
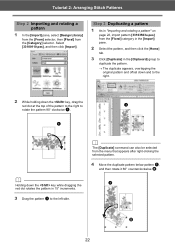
...be selected from the [Category] selector. Step 3 Duplicating a pattern 1 As in "Importing and rotating a pattern" on page 22, import pattern [33103503a.pes] from the [Floral] category in the [Import] pane. 2 Select the pattern, and then click the [Home] tab. 3 Click [Duplicate] in ...15° increments. 3 Drag the pattern a to a rotate the pattern 90° clockwise a. Tutorial 2: Arranging Stitch Patterns Step 2 Importing and rotating a pattern 1 In the [Import] pane, select [Design Library] from the [From] selector, then [Floral] from the menu that appears after right-clicking the ...
...be selected from the [Category] selector. Step 3 Duplicating a pattern 1 As in "Importing and rotating a pattern" on page 22, import pattern [33103503a.pes] from the [Floral] category in the [Import] pane. 2 Select the pattern, and then click the [Home] tab. 3 Click [Duplicate] in ...15° increments. 3 Drag the pattern a to a rotate the pattern 90° clockwise a. Tutorial 2: Arranging Stitch Patterns Step 2 Importing and rotating a pattern 1 In the [Import] pane, select [Design Library] from the [From] selector, then [Floral] from the menu that appears after right-clicking the ...

Instruction Manual
Page 24
b c a' 2 Select [no77_2.pes] in the [Misc] category of the [Import] pane, then click [Import], and then move it 90° clockwise c. cc For details, refer to create a circle ... menu that appears after right-clicking the selected pattern. 2 Move the flipped pattern to the right of the [Home] tab, and then click [Flip Horizontally]. Tutorial 2: Arranging Stitch Patterns Step 4 Flipping a pattern 1 Select the original pattern, then click [Flip] in the [Edit] group of pattern b, and then rotate it below the...
b c a' 2 Select [no77_2.pes] in the [Misc] category of the [Import] pane, then click [Import], and then move it 90° clockwise c. cc For details, refer to create a circle ... menu that appears after right-clicking the selected pattern. 2 Move the flipped pattern to the right of the [Home] tab, and then click [Flip Horizontally]. Tutorial 2: Arranging Stitch Patterns Step 4 Flipping a pattern 1 Select the original pattern, then click [Flip] in the [Edit] group of pattern b, and then rotate it below the...

Instruction Manual
Page 25
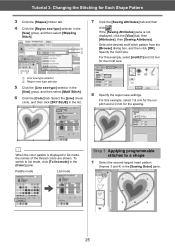
at : Documents (My documents)\PE-DESIGN PLUS2\Tutorial\Tutorial_3 Step 1 Step 2 Step 3 Step 4 Importing an outline shape Applying motif stitches to line Applying programmable stitches to a shape Applying motif stitches to a shape Step 1 ... [Misc] from the [Sewing Attributes] pane. Now, we will specify settings for line sewing and region sewing for this tutorial is located at the top of the [Sewing Order] 24 Select [OL_heart01.pes], and then click [Import]. While holding down the key, click the line (frame 2) and region (frame 1) of the largest...
at : Documents (My documents)\PE-DESIGN PLUS2\Tutorial\Tutorial_3 Step 1 Step 2 Step 3 Step 4 Importing an outline shape Applying motif stitches to line Applying programmable stitches to a shape Applying motif stitches to a shape Step 1 ... [Misc] from the [Sewing Attributes] pane. Now, we will specify settings for line sewing and region sewing for this tutorial is located at the top of the [Sewing Order] 24 Select [OL_heart01.pes], and then click [Import]. While holding down the key, click the line (frame 2) and region (frame 1) of the largest...
Instruction Manual
Page 26
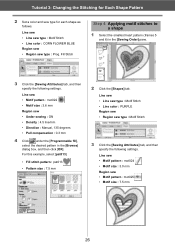
... list mode, the names of the thread colors are shown. Select the desired motif stitch pattern from the [Browse] dialog box, and then click [OK]. Tutorial 3: Changing the Stitching for Each Shape Pattern 3 Click the [Shapes] ribbon tab. 4 Click the [Region sew type] selector in the list. 8 Specify the region sew...
... list mode, the names of the thread colors are shown. Select the desired motif stitch pattern from the [Browse] dialog box, and then click [OK]. Tutorial 3: Changing the Stitching for Each Shape Pattern 3 Click the [Shapes] ribbon tab. 4 Click the [Region sew type] selector in the list. 8 Specify the region sew...
Instruction Manual
Page 27
...] tab, and then specify the following settings. For this example, select [pat013]. • Fill stitch pattern : pat013 • Pattern size : 7.5 mm 2 Click the [Shapes] tab. Tutorial 3: Changing the Stitching for Each Shape Pattern 2 Set a color and sew type for each shape as follows.
...] tab, and then specify the following settings. For this example, select [pat013]. • Fill stitch pattern : pat013 • Pattern size : 7.5 mm 2 Click the [Shapes] tab. Tutorial 3: Changing the Stitching for Each Shape Pattern 2 Set a color and sew type for each shape as follows.
Instruction Manual
Page 28
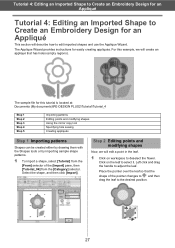
... provides instructions for this example, we will edit a point in the leaf. 1 Click on the leaf to deselect the flower. For this tutorial is located at: Documents (My documents)\PE-DESIGN PLUS2\Tutorial\Tutorial_4 Step 1 Step 2 Step 3 Step 4 Step 5 Importing patterns Editing points and modifying shapes Using the mirror copy tool Specifying hole sewing Creating...
... provides instructions for this example, we will edit a point in the leaf. 1 Click on the leaf to deselect the flower. For this tutorial is located at: Documents (My documents)\PE-DESIGN PLUS2\Tutorial\Tutorial_4 Step 1 Step 2 Step 3 Step 4 Step 5 Importing patterns Editing points and modifying shapes Using the mirror copy tool Specifying hole sewing Creating...
Instruction Manual
Page 29
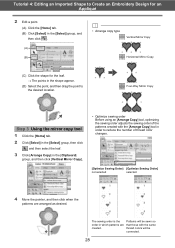
Tutorial 4: Editing an Imported Shape to Create an Embroidery Design for an Appliqué 2 Edit a point. (A) Click the [Home] tab. (B) Click [Select] in the [Select] group, and then click . (A) (B) b • Arrange copy type Vertical Mirror ...
Tutorial 4: Editing an Imported Shape to Create an Embroidery Design for an Appliqué 2 Edit a point. (A) Click the [Home] tab. (B) Click [Select] in the [Select] group, and then click . (A) (B) b • Arrange copy type Vertical Mirror ...
Instruction Manual
Page 30
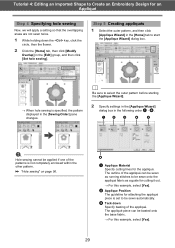
... the [Applique Wizard]. 2 Specify settings in the [Applique Wizard] dialog box in the [Edit] group, and then click [Set hole sewing]. Tutorial 4: Editing an Imported Shape to Create an Embroidery Design for an Appliqué Step 4 Specifying hole sewing Now, we will apply a setting so that the overlapping areas are not sewn...
... the [Applique Wizard]. 2 Specify settings in the [Applique Wizard] dialog box in the [Edit] group, and then click [Set hole sewing]. Tutorial 4: Editing an Imported Shape to Create an Embroidery Design for an Appliqué Step 4 Specifying hole sewing Now, we will apply a setting so that the overlapping areas are not sewn...
Instruction Manual
Page 31
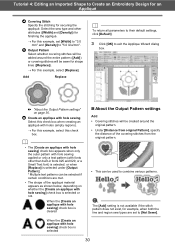
Tutorial 4: Editing an Imported Shape to Create an Embroidery Design for an Appliqué d Covering Stitch Specify the stitching for finishing the appliqué. For this example, set to [Not Sewn]. 30 cc "About ...
Tutorial 4: Editing an Imported Shape to Create an Embroidery Design for an Appliqué d Covering Stitch Specify the stitching for finishing the appliqué. For this example, set to [Not Sewn]. 30 cc "About ...
Instruction Manual
Page 32
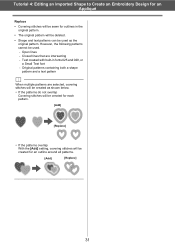
... with built-in the original pattern. • The original pattern will be deleted. • Shape and text patterns can be used . - Tutorial 4: Editing an Imported Shape to Create an Embroidery Design for an Appliqué Replace • Covering stitches will be sewn for outlines in fonts 025 and 029, or a Small Text...
... with built-in the original pattern. • The original pattern will be deleted. • Shape and text patterns can be used . - Tutorial 4: Editing an Imported Shape to Create an Embroidery Design for an Appliqué Replace • Covering stitches will be sewn for outlines in fonts 025 and 029, or a Small Text...
Instruction Manual
Page 33
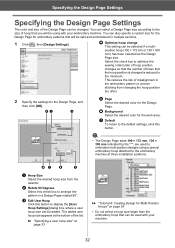
... so that the number of the list. c Edit User Hoop Click this button. cc "Specifying a user hoop size" on page 33 cc "Tutorial 8: Creating Design for Multi-Position Hoops" on page 93 • Do not select a hoop size larger than the embroidery hoop that will be using a special...the hoop position too often. 2 Specify the settings for embroidery patterns that can be split and embroidered in multiple sections. 1 Click , then [Design Settings]. a • The Design Page sizes 100 × 172 mm, 130 × 300 mm indicated by the "*", are used with your machine. 32 ba c e Page...
... so that the number of the list. c Edit User Hoop Click this button. cc "Specifying a user hoop size" on page 33 cc "Tutorial 8: Creating Design for Multi-Position Hoops" on page 93 • Do not select a hoop size larger than the embroidery hoop that will be using a special...the hoop position too often. 2 Specify the settings for embroidery patterns that can be split and embroidered in multiple sections. 1 Click , then [Design Settings]. a • The Design Page sizes 100 × 172 mm, 130 × 300 mm indicated by the "*", are used with your machine. 32 ba c e Page...


