
Instruction Manual
Page 1
Personal Embroidery Design Software System Instruction Manual Before using the software. We recommend that you keep this software, first read the Installation Guide for future reference. In addition, be sure to read this Instruction Manual before using this document nearby for details on installing the software.
Personal Embroidery Design Software System Instruction Manual Before using the software. We recommend that you keep this software, first read the Installation Guide for future reference. In addition, be sure to read this Instruction Manual before using this document nearby for details on installing the software.
Instruction Manual
Page 2
... not save any files on your embroidery machine. For additional product information and updates, visit our website at: http://www.brother.com/ or http://support.brother.com/ 1 Congratulations on the "PE-DESIGN Software Key". • Do not drop or hit the "PE-DESIGN Software Key". Trademarks • Windows®...for transferring or storage. • Do not plug the "PE-DESIGN Software Key" into your particular embroidery machine model. Please read this Instruction Manual nor the Installation Guide explains how to run the software, its subsidiaries in Canada, the United States and/or ...
... not save any files on your embroidery machine. For additional product information and updates, visit our website at: http://www.brother.com/ or http://support.brother.com/ 1 Congratulations on the "PE-DESIGN Software Key". • Do not drop or hit the "PE-DESIGN Software Key". Trademarks • Windows®...for transferring or storage. • Do not plug the "PE-DESIGN Software Key" into your particular embroidery machine model. Please read this Instruction Manual nor the Installation Guide explains how to run the software, its subsidiaries in Canada, the United States and/or ...
Instruction Manual
Page 7
... Search by Sample Project 2 Search by Operation 4 Table of Contents 6 PE-DESIGN Software Key 7 Comparison of Types of Data Created With PE-DESIGN PLUS2 8 Starting Up Applications 9 Understanding Windows 10 PE-DESIGN PLUS2 Window 10 Example of Importing Embroidery Data .......... 13 Basic Operations 14 Tutorial 1: Making a Quilt Using an Embroidery Pattern 14 Tutorial 2: Arranging Stitch Patterns 21 Tutorial 3: Changing the Stitching...
... Search by Sample Project 2 Search by Operation 4 Table of Contents 6 PE-DESIGN Software Key 7 Comparison of Types of Data Created With PE-DESIGN PLUS2 8 Starting Up Applications 9 Understanding Windows 10 PE-DESIGN PLUS2 Window 10 Example of Importing Embroidery Data .......... 13 Basic Operations 14 Tutorial 1: Making a Quilt Using an Embroidery Pattern 14 Tutorial 2: Arranging Stitch Patterns 21 Tutorial 3: Changing the Stitching...
Instruction Manual
Page 8
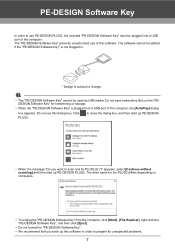
... PE-DESIGN PLUS2. The "PE-DESIGN Software Key" prevents unauthorized use this software. a • The "PE-DESIGN Software Key" cannot be plugged into a USB port of this dialog box. Do not save embroidery files on computers. • To unplug the "PE-DESIGN Software Key" from the computer, click [Start] - [File Explorer], right-click the "PE-DESIGN Software Key", and then click [Eject]. • Do not format the "PE-DESIGN Software...
... PE-DESIGN PLUS2. The "PE-DESIGN Software Key" prevents unauthorized use this software. a • The "PE-DESIGN Software Key" cannot be plugged into a USB port of this dialog box. Do not save embroidery files on computers. • To unplug the "PE-DESIGN Software Key" from the computer, click [Start] - [File Explorer], right-click the "PE-DESIGN Software Key", and then click [Eject]. • Do not format the "PE-DESIGN Software...

Instruction Manual
Page 11
... sewing order or thread color. 7 Import/Color/Sewing Attributes/Text Attributes panes This pane combines tabs for importing embroidery patterns as well as [New], [Save], [Print] and [Design Settings]. 2 Ribbon Click a tab at the top of commands. 3 Quick Access Toolbar This contains the most... mark displays a menu containing a choice of the pane to display the Instruction Manual and view information about the software. 6 Sewing Order pane This pane shows the sewing order. Understanding Windows PE-DESIGN PLUS2 Window 45 1 2 3 7 6 10 8 11 9 12 13 14 15 1 Application button Click to ...
... sewing order or thread color. 7 Import/Color/Sewing Attributes/Text Attributes panes This pane combines tabs for importing embroidery patterns as well as [New], [Save], [Print] and [Design Settings]. 2 Ribbon Click a tab at the top of commands. 3 Quick Access Toolbar This contains the most... mark displays a menu containing a choice of the pane to display the Instruction Manual and view information about the software. 6 Sewing Order pane This pane shows the sewing order. Understanding Windows PE-DESIGN PLUS2 Window 45 1 2 3 7 6 10 8 11 9 12 13 14 15 1 Application button Click to ...
Instruction Manual
Page 19
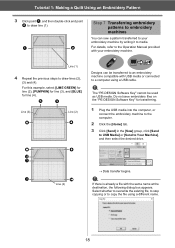
... to USB Media] or [Send to copy the file using a USB cable. e c Line (3) Line (2) f d Designs can sew a pattern transferred to your embroidery machine. Do not save embroidery files on the "PE-DESIGN Software Key" for line (4). Tutorial 1: Making a Quilt Using an Embroidery Pattern 3 Click point a, and then double-click end point b to draw lines (2), (3) and (4). For details...
... to USB Media] or [Send to copy the file using a USB cable. e c Line (3) Line (2) f d Designs can sew a pattern transferred to your embroidery machine. Do not save embroidery files on the "PE-DESIGN Software Key" for line (4). Tutorial 1: Making a Quilt Using an Embroidery Pattern 3 Click point a, and then double-click end point b to draw lines (2), (3) and (4). For details...
Instruction Manual
Page 45
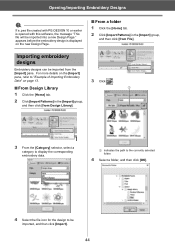
Opening/Importing Embroidery Designs a If a .pes file created with this software, the message "This file will be imported into a new Design Page." appears before the embroidery design is opened with PE-DESIGN 10 or earlier is displayed on page 13. 3 Click . ■ From Design Library 1 1 Click the [Home] tab. 2 Click [Import Patterns] in the [Import] group, and then click [from the...
Opening/Importing Embroidery Designs a If a .pes file created with this software, the message "This file will be imported into a new Design Page." appears before the embroidery design is opened with PE-DESIGN 10 or earlier is displayed on page 13. 3 Click . ■ From Design Library 1 1 Click the [Home] tab. 2 Click [Import Patterns] in the [Import] group, and then click [from the...
Instruction Manual
Page 105
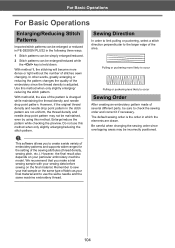
...changes the quality of several different parts, be sure to check the sewing order and correct it if necessary. a This software allows you make a trial sewing sample with your sewing data before sewing on the final material. Remember to sew your ...PE-DESIGN PLUS2 in the following three ways. 1 Stitch patterns can be simply enlarged/reduced. 2 Stitch patterns can be enlarged/reduced while the key is changed while maintaining the thread density and needle drop point pattern. The default sewing order is adjusted. We recommend that you to occur Sewing Order After creating an embroidery...
...changes the quality of several different parts, be sure to check the sewing order and correct it if necessary. a This software allows you make a trial sewing sample with your sewing data before sewing on the final material. Remember to sew your ...PE-DESIGN PLUS2 in the following three ways. 1 Stitch patterns can be simply enlarged/reduced. 2 Stitch patterns can be enlarged/reduced while the key is changed while maintaining the thread density and needle drop point pattern. The default sewing order is adjusted. We recommend that you to occur Sewing Order After creating an embroidery...
Instruction Manual
Page 118
...N New 43 NOT DEFINED 62 Not sewn Line 62 Region 63 O Offset line 58 Online Registration 114 Open .pes file 43 New Design Page 43 PE-DESIGN PLUS2 file 43 Open Image from Clipboard 91 from File 90 Open paths 50 Optimizing 95 Hoop changes 95 Sewing Order ...Pattern 8 Pattern information 39 Adding comments 39 Multi-position hoops 96 PE-DESIGN Software Key 7 Photo Stitch 1 Wizard 79 Candidates 82 Color 79 Parameters 81 Photo Stitch 2 Wizard 84 Color 85 Parameters 85 Previewing 35 Print Embroidery patterns 48 Multi-position hoops 97 Preview 48 Settings 47 Programmable ...
...N New 43 NOT DEFINED 62 Not sewn Line 62 Region 63 O Offset line 58 Online Registration 114 Open .pes file 43 New Design Page 43 PE-DESIGN PLUS2 file 43 Open Image from Clipboard 91 from File 90 Open paths 50 Optimizing 95 Hoop changes 95 Sewing Order ...Pattern 8 Pattern information 39 Adding comments 39 Multi-position hoops 96 PE-DESIGN Software Key 7 Photo Stitch 1 Wizard 79 Candidates 82 Color 79 Parameters 81 Photo Stitch 2 Wizard 84 Color 85 Parameters 85 Previewing 35 Print Embroidery patterns 48 Multi-position hoops 97 Preview 48 Settings 47 Programmable ...
Installation Guide
Page 1
...embroidery files on transfer This software may arise out of its replacement value is required, please consult your authorized dealer or Brother Customer Service. Do not save any damages that you make a trial sewing sample with your sewing data before using the "PE-DESIGN Software...included. Please refer to launch the program. Plug the "PE-DESIGN Software Key" in use. • The "PE-DESIGN Software Key" prevents unauthorized use your embroidery machine. Caution The software included with the "PE-DESIGN Software Key" plugged in accordance with your choice or use of ...
...embroidery files on transfer This software may arise out of its replacement value is required, please consult your authorized dealer or Brother Customer Service. Do not save any damages that you make a trial sewing sample with your sewing data before using the "PE-DESIGN Software...included. Please refer to launch the program. Plug the "PE-DESIGN Software Key" in use. • The "PE-DESIGN Software Key" prevents unauthorized use your embroidery machine. Caution The software included with the "PE-DESIGN Software Key" plugged in accordance with your choice or use of ...

Installation Guide
Page 2
...; 768), 16-bit color or higher Port Two or more USB ports (used for connecting the "PE-DESIGN Software Key" and for transferring embroidery data to an embroidery machine) Device Mouse Printer Graphic printer that is supported by your system (if you wish to print your...is not performed as described, the software will be installed correctly. • Do not remove the "PE-DESIGN Software Key" from the "PE-DESIGN Software Key" into the folder created in step 1). • Do not delete the data in the [PE-DESIGN PLUS2] folder on the "PE-DESIGN Software Key". Please Read Before Installation ...
...; 768), 16-bit color or higher Port Two or more USB ports (used for connecting the "PE-DESIGN Software Key" and for transferring embroidery data to an embroidery machine) Device Mouse Printer Graphic printer that is supported by your system (if you wish to print your...is not performed as described, the software will be installed correctly. • Do not remove the "PE-DESIGN Software Key" from the "PE-DESIGN Software Key" into the folder created in step 1). • Do not delete the data in the [PE-DESIGN PLUS2] folder on the "PE-DESIGN Software Key". Please Read Before Installation ...

