
Users Manual - English
Page 2
... product Product Name: Model Number: Brother USB Writer PE-Design complies with Part 15 of the following two conditions: (1) this device may not cause harmful interference, and (2) this equipment does cause harmful interference to radio or television reception, which can radiate radio frequency energy and, if not installed and used in accordance with the instructions, may cause undesired operation. Consult the...
... product Product Name: Model Number: Brother USB Writer PE-Design complies with Part 15 of the following two conditions: (1) this device may not cause harmful interference, and (2) this equipment does cause harmful interference to radio or television reception, which can radiate radio frequency energy and, if not installed and used in accordance with the instructions, may cause undesired operation. Consult the...
Users Manual - English
Page 3
... purchasing our product. For safe operation • Avoid dropping a needle, a piece of material from this unit and to create a wide variety of embroidery patterns and supports a wider range of copyrights which is a registered trademark of their respective companies and are hereby acknowledged. For repairs or adjustments • In the event that you make a trial sewing sample with your computer under...
... purchasing our product. For safe operation • Avoid dropping a needle, a piece of material from this unit and to create a wide variety of embroidery patterns and supports a wider range of copyrights which is a registered trademark of their respective companies and are hereby acknowledged. For repairs or adjustments • In the event that you make a trial sewing sample with your computer under...
Users Manual - English
Page 10
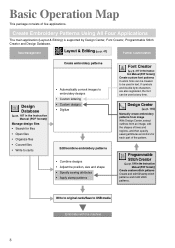
... Operation Map This package consists of the pattern. tion Manual (PDF format)) Create custom font patterns Custom fonts can be used at any time. Write to original cards/Save to embroidery designs • Custom lettering • Custom designs • Digitize Edit/combine embroidery patterns • Combine designs • Adjust the position, size and shape • Specify sewing attributes • Apply stamp patterns Font Creator (☞p. 217 in text. Create Embroidery Patterns Using...
... Operation Map This package consists of the pattern. tion Manual (PDF format)) Create custom font patterns Custom fonts can be used at any time. Write to original cards/Save to embroidery designs • Custom lettering • Custom designs • Digitize Edit/combine embroidery patterns • Combine designs • Adjust the position, size and shape • Specify sewing attributes • Apply stamp patterns Font Creator (☞p. 217 in text. Create Embroidery Patterns Using...
Users Manual - English
Page 13
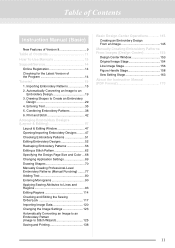
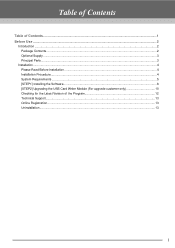
... Basic Design Center Operations 145 Creating an Embroidery Design From an Image 145 Manually Creating Embroidery Patterns From Images (Design Center 153 Design Center Window 153 Original Image Stage 154 Line Image Stage 156 Figure Handle Stage 158 Sew Setting Stage 163 About the Instruction Manual (PDF Format 170 11 Table of Contents Instruction Manual (Basic) New Features of Version 8 9 Table of Contents 11 How To Use Manuals 13 Support/Service 14 Online Registration...
... Basic Design Center Operations 145 Creating an Embroidery Design From an Image 145 Manually Creating Embroidery Patterns From Images (Design Center 153 Design Center Window 153 Original Image Stage 154 Line Image Stage 156 Figure Handle Stage 158 Sew Setting Stage 163 About the Instruction Manual (PDF Format 170 11 Table of Contents Instruction Manual (Basic) New Features of Version 8 9 Table of Contents 11 How To Use Manuals 13 Support/Service 14 Online Registration...
Users Manual - English
Page 15
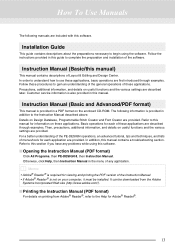
... addition, this software. ■ Opening the Instruction Manual (PDF format) Click All Programs, then PE-DESIGN 8, then Instruction Manual. Then, precautions, additional information, and details on your computer, it must be downloaded from Adobe® Reader®, refer to use these applications are provided. Installation Guide This guide contains descriptions about the preparations necessary to begin using this manual contains a troubleshooting section. How To Use Manuals The following information...
... addition, this software. ■ Opening the Instruction Manual (PDF format) Click All Programs, then PE-DESIGN 8, then Instruction Manual. Then, precautions, additional information, and details on your computer, it must be downloaded from Adobe® Reader®, refer to use these applications are provided. Installation Guide This guide contains descriptions about the preparations necessary to begin using this manual contains a troubleshooting section. How To Use Manuals The following information...
Users Manual - English
Page 16
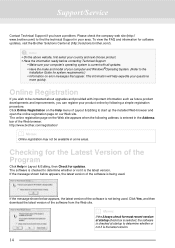
... Click Help in your computer's operating system is not being used . Please check the company web site (http:// www.brother.com/) to start up the installed Web browser and open the online registration page on error messages that appear. Checking for most recent version at startup check box is selected, the software is checked at (http://solutions.brother.com/). Support/Service Contact Technical Support...
... Click Help in your computer's operating system is not being used . Please check the company web site (http:// www.brother.com/) to start up the installed Web browser and open the online registration page on error messages that appear. Checking for most recent version at startup check box is selected, the software is checked at (http://solutions.brother.com/). Support/Service Contact Technical Support...
Users Manual - English
Page 19
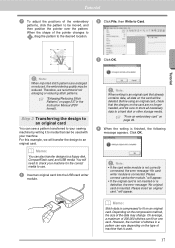
... a pattern can fit on page 49. 4 When the writing is connected. a Note: When imported stitch patterns are no longer needed, and be moved, and then position the pointer over the pattern. However, the number of the embroidery patterns, click the pattern to be sure to store all data on an original card. c "From an embroidery card" on one card. Tutorial 7 To adjust the positions of stitches in the Instruction Manual (PDF...
... a pattern can fit on page 49. 4 When the writing is connected. a Note: When imported stitch patterns are no longer needed, and be moved, and then position the pointer over the pattern. However, the number of the embroidery patterns, click the pattern to be sure to store all data on an original card. c "From an embroidery card" on one card. Tutorial 7 To adjust the positions of stitches in the Instruction Manual (PDF...
Users Manual - English
Page 49
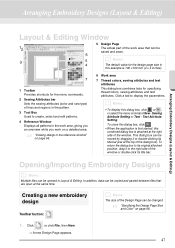
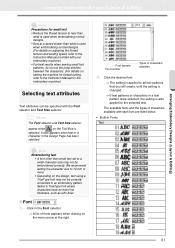
... New. → A new Design Page appears. 47 Creating a new embroidery design Toolbar button: b Memo: The size of the window or double-click its title bar (bar at the right side of the window. c "Specifying the Design Page Size and Color" on page 66. 6 Work area 7 Thread colors, sewing attributes and text attributes This dialog box combines tabs for the menu commands. 2 Sewing Attributes bar Sets the sewing attributes (color and sew type...
... New. → A new Design Page appears. 47 Creating a new embroidery design Toolbar button: b Memo: The size of the window or double-click its title bar (bar at the right side of the window. c "Specifying the Design Page Size and Color" on page 66. 6 Work area 7 Thread colors, sewing attributes and text attributes This dialog box combines tabs for the menu commands. 2 Sewing Attributes bar Sets the sewing attributes (color and sew type...

Users Manual - English
Page 65
... Instruction Manual (PDF format). 63 Click OK. → The stitch pattern is deleted and the stitches before and after the jump stitch are used with some of their sewing attributes and to select a setting more towards Coarse or Fine. 4. Converting a stitch pattern to blocks Imported stitch data or patterns converted to "Grouping/ Ungrouping embroidery patterns" on page 57. ■ Inserting stitch points and jump stitches 1. Arranging Embroidery Designs (Layout & Editing) Arranging Embroidery Designs...
... Instruction Manual (PDF format). 63 Click OK. → The stitch pattern is deleted and the stitches before and after the jump stitch are used with some of their sewing attributes and to select a setting more towards Coarse or Fine. 4. Converting a stitch pattern to blocks Imported stitch data or patterns converted to "Grouping/ Ungrouping embroidery patterns" on page 57. ■ Inserting stitch points and jump stitches 1. Arranging Embroidery Designs (Layout & Editing) Arranging Embroidery Designs...
Users Manual - English
Page 83
... will create, until the setting is changed. → If text patterns or characters in a text pattern were selected, the setting is selected. The available fonts and the types of characters available 2. a Note: Embroidering text • A font other than what is used when embroidering normal designs. (For details on adjusting the thread tension and sewing speed, refer to the Instruction Manual provided with your embroidery machine.) • For best results...
... will create, until the setting is changed. → If text patterns or characters in a text pattern were selected, the setting is selected. The available fonts and the types of characters available 2. a Note: Embroidering text • A font other than what is used when embroidering normal designs. (For details on adjusting the thread tension and sewing speed, refer to the Instruction Manual provided with your embroidery machine.) • For best results...
Users Manual - English
Page 107
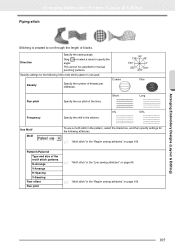
Use Motif Motif To use a motif stitch in the pattern, select the check box, and then specify settings for manual punching patterns. c "Motif stitch" in the stitches. Coarse Density Specify the number of threads per millimeter. 135° 90° 45° 180° 0° 225° 315° 270° Fine Run pitch Specify the run through the length of blocks. Short...
Use Motif Motif To use a motif stitch in the pattern, select the check box, and then specify settings for manual punching patterns. c "Motif stitch" in the stitches. Coarse Density Specify the number of threads per millimeter. 135° 90° 45° 180° 0° 225° 315° 270° Fine Run pitch Specify the run through the length of blocks. Short...
Users Manual - English
Page 111
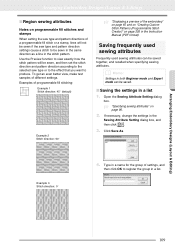
... Stitch Patterns (Programmable Stitch Creator)" on page 205 in the Instruction Manual (PDF format). Use the Preview function to view exactly how the stitch pattern will not be sewn in the same direction as a line in the stitch pattern. If necessary, change the settings in a list 1. Arranging Embroidery Designs (Layout & Editing) Arranging Embroidery Designs (Layout & Editing) ■ Region sewing attributes Notes on programmable fill stitches and stamps When setting the sew type and pattern directions of settings...
... Stitch Patterns (Programmable Stitch Creator)" on page 205 in the Instruction Manual (PDF format). Use the Preview function to view exactly how the stitch pattern will not be sewn in the same direction as a line in the stitch pattern. If necessary, change the settings in a list 1. Arranging Embroidery Designs (Layout & Editing) Arranging Embroidery Designs (Layout & Editing) ■ Region sewing attributes Notes on programmable fill stitches and stamps When setting the sew type and pattern directions of settings...
Users Manual - English
Page 139
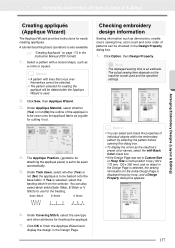
... be checked in the Instruction Manual (PDF format). 1. The actual sewing time depends on page 174 in the Design Property dialog box. 1. A tutorial describing basic operations is set to be deleted after the Applique Wizard is used and the specified settings. b Memo: • A pattern with Basic Color check box. • If the Design Page was set to Custom Size or Hoop Size is multi-position hoop (100 x 172 mm, 130...
... be checked in the Instruction Manual (PDF format). 1. The actual sewing time depends on page 174 in the Design Property dialog box. 1. A tutorial describing basic operations is set to be deleted after the Applique Wizard is used and the specified settings. b Memo: • A pattern with Basic Color check box. • If the Design Page was set to Custom Size or Hoop Size is multi-position hoop (100 x 172 mm, 130...
Users Manual - English
Page 186
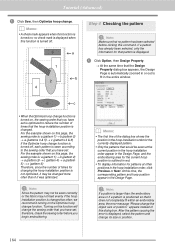
At this time, the corresponding pattern and hoop position appear in the entire window. 6 c • When the Optimize hoop change the sewing order that would be sewn correctly or the fabric may not feed evenly if the hoop installation position is changed more often than the embroidery area or if a pattern is positioned so that you have set. Tutorial (Advanced) 1 Click Sew, then Optimize hoop change its size or position. 184 b Memo: • A check...
At this time, the corresponding pattern and hoop position appear in the entire window. 6 c • When the Optimize hoop change the sewing order that would be sewn correctly or the fabric may not feed evenly if the hoop installation position is changed more often than the embroidery area or if a pattern is positioned so that you have set. Tutorial (Advanced) 1 Click Sew, then Optimize hoop change its size or position. 184 b Memo: • A check...
Users Manual - English
Page 239
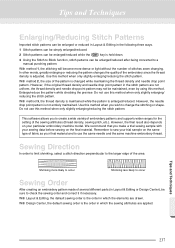
... needle and the same machine embroidery thread. Sewing Direction In order to limit shrinking, select a stitch direction perpendicular to the larger edge of stitches sewn changing. With Design Center, the default sewing order is the order in the stitch pattern are drawn. In other words, greatly enlarging or reducing the pattern changes the quality of the embroidery since the thread density is held down. 3 Using the Stitch to Block function, stitch patterns...
... needle and the same machine embroidery thread. Sewing Direction In order to limit shrinking, select a stitch direction perpendicular to the larger edge of stitches sewn changing. With Design Center, the default sewing order is the order in the stitch pattern are drawn. In other words, greatly enlarging or reducing the pattern changes the quality of the embroidery since the thread density is held down. 3 Using the Stitch to Block function, stitch patterns...
Users Manual - English
Page 241
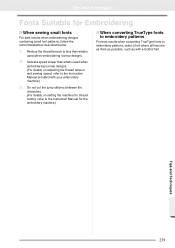
... details on adjusting the thread tension and sewing speed, refer to the Instruction Manual provided with a Gothic font. Reduce the thread tension to less than what is used when embroidering normal designs. 2. Sew at a speed slower than what is used when embroidering normal designs. (For details on setting the machine for thread cutting, refer to the Instruction Manual for Embroidering ■ When sewing small fonts For best results when embroidering designs containing small font patterns, follow the...
... details on adjusting the thread tension and sewing speed, refer to the Instruction Manual provided with a Gothic font. Reduce the thread tension to less than what is used when embroidering normal designs. 2. Sew at a speed slower than what is used when embroidering normal designs. (For details on setting the machine for thread cutting, refer to the Instruction Manual for Embroidering ■ When sewing small fonts For best results when embroidering designs containing small font patterns, follow the...
Users Manual - English
Page 252
... Saves the current pattern under a new file name. Opens a new Design Page in the Original Image Stage, and imports the image data from Clipboard Output to Clipboard Import Figure Selects which TWAIN device installed in the computer to fit in line (part) sewing mode. Alt + F4 250 Operates a TWAIN standardized scanner or other device to the Clipboard. Sets the pointer...
... Saves the current pattern under a new file name. Opens a new Design Page in the Original Image Stage, and imports the image data from Clipboard Output to Clipboard Import Figure Selects which TWAIN device installed in the computer to fit in line (part) sewing mode. Alt + F4 250 Operates a TWAIN standardized scanner or other device to the Clipboard. Sets the pointer...
Users Manual - English
Page 264
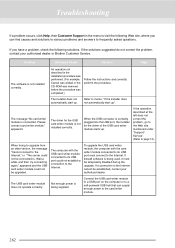
... can supply enough power to memo: "If the installer does not automatically start up. Problem Estimated Cause Solution Page The software is connected. Refer to the card writer module. 262 When the USB connector is correctly plugged into the USB port, the installer for the USB card writer module is not installed correctly. Troubleshooting If a problem occurs, click Help, then Customer Support in the installation procedure was performed...
... can supply enough power to memo: "If the installer does not automatically start up. Problem Estimated Cause Solution Page The software is connected. Refer to the card writer module. 262 When the USB connector is correctly plugged into the USB port, the installer for the USB card writer module is not installed correctly. Troubleshooting If a problem occurs, click Help, then Customer Support in the installation procedure was performed...
Installation Guide
Page 3
Table of Contents Table of Contents...1 Before Use ...2 Introduction ...2 Package Contents ...2 Optional Supply ...3 Principal Parts ...3 Installation ...4 Please Read Before Installation ...4 Installation Procedure...4 System Requirements ...5 [STEP1] Installing the Software...6 [STEP2] Upgrading the USB Card Writer Module (For upgrade customer only 10 Checking for the Latest Version of the Program 12 Technical Support...13 Online Registration ...13 Uninstallation ...13 1
Table of Contents Table of Contents...1 Before Use ...2 Introduction ...2 Package Contents ...2 Optional Supply ...3 Principal Parts ...3 Installation ...4 Please Read Before Installation ...4 Installation Procedure...4 System Requirements ...5 [STEP1] Installing the Software...6 [STEP2] Upgrading the USB Card Writer Module (For upgrade customer only 10 Checking for the Latest Version of the Program 12 Technical Support...13 Online Registration ...13 Uninstallation ...13 1
Installation Guide
Page 15
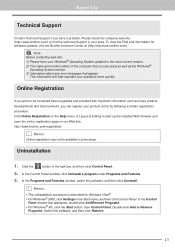
... help expedite your questions more quickly. Online Registration If you wish to be available in the Start menu, and then click Control Panel. b Memo: • The uninstallation procedure is described for software updates, visit the Brother Solutions Center at (http://solutions.brother.com/). Click the button in your area. Uninstallation 1. Before Use Technical Support Contact Technical Support if you have your Windows® Operating...
... help expedite your questions more quickly. Online Registration If you wish to be available in the Start menu, and then click Control Panel. b Memo: • The uninstallation procedure is described for software updates, visit the Brother Solutions Center at (http://solutions.brother.com/). Click the button in your area. Uninstallation 1. Before Use Technical Support Contact Technical Support if you have your Windows® Operating...


