Users Manual - English
Page 3
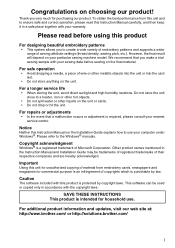
...unit or into the card slot. • Do not store anything on the final material. Caution The software included with your sewing data before using this product For designing beautiful embroidery patterns • This system allows you to create a wide variety of embroidery patterns and ... of their respective companies and are hereby acknowledged. For additional product information and updates, visit our web site at: http://www.brother.com/ or http://solutions.brother.com/ 1 Thank you make a trial sewing sample with this unit and to the Windows® manuals. Congratulations on your ...
...unit or into the card slot. • Do not store anything on the final material. Caution The software included with your sewing data before using this product For designing beautiful embroidery patterns • This system allows you to create a wide variety of embroidery patterns and ... of their respective companies and are hereby acknowledged. For additional product information and updates, visit our web site at: http://www.brother.com/ or http://solutions.brother.com/ 1 Thank you make a trial sewing sample with this unit and to the Windows® manuals. Congratulations on your ...

Users Manual - English
Page 4
Easily turn illustrations, photos and lettering into custom embroidery designs. ■ Layout ready-made designs ■ Large-sized patterns (☞p. 15) (☞p. 176 in the Instruction Manual (PDF format)) 2 Turn Any Design Into Original Embroidery With PE-DESIGN This software provides digitizing and editing capabilities, allowing you the creative freedom to design original embroidery.
Easily turn illustrations, photos and lettering into custom embroidery designs. ■ Layout ready-made designs ■ Large-sized patterns (☞p. 15) (☞p. 176 in the Instruction Manual (PDF format)) 2 Turn Any Design Into Original Embroidery With PE-DESIGN This software provides digitizing and editing capabilities, allowing you the creative freedom to design original embroidery.
Users Manual - English
Page 7
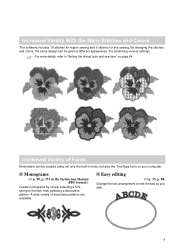
By changing the stitches and colors, the same design can be given a different appearance. Try combining various settings. A wide variety of Fonts Embroidery can be created using not only the built-in fonts, but ... text, then selecting a decorative pattern. c For more details, refer to edit the text as you wish. 5 Increased Variety With the Many Stitches and Colors This software includes 10 stitches for region sewing and 5 stitches for line sewing.
By changing the stitches and colors, the same design can be given a different appearance. Try combining various settings. A wide variety of Fonts Embroidery can be created using not only the built-in fonts, but ... text, then selecting a decorative pattern. c For more details, refer to edit the text as you wish. 5 Increased Variety With the Many Stitches and Colors This software includes 10 stitches for region sewing and 5 stitches for line sewing.
Users Manual - English
Page 15
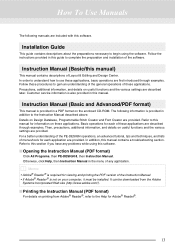
...guide to the Help for Adobe® Reader®. 13 For a better understanding of the PE-DESIGN operations, an advanced tutorial, tips and techniques, and lists of the software. Instruction Manual (Basic and Advanced/PDF format) This manual is required for each application are... order to understand how to begin using this manual contains a troubleshooting section. In addition, this software. ■ Opening the Instruction Manual (PDF format) Click All Programs, then PE-DESIGN 8, then Instruction Manual. Otherwise, click Help, then Instruction Manual in a PDF format on printing...
...guide to the Help for Adobe® Reader®. 13 For a better understanding of the PE-DESIGN operations, an advanced tutorial, tips and techniques, and lists of the software. Instruction Manual (Basic and Advanced/PDF format) This manual is required for each application are... order to understand how to begin using this manual contains a troubleshooting section. In addition, this software. ■ Opening the Instruction Manual (PDF format) Click All Programs, then PE-DESIGN 8, then Instruction Manual. Otherwise, click Help, then Instruction Manual in a PDF format on printing...
Users Manual - English
Page 16
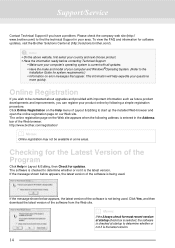
... not being used . The online registration page on our Web site. b Memo: If the Always check for software updates, visit the Brother Solutions Center at startup to determine whether or not it is current with important information such as future product developments and improvements, you...the Web browser. To view the FAQ and information for most recent version at startup check box is selected, the software is checked at (http://solutions.brother.com/). The software is checked to determine whether or not it is entered in your questions more quickly. Click Yes, and then download...
... not being used . The online registration page on our Web site. b Memo: If the Always check for software updates, visit the Brother Solutions Center at startup to determine whether or not it is current with important information such as future product developments and improvements, you...the Web browser. To view the FAQ and information for most recent version at startup check box is selected, the software is checked at (http://solutions.brother.com/). The software is checked to determine whether or not it is entered in your questions more quickly. Click Yes, and then download...
Users Manual - English
Page 17
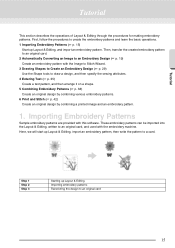
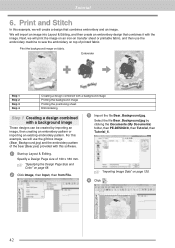
...Create a text pattern, and then arrange it on a shape. 5 Combining Embroidery Patterns (☞ p. 38) Create an original design by combining various embroidery patterns. 6 Print and Stitch (☞ p. 42) Create an original design by combining a printed image and an embroidery pattern. 1. Tutorial Tutorial This section describes the operations of Layout & Editing through...Editing, import an embroidery pattern, then write the pattern to a card. Here, we will start up Layout & Editing Importing embroidery patterns Transferring the design to an original card, and used with this software.
...Create a text pattern, and then arrange it on a shape. 5 Combining Embroidery Patterns (☞ p. 38) Create an original design by combining various embroidery patterns. 6 Print and Stitch (☞ p. 42) Create an original design by combining a printed image and an embroidery pattern. 1. Tutorial Tutorial This section describes the operations of Layout & Editing through...Editing, import an embroidery pattern, then write the pattern to a card. Here, we will start up Layout & Editing Importing embroidery patterns Transferring the design to an original card, and used with this software.
Users Manual - English
Page 37
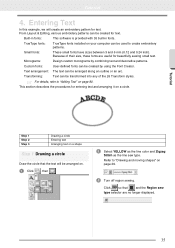
... created by combining text and decorative patterns. From Layout & Editing, various embroidery patterns can be arranged on a circle. Monograms: Design custom monograms by using the Font Creator. Tutorial 4. Built-in fonts: This software is provided with 35 built-in fonts. Click so that the text will create an embroidery pattern for entering...
... created by combining text and decorative patterns. From Layout & Editing, various embroidery patterns can be arranged on a circle. Monograms: Design custom monograms by using the Font Creator. Tutorial 4. Built-in fonts: This software is provided with 35 built-in fonts. Click so that the text will create an embroidery pattern for entering...
Users Manual - English
Page 40
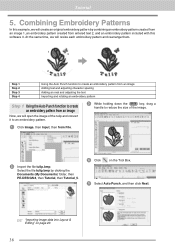
Combining Embroidery Patterns In this software 3. c "Importing image data into Layout & Editing" on the Tool Box. 5 Select Auto Punch, and then click Next. Tutorial 5. At the same time, we will resize ... entered text 2, and an embroidery pattern included with this example, we will create an original embroidery pattern by clicking the Documents (My Documents) folder, then PE-DESIGN 8, then Tutorial, then Tutorial_5. 4 Click on page 20. 38 Select the file tulip.bmp by combining an embroidery pattern created from an image 1, an embroidery...
Combining Embroidery Patterns In this software 3. c "Importing image data into Layout & Editing" on the Tool Box. 5 Select Auto Punch, and then click Next. Tutorial 5. At the same time, we will resize ... entered text 2, and an embroidery pattern included with this example, we will create an original embroidery pattern by clicking the Documents (My Documents) folder, then PE-DESIGN 8, then Tutorial, then Tutorial_5. 4 Click on page 20. 38 Select the file tulip.bmp by combining an embroidery pattern created from an image 1, an embroidery...
Users Manual - English
Page 44
...background image Printing the background image Printing the positioning sheet Embroidering Step 1 Creating a design combined with a background image These designs can be created by clicking the Documents (My Documents) folder, then PE-DESIGN 8, then Tutorial, then Tutorial_6. 1 Start up Layout & Editing. Select the file... an image into Layout & Editing, and then create an embroidery design that combines embroidery and an image. For this software. 3 Import the file Bear_Background.jpg. Next, we will create a design that combines it with this example, we will print the image on...
...background image Printing the background image Printing the positioning sheet Embroidering Step 1 Creating a design combined with a background image These designs can be created by clicking the Documents (My Documents) folder, then PE-DESIGN 8, then Tutorial, then Tutorial_6. 1 Start up Layout & Editing. Select the file... an image into Layout & Editing, and then create an embroidery design that combines embroidery and an image. For this software. 3 Import the file Bear_Background.jpg. Next, we will create a design that combines it with this example, we will print the image on...
Users Manual - English
Page 122
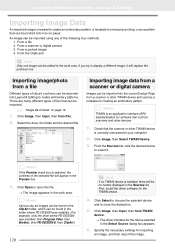
...(API) standardization for the device selected in the Preview box. 3. Importing image data from TWAIN device. → The driver interface for software that controls scanners and other TWAIN device and used as a pattern that can be printed onto iron-on page 19. 1. From the Sources... dialog box. 5. b Memo: Various clip art images can be found in the folder where PE-DESIGN was installed. (For example, click the drive where PE-DESIGN was installed, then Program Files, then Brother, then PE-DESIGN 8, then ClipArt.) 120 a Note: If no TWAIN device is installed, there will replace the...
...(API) standardization for the device selected in the Preview box. 3. Importing image data from TWAIN device. → The driver interface for software that controls scanners and other TWAIN device and used as a pattern that can be printed onto iron-on page 19. 1. From the Sources... dialog box. 5. b Memo: Various clip art images can be found in the folder where PE-DESIGN was installed. (For example, click the drive where PE-DESIGN was installed, then Program Files, then Brother, then PE-DESIGN 8, then ClipArt.) 120 a Note: If no TWAIN device is installed, there will replace the...

Users Manual - English
Page 140
...file can be saved with that version of a previous software version, saved .pes files can be opened with a different file name in the file name. 3. Arranging Embroidery Designs (Layout & Editing) Saving and Printing Saving ■ Overwriting Once the image or design has been saved, changes can easily be saved so that... as. b Memo: With the DST format, you select a file type of the software; The files are cut according to keep the original unchanged or to the number of the same image or design. Select the drive and the folder, and then type in order to keep various versions...
...file can be saved with that version of a previous software version, saved .pes files can be opened with a different file name in the file name. 3. Arranging Embroidery Designs (Layout & Editing) Saving and Printing Saving ■ Overwriting Once the image or design has been saved, changes can easily be saved so that... as. b Memo: With the DST format, you select a file type of the software; The files are cut according to keep the original unchanged or to the number of the same image or design. Select the drive and the folder, and then type in order to keep various versions...

Users Manual - English
Page 171
...saved at each stage. ■ Overwriting 1. Manually Creating Embroidery Patterns From Images (Design Center) Manually Creating Embroidery Patterns From Images (Design Center) 3. a Note: If you select a file type of a previous software version, saved .pem files can be lost. 3. To view the sewing order ...of multiple patterns of the software; Click Save to an embroidery machine. To view ...
...saved at each stage. ■ Overwriting 1. Manually Creating Embroidery Patterns From Images (Design Center) Manually Creating Embroidery Patterns From Images (Design Center) 3. a Note: If you select a file type of a previous software version, saved .pem files can be lost. 3. To view the sewing order ...of multiple patterns of the software; Click Save to an embroidery machine. To view ...
Users Manual - English
Page 172
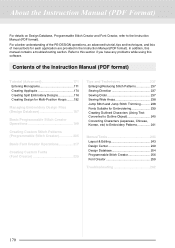
...PE-DESIGN operations, an advanced tutorial, tips and techniques, and lists of the Instruction Manual (PDF format) Tutorial (Advanced 171 Entering Monograms 171 Creating Appliqués 174 Creating Split Embroidery Designs 176 Creating Design for Multi-Position Hoops ........182 Managing Embroidery Design Files (Design... to Embroidery Patterns 241 Menus/Tools 243 Layout & Editing 243 Design Center 249 Design Database 254 Programmable Stitch Creator 256 Font Creator 259 Troubleshooting 262 170 In addition, this software. Refer to this section if you have any problems while using...
...PE-DESIGN operations, an advanced tutorial, tips and techniques, and lists of the Instruction Manual (PDF format) Tutorial (Advanced 171 Entering Monograms 171 Creating Appliqués 174 Creating Split Embroidery Designs 176 Creating Design for Multi-Position Hoops ........182 Managing Embroidery Design Files (Design... to Embroidery Patterns 241 Menus/Tools 243 Layout & Editing 243 Design Center 249 Design Database 254 Programmable Stitch Creator 256 Font Creator 259 Troubleshooting 262 170 In addition, this software. Refer to this section if you have any problems while using...
Users Manual - English
Page 179
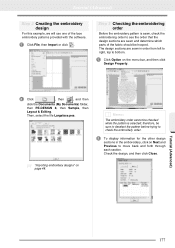
.... 2 Click , then , and then click the Documents (My Documents) folder, then PE-DESIGN 8, then Sample, then Layout & Editing. The design sections are sewn and determine which parts of the lace embroidery patterns provided with the software. 1 Click File, then Import or click . Tutorial (Advanced) 177 Step 3 Checking the embroidering order Before the embroidery pattern...
.... 2 Click , then , and then click the Documents (My Documents) folder, then PE-DESIGN 8, then Sample, then Layout & Editing. The design sections are sewn and determine which parts of the lace embroidery patterns provided with the software. 1 Click File, then Import or click . Tutorial (Advanced) 177 Step 3 Checking the embroidering order Before the embroidery pattern...
Users Manual - English
Page 213
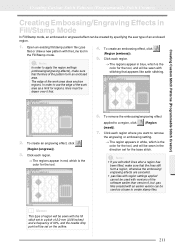
... Creator) Creating Embossing/Engraving Effects in Fill/Stamp Mode In Fill/Stamp mode, an embossed or engraved effect can be used with versions of the software earlier than version 6, but .pas files created with an earlier version can be created by specifying the sew type of an enclosed region. 1. Creating Custom...
... Creator) Creating Embossing/Engraving Effects in Fill/Stamp Mode In Fill/Stamp mode, an embossed or engraved effect can be used with versions of the software earlier than version 6, but .pas files created with an earlier version can be created by specifying the sew type of an enclosed region. 1. Creating Custom...
Users Manual - English
Page 239
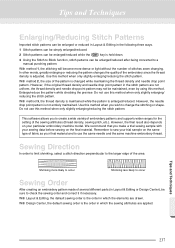
...occur Sewing Order After creating an embroidery pattern made of fabric as your final material and to change the stitching or shape. With Design Center, the default sewing order is not entirely maintained. With method 2, the size of stitches sewn changing. Shrinking more dense or...select a stitch direction perpendicular to create a wide variety of embroidery patterns and supports wider ranges for the setting of the area. This software allows you make a trial sewing sample with your particular embroidery machine model. However, if the original thread density and needle drop point...
...occur Sewing Order After creating an embroidery pattern made of fabric as your final material and to change the stitching or shape. With Design Center, the default sewing order is not entirely maintained. With method 2, the size of stitches sewn changing. Shrinking more dense or...select a stitch direction perpendicular to create a wide variety of embroidery patterns and supports wider ranges for the setting of the area. This software allows you make a trial sewing sample with your particular embroidery machine model. However, if the original thread density and needle drop point...
Users Manual - English
Page 264
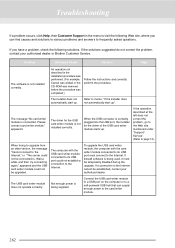
...The computer with the card writer module connected to . or "The server could not be temporarily disabled during the upgrade. If firewall software is connected. If the solutions suggested do not correct the problem, contact your authorized dealer. Troubleshooting If a problem occurs, click Help... can find causes and solutions to various problems and answers to the Internet cannot be established, contact your authorized dealer or Brother Customer Service. appeared and the USB card writer module could not be connected to its USB port could not establish a connection...
...The computer with the card writer module connected to . or "The server could not be temporarily disabled during the upgrade. If firewall software is connected. If the solutions suggested do not correct the problem, contact your authorized dealer. Troubleshooting If a problem occurs, click Help... can find causes and solutions to various problems and answers to the Internet cannot be established, contact your authorized dealer or Brother Customer Service. appeared and the USB card writer module could not be connected to its USB port could not establish a connection...
Installation Guide
Page 1
Please read before use Personal Embroidery Design Software System 8 Installation Guide
Please read before use Personal Embroidery Design Software System 8 Installation Guide

Installation Guide
Page 2
...of its use . 7) Others This product is an agreement between you agree to the terms of this product were created using technology from Softfoundry International Pte. This product cannot be transferred to or used in any other way by a third party. 6) Warranty We accept no responsibility for your... laws. Use this product in any damages that may not be returned after it has been opened. Portions of this software. Before opening the CD-ROM package for this software, carefully read the following before opening the CD-ROM package, you (the end-user) and our company for this ...
...of its use . 7) Others This product is an agreement between you agree to the terms of this product were created using technology from Softfoundry International Pte. This product cannot be transferred to or used in any other way by a third party. 6) Warranty We accept no responsibility for your... laws. Use this product in any damages that may not be returned after it has been opened. Portions of this software. Before opening the CD-ROM package for this software, carefully read the following before opening the CD-ROM package, you (the end-user) and our company for this ...
Installation Guide
Page 3
Table of Contents Table of Contents...1 Before Use ...2 Introduction ...2 Package Contents ...2 Optional Supply ...3 Principal Parts ...3 Installation ...4 Please Read Before Installation ...4 Installation Procedure...4 System Requirements ...5 [STEP1] Installing the Software...6 [STEP2] Upgrading the USB Card Writer Module (For upgrade customer only 10 Checking for the Latest Version of the Program 12 Technical Support...13 Online Registration ...13 Uninstallation ...13 1
Table of Contents Table of Contents...1 Before Use ...2 Introduction ...2 Package Contents ...2 Optional Supply ...3 Principal Parts ...3 Installation ...4 Please Read Before Installation ...4 Installation Procedure...4 System Requirements ...5 [STEP1] Installing the Software...6 [STEP2] Upgrading the USB Card Writer Module (For upgrade customer only 10 Checking for the Latest Version of the Program 12 Technical Support...13 Online Registration ...13 Uninstallation ...13 1


