Users Manual - English
Page 13
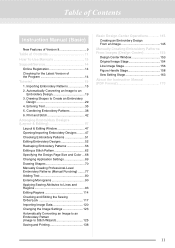
... an Image to an Embroidery Pattern (Image to Stitch Wizard 125 Saving and Printing 138 Basic Design Center Operations 145 Creating an Embroidery Design From an Image 145 Manually Creating Embroidery Patterns From Images (Design Center 153 Design Center Window 153 Original Image Stage 154 Line Image Stage 156 Figure Handle Stage 158 Sew... Version 8 9 Table of Contents 11 How To Use Manuals 13 Support/Service 14 Online Registration 14 Checking for the Latest Version of the Program 14 Tutorial 15 1.
... an Image to an Embroidery Pattern (Image to Stitch Wizard 125 Saving and Printing 138 Basic Design Center Operations 145 Creating an Embroidery Design From an Image 145 Manually Creating Embroidery Patterns From Images (Design Center 153 Design Center Window 153 Original Image Stage 154 Line Image Stage 156 Figure Handle Stage 158 Sew... Version 8 9 Table of Contents 11 How To Use Manuals 13 Support/Service 14 Online Registration 14 Checking for the Latest Version of the Program 14 Tutorial 15 1.

Users Manual - English
Page 14
... (Advanced) Tutorial (Advanced 171 Entering Monograms 171 Creating Appliqués 174 Creating Split Embroidery Designs 176 Creating Design for Multi-Position Hoops......182 Managing Embroidery Design Files (Design Database 187 Design Database Window 187 Starting Up Design Database 187 Checking Embroidery Designs 188 Opening Embroidery Designs 189 Organizing Embroidery Designs 190 Searching for an Embroidery Design 192 Converting Embroidery Design Files to...
... (Advanced) Tutorial (Advanced 171 Entering Monograms 171 Creating Appliqués 174 Creating Split Embroidery Designs 176 Creating Design for Multi-Position Hoops......182 Managing Embroidery Design Files (Design Database 187 Design Database Window 187 Starting Up Design Database 187 Checking Embroidery Designs 188 Opening Embroidery Designs 189 Organizing Embroidery Designs 190 Searching for an Embroidery Design 192 Converting Embroidery Design Files to...
Users Manual - English
Page 15
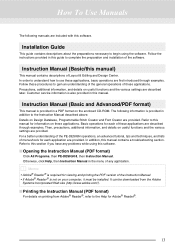
...following information is provided in the menu of Layout & Editing and Design Center. In order to understand how to the Instruction Manual described above. For a better understanding of the PE-DESIGN operations, an advanced tutorial, tips and techniques, and lists of menus/tools for Adobe&#...functions and the various settings are included with this software. ■ Opening the Instruction Manual (PDF format) Click All Programs, then PE-DESIGN 8, then Instruction Manual. In addition, this section if you have any application. Refer to gain an understanding of the general operations ...
...following information is provided in the menu of Layout & Editing and Design Center. In order to understand how to the Instruction Manual described above. For a better understanding of the PE-DESIGN operations, an advanced tutorial, tips and techniques, and lists of menus/tools for Adobe&#...functions and the various settings are included with this software. ■ Opening the Instruction Manual (PDF format) Click All Programs, then PE-DESIGN 8, then Instruction Manual. In addition, this section if you have any application. Refer to gain an understanding of the general operations ...
Users Manual - English
Page 17
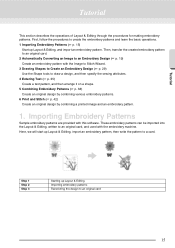
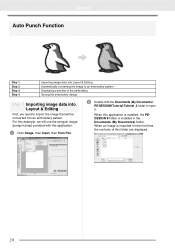
... 3 Starting up Layout & Editing, import an embroidery pattern, then write the pattern to an original card 15 First, follow the procedures to draw a design, and then specify the sewing attributes. 4 Entering Text (☞ p. 35) Create a text pattern, and then arrange it on a shape. 5 ... Shapes to Create an Embroidery Design (☞ p. 29) Use the Shape tools to create the embroidery patterns and learn the basic operations. 1 Importing Embroidery Patterns (☞ p. 15) Start up Layout & Editing, and import an embroidery pattern. Tutorial Tutorial This section describes the operations ...
... 3 Starting up Layout & Editing, import an embroidery pattern, then write the pattern to an original card 15 First, follow the procedures to draw a design, and then specify the sewing attributes. 4 Entering Text (☞ p. 35) Create a text pattern, and then arrange it on a shape. 5 ... Shapes to Create an Embroidery Design (☞ p. 29) Use the Shape tools to create the embroidery patterns and learn the basic operations. 1 Importing Embroidery Patterns (☞ p. 15) Start up Layout & Editing, and import an embroidery pattern. Tutorial Tutorial This section describes the operations ...
Users Manual - English
Page 18
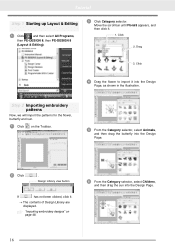
.... 16 Move the scroll bar until Floral3 appears, and then click it . → The contents of Design Library are displayed. Tutorial Step 1 Starting up Layout & Editing 1 Click , and then select All Programs, then PE-DESIGN 8, then PE-DESIGN 8 (Layout & Editing). 3 Click Category selector. Drag 3. Step 2 Importing embroidery patterns Now, we will import the patterns for the...
.... 16 Move the scroll bar until Floral3 appears, and then click it . → The contents of Design Library are displayed. Tutorial Step 1 Starting up Layout & Editing 1 Click , and then select All Programs, then PE-DESIGN 8, then PE-DESIGN 8 (Layout & Editing). 3 Click Category selector. Drag 3. Step 2 Importing embroidery patterns Now, we will import the patterns for the...
Users Manual - English
Page 19
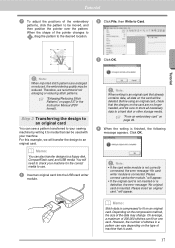
...quality may change. However, the number of stitches in the Instruction Manual (PDF format). Tutorial 3 Click OK. For this example, we recommend not enlarging or reducing stitch patterns. will transfer the design to an original card. When the shape of the pointer changes to , drag the ...pattern to the desired location. 2 Click File, then Write to Card. Tutorial 7 To adjust the positions of the embroidery patterns, click ...
...quality may change. However, the number of stitches in the Instruction Manual (PDF format). Tutorial 3 Click OK. For this example, we recommend not enlarging or reducing stitch patterns. will transfer the design to an original card. When the shape of the pointer changes to , drag the ...pattern to the desired location. 2 Click File, then Write to Card. Tutorial 7 To adjust the positions of the embroidery patterns, click ...
Users Manual - English
Page 20
Tutorial a Note: Precautions for the embroidery machine. c For details on saving embroidery patterns, refer to the Instruction Manual for using the card writer module/original cards • The original card is inserted correctly when you hear it snap into place. • Never remove an original card or unplug the USB cable while the LED indicator is flashing. • Correctly insert or remove the original card according to "Saving the embroidery design" on page 22. 18
Tutorial a Note: Precautions for the embroidery machine. c For details on saving embroidery patterns, refer to the Instruction Manual for using the card writer module/original cards • The original card is inserted correctly when you hear it snap into place. • Never remove an original card or unplug the USB cable while the LED indicator is flashing. • Correctly insert or remove the original card according to "Saving the embroidery design" on page 22. 18
Users Manual - English
Page 21
... the distance between two points" on page 51, and "Changing the measurement units (mm or inch)" on paper, as an original image in Design Center, and as templates for the sizes can be displayed in Layout & Editing, an image can not be sure to Stitch Wizard in either...stitching. When you create a file in the following three types of embroidery patterns and images appear in the photo should be imported. - Tutorial Tutorial 2. First, we wish to an Embroidery Design An embroidery pattern can be at least 100 × 100 mm (4 × 4 inches) for best results. ■ Cross ...
... the distance between two points" on page 51, and "Changing the measurement units (mm or inch)" on paper, as an original image in Design Center, and as templates for the sizes can be displayed in Layout & Editing, an image can not be sure to Stitch Wizard in either...stitching. When you create a file in the following three types of embroidery patterns and images appear in the photo should be imported. - Tutorial Tutorial 2. First, we wish to an Embroidery Design An embroidery pattern can be at least 100 × 100 mm (4 × 4 inches) for best results. ■ Cross ...
Users Manual - English
Page 22
...When this application is installed, the PEDESIGN 8 folder is imported for the first time, the contents of the embroidery Saving the embroidery design Step 1 Importing image data into Layout & Editing First, we will be converted into Layout & Editing Automatically converting the image to... (penguin.bmp) provided with this application. 1 Click Image, then Input, then from File. 2 Double-click the Documents (My Documents)\ PE-DESIGN8\Tutorial\Tutorial_2 folder to an embroidery pattern Displaying a preview of this folder are displayed. 20 When an image is installed in the Documents (My ...
...When this application is installed, the PEDESIGN 8 folder is imported for the first time, the contents of the embroidery Saving the embroidery design Step 1 Importing image data into Layout & Editing First, we will be converted into Layout & Editing Automatically converting the image to... (penguin.bmp) provided with this application. 1 Click Image, then Input, then from File. 2 Double-click the Documents (My Documents)\ PE-DESIGN8\Tutorial\Tutorial_2 folder to an embroidery pattern Displaying a preview of this folder are displayed. 20 When an image is installed in the Documents (My ...

Users Manual - English
Page 23
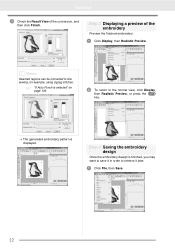
... function and import that appeared. 21 b Memo: If the handles have disappeared, right-click the image, and then click Modify Image in the work area. Tutorial 3 Select the sample file penguin.bmp, and then click Open, or double-click the file's icon. 5 Move the pointer over the selected image, and then...
... function and import that appeared. 21 b Memo: If the handles have disappeared, right-click the image, and then click Modify Image in the work area. Tutorial 3 Select the sample file penguin.bmp, and then click Open, or double-click the file's icon. 5 Move the pointer over the selected image, and then...
Users Manual - English
Page 24
... File, then Save. 22 Step 3 Displaying a preview of the conversion, and then click Finish. Tutorial 3 Check the Result View of the embroidery Preview the finished embroidery. 1 Click Display, then Realistic Preview. Step 4 Saving the embroidery design Once the embroidery design is displayed. c "If Auto Punch is selected" on page 126. 2 To return to...
... File, then Save. 22 Step 3 Displaying a preview of the conversion, and then click Finish. Tutorial 3 Check the Result View of the embroidery Preview the finished embroidery. 1 Click Display, then Realistic Preview. Step 4 Saving the embroidery design Once the embroidery design is displayed. c "If Auto Punch is selected" on page 126. 2 To return to...
Users Manual - English
Page 25
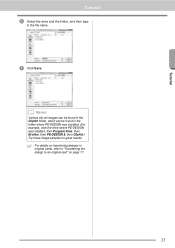
c For details on transferring designs to original cards, refer to "Transferring the design to an original card" on page 17. 23 b Memo: Various clip art images can be found in the ClipArt folder, which can be found in the file name. 3 Click Save. Tutorial Tutorial 2 Select the drive and the folder, and then type in the folder where PE-DESIGN was installed. (For example, click the drive where PE-DESIGN was installed, then Program Files, then Brother, then PE-DESIGN 8, then ClipArt.) Try these image samples for great results.
c For details on transferring designs to original cards, refer to "Transferring the design to an original card" on page 17. 23 b Memo: Various clip art images can be found in the ClipArt folder, which can be found in the file name. 3 Click Save. Tutorial Tutorial 2 Select the drive and the folder, and then type in the folder where PE-DESIGN was installed. (For example, click the drive where PE-DESIGN was installed, then Program Files, then Brother, then PE-DESIGN 8, then ClipArt.) Try these image samples for great results.
Users Manual - English
Page 26
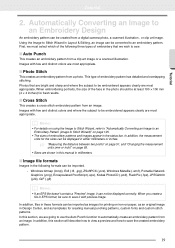
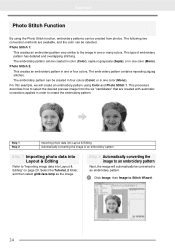
Tutorial Photo Stitch Function By using Color and Photo Stitch 1. This procedure describes how to an embroidery pattern Next, the image will create an embroidery pattern ...
Tutorial Photo Stitch Function By using Color and Photo Stitch 1. This procedure describes how to an embroidery pattern Next, the image will create an embroidery pattern ...

Users Manual - English
Page 27
... This is also possible to change the final finishing size. b Memo: • The shape of the mask line can be converted then click Next. 25 Tutorial Tutorial 2 Click Photo Stitch 1, then Color, and then click Next. b Memo: • The size of the embroidery pattern appears in this display. •... pattern to be edited by moving, adding or deleting the point of the mask line. • It is a size where the design fills the entire design page. The user can create sepia tone or grayscale tone embroidery. b Memo: The Sepia choice means you can change the size of...
... This is also possible to change the final finishing size. b Memo: • The shape of the mask line can be converted then click Next. 25 Tutorial Tutorial 2 Click Photo Stitch 1, then Color, and then click Next. b Memo: • The size of the embroidery pattern appears in this display. •... pattern to be edited by moving, adding or deleting the point of the mask line. • It is a size where the design fills the entire design page. The user can create sepia tone or grayscale tone embroidery. b Memo: The Sepia choice means you can change the size of...
Users Manual - English
Page 28
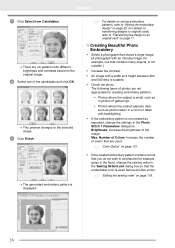
..., such as expected, change the sewing order in the Sewing Order/Lock dialog box so that you do not wish to "Saving the embroidery design" on page 118. 26 Max. c "Color Option" on page 131. • If the created embroidery pattern contains colors that the undesirable... color is sewn before all other colors. c "Editing the sewing order" on page 22. Tutorial 7 Click Select from Candidates. → There are six patterns with different brightness and contrasts based on the original image. 8 Select one that are ...
..., such as expected, change the sewing order in the Sewing Order/Lock dialog box so that you do not wish to "Saving the embroidery design" on page 118. 26 Max. c "Color Option" on page 131. • If the created embroidery pattern contains colors that the undesirable... color is sewn before all other colors. c "Editing the sewing order" on page 22. Tutorial 7 Click Select from Candidates. → There are six patterns with different brightness and contrasts based on the original image. 8 Select one that are ...
Users Manual - English
Page 29
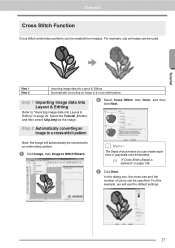
In this example, we will automatically be created from images. Tutorial Tutorial Cross Stitch Function Cross Stitch embroidery patterns can be converted to an embroidery pattern. 1 Click Image, then Image to Stitch Wizard. Step 2 Automatically converting an ...
In this example, we will automatically be created from images. Tutorial Tutorial Cross Stitch Function Cross Stitch embroidery patterns can be converted to an embroidery pattern. 1 Click Image, then Image to Stitch Wizard. Step 2 Automatically converting an ...
Users Manual - English
Page 30
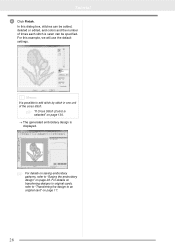
Tutorial 4 Click Finish. c "If Cross Stitch (Color) is selected" on page 22. b Memo: It is possible to edit stitch by stitch in one unit of times each stitch is displayed. c For details on saving embroidery patterns, refer to an original card" on page 17. 28 For details on transferring designs... to original cards, refer to "Transferring the design to "Saving the embroidery design" on page 134. → The generated embroidery design is sewn can be specified. For this dialog box, stitches can be ...
Tutorial 4 Click Finish. c "If Cross Stitch (Color) is selected" on page 22. b Memo: It is possible to edit stitch by stitch in one unit of times each stitch is displayed. c For details on saving embroidery patterns, refer to an original card" on page 17. 28 For details on transferring designs... to original cards, refer to "Transferring the design to "Saving the embroidery design" on page 134. → The generated embroidery design is sewn can be specified. For this dialog box, stitches can be ...
Users Manual - English
Page 31
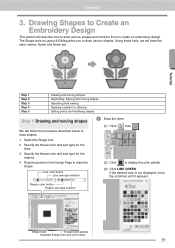
Tutorial Tutorial 3. Line color button Line sew type selector 1 Draw the stem. (1) Click , then . (2) Click to draw various shapes. The Shape tools in the Design Page to create an embroidery design. Using these tools, we will draw the stem, leaves, flower and flower pot. 4 5 1 3 2 6 Step 1 Step 2 Step 3 Step 4 Step ... name 29 If the desired color is not displayed, move the scroll bar until it appears. Drawing Shapes to Create an Embroidery Design This section will follow the procedure described below to draw shapes. 1 Select the Shape tool. 2 Specify the thread color and ...
Tutorial Tutorial 3. Line color button Line sew type selector 1 Draw the stem. (1) Click , then . (2) Click to draw various shapes. The Shape tools in the Design Page to create an embroidery design. Using these tools, we will draw the stem, leaves, flower and flower pot. 4 5 1 3 2 6 Step 1 Step 2 Step 3 Step 4 Step ... name 29 If the desired color is not displayed, move the scroll bar until it appears. Drawing Shapes to Create an Embroidery Design This section will follow the procedure described below to draw shapes. 1 Select the Shape tool. 2 Specify the thread color and ...
Users Manual - English
Page 32
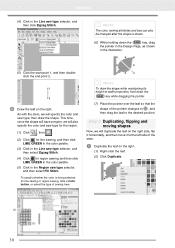
...selected for region sewing, and then click LIME GREEN in the color palette. (5) Click in the Line sew type selector, and then click Zigzag Stitch. Tutorial (4) Click in the Region sew type selector, and then select Fill Stitch. To specify whether the color is drawn. (6) While holding down the Shift... the shape of the pointer changes to , and then drag the leaf to -width proportion, hold down the Shift key, drag the pointer in the Design Page, as shown in the illustration. (5) Click the start point 1, and then doubleclick the end point 2. 1 2 2 Draw the leaf on the right. Step 2 ...
...selected for region sewing, and then click LIME GREEN in the color palette. (5) Click in the Line sew type selector, and then click Zigzag Stitch. Tutorial (4) Click in the Region sew type selector, and then select Fill Stitch. To specify whether the color is drawn. (6) While holding down the Shift... the shape of the pointer changes to , and then drag the leaf to -width proportion, hold down the Shift key, drag the pointer in the Design Page, as shown in the illustration. (5) Click the start point 1, and then doubleclick the end point 2. 1 2 2 Draw the leaf on the right. Step 2 ...

Users Manual - English
Page 33
... Drag the pointer to draw a selection frame across the patterns to be selected. (4) (1) (1) (2) (3) 2 Draw the circle at the center. Tutorial Tutorial 2 Flip the duplicated leaf horizontally. (1) Right-click the duplicated leaf. (2) Click Mirror, then Vertical. 3 Drag the duplicated leaf to the left side... Select YELLOW as the region color and Concentric Circle Stitch as the sew type. (4) While holding down the Shift key, drag the pointer in the Design Page, as shown in the illustration. (2) (3) 4 Align the leaves on the left side of the flower petals. (2) (3) (1) (1) (4) (5)...
... Drag the pointer to draw a selection frame across the patterns to be selected. (4) (1) (1) (2) (3) 2 Draw the circle at the center. Tutorial Tutorial 2 Flip the duplicated leaf horizontally. (1) Right-click the duplicated leaf. (2) Click Mirror, then Vertical. 3 Drag the duplicated leaf to the left side... Select YELLOW as the region color and Concentric Circle Stitch as the sew type. (4) While holding down the Shift key, drag the pointer in the Design Page, as shown in the illustration. (2) (3) 4 Align the leaves on the left side of the flower petals. (2) (3) (1) (1) (4) (5)...


