Users Manual - English
Page 3
... operation, please read before sewing on the final material. Caution The software included with your computer under Windows®. Important Using this product For designing beautiful embroidery patterns • This system allows you very much for purchasing our product. Copyright acknowledgment Windows® is required, please consult your... this unit for commercial purpose is an infringement of sewing attribute settings (thread density, sewing pitch, etc.). For additional product information and updates, visit our web site at: http://www.brother.com/ or http://solutions...
... operation, please read before sewing on the final material. Caution The software included with your computer under Windows®. Important Using this product For designing beautiful embroidery patterns • This system allows you very much for purchasing our product. Copyright acknowledgment Windows® is required, please consult your... this unit for commercial purpose is an infringement of sewing attribute settings (thread density, sewing pitch, etc.). For additional product information and updates, visit our web site at: http://www.brother.com/ or http://solutions...
Users Manual - English
Page 16
...shown below appears, the latest version of the software is the latest version. 14 http://www.brother.com/registration/ b Memo: Online registration may not be contacted about upgrades and provided with all updates. • Have the make and model of the Web browser. The online registration page ...Editing, then Check for the Latest Version of the software from the Web site. b Memo: If the Always check for software updates, visit the Brother Solutions Center at startup to find the technical Support in the Address bar of your product online by following address is the latest ...
...shown below appears, the latest version of the software is the latest version. 14 http://www.brother.com/registration/ b Memo: Online registration may not be contacted about upgrades and provided with all updates. • Have the make and model of the Web browser. The online registration page ...Editing, then Check for the Latest Version of the software from the Web site. b Memo: If the Always check for software updates, visit the Brother Solutions Center at startup to find the technical Support in the Address bar of your product online by following address is the latest ...
Users Manual - English
Page 131
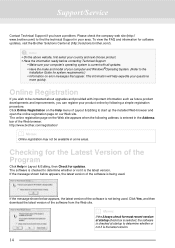
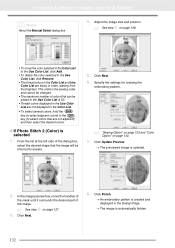
.... → The previewed image is updated. 2. on page 128. 8. c See step 4. Click Sepia or Gray to (mask). 6. Click Finish. → An embroidery pattern is created and displayed in the Design Page. → The image is selected The basic operations for this function are the ...same as those for creating the embroidery pattern. c See step 2. Click Update Preview. → The previewed image is updated. 4. In the image preview box, move...
.... → The previewed image is updated. 2. on page 128. 8. c See step 4. Click Sepia or Gray to (mask). 6. Click Finish. → An embroidery pattern is created and displayed in the Design Page. → The image is selected The basic operations for this function are the ...same as those for creating the embroidery pattern. c See step 2. Click Update Preview. → The previewed image is updated. 4. In the image preview box, move...
Users Manual - English
Page 132
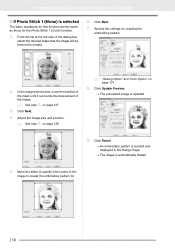
... 1 (Mono) is automatically hidden. 5. on page 131. 8. Adjust the image size and position. Click Finish. → An embroidery pattern is created and displayed in the Design Page. → The image is selected The basic operations for this function are the same as those for the Photo Stitch 1 (Color) function. 1. c "Sewing Option... for creating the embroidery pattern. 2. on page 128. From the list at the left side of the image c See step 2. c See step 4. Click Next. 7. Click Update Preview. → The previewed image is...
... 1 (Mono) is automatically hidden. 5. on page 131. 8. Adjust the image size and position. Click Finish. → An embroidery pattern is created and displayed in the Design Page. → The image is selected The basic operations for this function are the same as those for the Photo Stitch 1 (Color) function. 1. c "Sewing Option... for creating the embroidery pattern. 2. on page 128. From the list at the left side of the image c See step 2. c See step 4. Click Next. 7. Click Update Preview. → The previewed image is...
Users Manual - English
Page 133
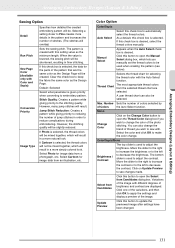
... the contrast. Variations of the variations, and then click OK to keep the fabric the same color as the Design Page. Arranging Embroidery Designs (Layout & Editing) Arranging Embroidery Designs (Layout & Editing) Sewing Option Detail Run Pitch Sew Page Color (Available only with Color and Sepia) Conversion ...embroidering. Select the color and click OK to make the color change the brand of the image. Select from an illustration, etc. Update Preview Click this button to be created. Stitch Quality: Creates a pattern while giving priority to reducing the number of brightness and ...
... the contrast. Variations of the variations, and then click OK to keep the fabric the same color as the Design Page. Arranging Embroidery Designs (Layout & Editing) Arranging Embroidery Designs (Layout & Editing) Sewing Option Detail Run Pitch Sew Page Color (Available only with Color and Sepia) Conversion ...embroidering. Select the color and click OK to make the color change the brand of the image. Select from an illustration, etc. Update Preview Click this button to be created. Stitch Quality: Creates a pattern while giving priority to reducing the number of brightness and ...
Users Manual - English
Page 134
...the mask until it surrounds the desired part of the image. Click Finish. → An embroidery pattern is created and displayed in the Design Page. → The image is updated. 2. c "Sewing Option" on page 133 and "Color Option" on page 127. 3. Specify the settings for creating the embroidery pattern.... c See step 2. on page 134. 7. Adjust the image size and position. Click Update Preview. → The previewed image is automatically hidden. 132 From the list at the left side of colors that can be added to the ...
...the mask until it surrounds the desired part of the image. Click Finish. → An embroidery pattern is created and displayed in the Design Page. → The image is updated. 2. c "Sewing Option" on page 133 and "Color Option" on page 127. 3. Specify the settings for creating the embroidery pattern.... c See step 2. on page 134. 7. Adjust the image size and position. Click Update Preview. → The previewed image is automatically hidden. 132 From the list at the left side of colors that can be added to the ...
Users Manual - English
Page 135
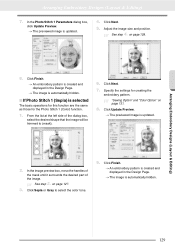
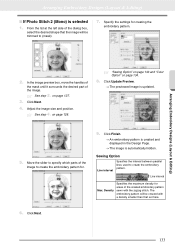
... Option Line interval Specifies the interval between parallel lines used to (mask). 7. Arranging Embroidery Designs (Layout & Editing) ■ If Photo Stitch 2 (Mono) is updated. 5. on page 134. 8. Click Update Preview. → The previewed image is selected 1. Click Finish. → An embroidery ...pattern is created and displayed in the Design Page. → The image is automatically hidden. The ...
... Option Line interval Specifies the interval between parallel lines used to (mask). 7. Arranging Embroidery Designs (Layout & Editing) ■ If Photo Stitch 2 (Mono) is updated. 5. on page 134. 8. Click Update Preview. → The previewed image is selected 1. Click Finish. → An embroidery ...pattern is created and displayed in the Design Page. → The image is automatically hidden. The ...
Users Manual - English
Page 136
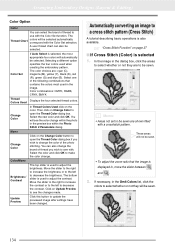
... settings have been changed. Click on page 27 ■ If Cross Stitch (Color) is used in the image. c "Cross Stitch Function" on Update Preview to see the color change . If necessary, in the dialog box, click the areas to select whether or not they will see the changes... Color Click on the Change Color button to open the Thread Color dialog box. b Memo: • Areas not set to be selected. Arranging Embroidery Designs (Layout & Editing) Color Option Color You can select the brand of thread to use with a crosshatch pattern. Selecting a different option specifies the four ...
... settings have been changed. Click on page 27 ■ If Cross Stitch (Color) is used in the image. c "Cross Stitch Function" on Update Preview to see the color change . If necessary, in the dialog box, click the areas to select whether or not they will see the changes... Color Click on the Change Color button to open the Thread Color dialog box. b Memo: • Areas not set to be selected. Arranging Embroidery Designs (Layout & Editing) Color Option Color You can select the brand of thread to use with a crosshatch pattern. Selecting a different option specifies the four ...

Users Manual - English
Page 210
... and vertical lines that you to specify the start point 1. Regardless of a different size. Repeat the entire procedure until the fill/stamp stitch pattern is updated as you enter the changes in the work area. 2. Creating Custom Stitch Patterns (Programmable Stitch Creator) Viewing the Pattern While Creating It You can display...
... and vertical lines that you to specify the start point 1. Regardless of a different size. Repeat the entire procedure until the fill/stamp stitch pattern is updated as you enter the changes in the work area. 2. Creating Custom Stitch Patterns (Programmable Stitch Creator) Viewing the Pattern While Creating It You can display...
Users Manual - English
Page 249
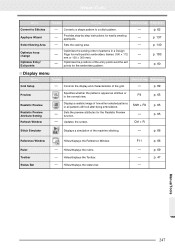
... a shape pattern to a stitch pattern. Shortcut key Reference p. 69 Preview Specifies whether the patterns appear as stitches or in a Design Page for the embroidery pattern. p. 66 Reference Window Ruler Toolbar Status Bar Hides/displays the Reference Window. Hides/displays the Toolbar. ...for multi-position embroidery frames (100 × 172 mm or 130 × 300 mm). Optimizes the positions of the machine stitching. Updates the screen. p. 62 Provides step-by-step instructions for the Realistic Preview function. p. 137 p. 140 Optimizes the sewing order of...
... a shape pattern to a stitch pattern. Shortcut key Reference p. 69 Preview Specifies whether the patterns appear as stitches or in a Design Page for the embroidery pattern. p. 66 Reference Window Ruler Toolbar Status Bar Hides/displays the Reference Window. Hides/displays the Toolbar. ...for multi-position embroidery frames (100 × 172 mm or 130 × 300 mm). Optimizes the positions of the machine stitching. Updates the screen. p. 62 Provides step-by-step instructions for the Realistic Preview function. p. 137 p. 140 Optimizes the sewing order of...
Users Manual - English
Page 250
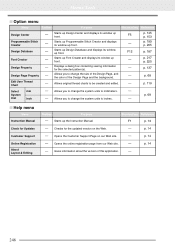
... up Programmable Stitch Creator and displays its window up the Instruction Manual. p. 217 p. 225 Design Property Design Page Property Edit User Thread Chart Displays a dialog box containing sewing information for the updated version on our Web site. p. 137 p. 68 p. 110 Select System Unit mm inch... Allows you to change the size of the Design Page, and the color of this application. Gives information about the version of the Design Page and the background....
... up Programmable Stitch Creator and displays its window up the Instruction Manual. p. 217 p. 225 Design Property Design Page Property Edit User Thread Chart Displays a dialog box containing sewing information for the updated version on our Web site. p. 137 p. 68 p. 110 Select System Unit mm inch... Allows you to change the size of the Design Page, and the color of this application. Gives information about the version of the Design Page and the background....
Users Manual - English
Page 254
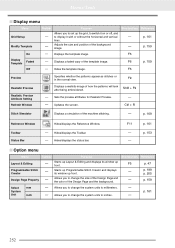
Updates the screen. F5 Starts up Programmable Stitch Creator and displays its window up front. F6 p. 159 F6 Preview Specifies whether the patterns appear as stitches ... Creator Starts up Layout & Editing and displays its window up front. p. 47 p. 199 p. 205 Design Page Property Allows you to change the system units to change the size of the Design Page and the color of the Design Page and the background. Shift + F9 Sets the preview attributes for Realistic Preview. Menus/Tools...
Updates the screen. F5 Starts up Programmable Stitch Creator and displays its window up front. F6 p. 159 F6 Preview Specifies whether the patterns appear as stitches ... Creator Starts up Layout & Editing and displays its window up front. p. 47 p. 199 p. 205 Design Page Property Allows you to change the system units to change the size of the Design Page and the color of the Design Page and the background. Shift + F9 Sets the preview attributes for Realistic Preview. Menus/Tools...
Users Manual - English
Page 265
... 52 Change Color 131, 134 changing thread color order 113 Changing the character spacing 86 Character Spacing 84, 86 Check for Updates 14 checking sewing order 117 stitching 66 Circle 71 Color button 95, 165 Color Option 131 combining pattern colors 118 concentric circle...stitch points 63 thread color charts 111 thread colors from charts 112 Design Center 145, 249 Design Database 187, 254 Design Page Property 68, 159, 182 Design Page size 68, 159 multi-position hoops 182 Design Property 137 Display Small Thumbnails 191 displaying background images 215 embroidery patterns ...
... 52 Change Color 131, 134 changing thread color order 113 Changing the character spacing 86 Character Spacing 84, 86 Check for Updates 14 checking sewing order 117 stitching 66 Circle 71 Color button 95, 165 Color Option 131 combining pattern colors 118 concentric circle...stitch points 63 thread color charts 111 thread colors from charts 112 Design Center 145, 249 Design Database 187, 254 Design Page Property 68, 159, 182 Design Page size 68, 159 multi-position hoops 182 Design Property 137 Display Small Thumbnails 191 displaying background images 215 embroidery patterns ...
Installation Guide
Page 14
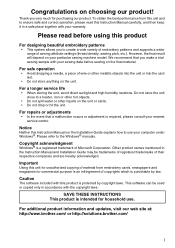
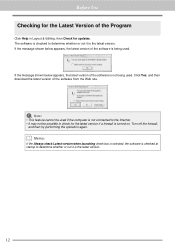
... if a firewall is the latest version. Click Yes, and then download the latest version of the Program Click Help in Layout & Editing, then Check for updates. a Note: • This feature cannot be used . Before Use Checking for the Latest Version of the software from the Web site. Turn off the firewall...
... if a firewall is the latest version. Click Yes, and then download the latest version of the Program Click Help in Layout & Editing, then Check for updates. a Note: • This feature cannot be used . Before Use Checking for the Latest Version of the software from the Web site. Turn off the firewall...
Installation Guide
Page 15
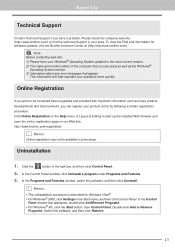
.... 2) The make and model number of Layout & Editing to find the technical Support in the task bar, and then click Control Panel. 2. http://www.brother.com/registration/ b Memo: Online registration may not be contacted about upgrades and provided with important information such as the Windows® Operating System version. 3) Information...Registration on our Web site. a Note: Before contacting web site: 1) Please have your questions more quickly. b Memo: • The uninstallation procedure is described for software updates, visit the Brother Solutions Center at (http://solutions...
.... 2) The make and model number of Layout & Editing to find the technical Support in the task bar, and then click Control Panel. 2. http://www.brother.com/registration/ b Memo: Online registration may not be contacted about upgrades and provided with important information such as the Windows® Operating System version. 3) Information...Registration on our Web site. a Note: Before contacting web site: 1) Please have your questions more quickly. b Memo: • The uninstallation procedure is described for software updates, visit the Brother Solutions Center at (http://solutions...


