Users Manual - English
Page 3
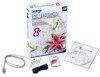
...with the copyright laws. Important Using this product is protected by law. For additional product information and updates, visit our web site at: http://www.brother.com/ or http://solutions.brother.com/ 1 Thank you very much for household use your particular sewing machine model. We recommend ... and magazines for commercial purpose is an infringement of material from this unit and to use . Please read this product For designing beautiful embroidery patterns • This system allows you make a trial sewing sample with your warranty. Notice Neither this Instruction Manual...
...with the copyright laws. Important Using this product is protected by law. For additional product information and updates, visit our web site at: http://www.brother.com/ or http://solutions.brother.com/ 1 Thank you very much for household use your particular sewing machine model. We recommend ... and magazines for commercial purpose is an infringement of material from this unit and to use . Please read this product For designing beautiful embroidery patterns • This system allows you make a trial sewing sample with your warranty. Notice Neither this Instruction Manual...
Users Manual - English
Page 16
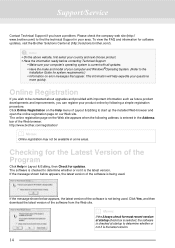
...8226; Information on error messages that appear. Online Registration If you have a problem. http://www.brother.com/registration/ b Memo: Online registration may not be contacted about upgrades and provided with all updates. • Have the make and model of the Web browser. To view the FAQ and ...information for software updates, visit the Brother Solutions Center at startup to the Installation Guide for updates. The software is the latest version. Support/Service Contact Technical Support if you wish to start up...
...8226; Information on error messages that appear. Online Registration If you have a problem. http://www.brother.com/registration/ b Memo: Online registration may not be contacted about upgrades and provided with all updates. • Have the make and model of the Web browser. To view the FAQ and ...information for software updates, visit the Brother Solutions Center at startup to the Installation Guide for updates. The software is the latest version. Support/Service Contact Technical Support if you wish to start up...
Users Manual - English
Page 131
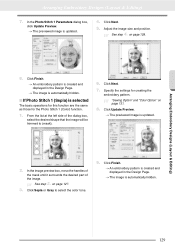
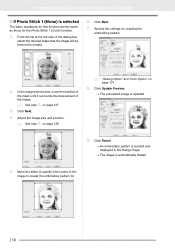
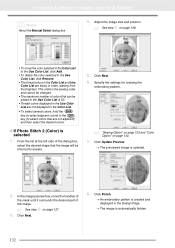
... 9. c See step 4. Adjust the image size and position. Arranging Embroidery Designs (Layout & Editing) Arranging Embroidery Designs (Layout & Editing) 7. In the Photo Stitch 1 Parameters dialog box, click Update Preview. → The previewed image is selected The basic operations for this ... those for creating the embroidery pattern. Click Next. 5. Click Finish. → An embroidery pattern is created and displayed in the Design Page. → The image is updated. 2. Specify the settings for the Photo Stitch 1 (Color) function. 1. c See step 2. Click Next. 7. on page 128...
... 9. c See step 4. Adjust the image size and position. Arranging Embroidery Designs (Layout & Editing) Arranging Embroidery Designs (Layout & Editing) 7. In the Photo Stitch 1 Parameters dialog box, click Update Preview. → The previewed image is selected The basic operations for this ... those for creating the embroidery pattern. Click Next. 5. Click Finish. → An embroidery pattern is created and displayed in the Design Page. → The image is updated. 2. Specify the settings for the Photo Stitch 1 (Color) function. 1. c See step 2. Click Next. 7. on page 128...
Users Manual - English
Page 132
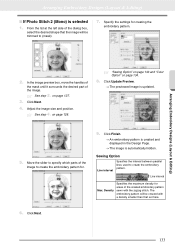
Arranging Embroidery Designs (Layout & Editing) ■ If Photo Stitch 1 (Mono) is updated. 9. c See step 4. c "Sewing Option" and "Color Option" on page 127. 3. Move the slider to specify which parts of the dialog box, select the desired shape ... for the Photo Stitch 1 (Color) function. 1. Adjust the image size and position. From the list at the left side of the image to (mask). 6. Click Update Preview. → The previewed image is selected The basic operations for this function are the same as those for creating the embroidery pattern. 2. In the...
Arranging Embroidery Designs (Layout & Editing) ■ If Photo Stitch 1 (Mono) is updated. 9. c See step 4. c "Sewing Option" and "Color Option" on page 127. 3. Move the slider to specify which parts of the dialog box, select the desired shape ... for the Photo Stitch 1 (Color) function. 1. Adjust the image size and position. From the list at the left side of the image to (mask). 6. Click Update Preview. → The previewed image is selected The basic operations for this function are the same as those for creating the embroidery pattern. 2. In the...
Users Manual - English
Page 133
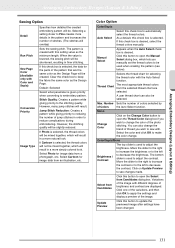
... the pattern that are the same color as the Design Page will be selected. Update Preview Click this check box to update the previewed image after settings have been changed. 131 Arranging Embroidery Designs (Layout & Editing) Arranging Embroidery Designs (Layout & Editing) Sewing Option Detail Run Pitch ...in finer stitching. Select the color and click OK to Fine creates more natural look . If this setting value as the Design Page. Select from the selected thread chart are displayed. Select Cartoon for selecting the thread color with Color and Sepia) ...
... the pattern that are the same color as the Design Page will be selected. Update Preview Click this check box to update the previewed image after settings have been changed. 131 Arranging Embroidery Designs (Layout & Editing) Arranging Embroidery Designs (Layout & Editing) Sewing Option Detail Run Pitch ...in finer stitching. Select the color and click OK to Fine creates more natural look . If this setting value as the Design Page. Select from the selected thread chart are displayed. Select Cartoon for selecting the thread color with Color and Sepia) ...
Users Manual - English
Page 134
... 128. • To move the handles of the mask until it surrounds the desired part of colors that are listed, in the Design Page. → The image is updated. 2. Click Update Preview. → The previewed image is automatically hidden. 132 This order is the sewing order and cannot be added to the Use... the image size and position. Click Next. 6. Click Finish. → An embroidery pattern is created and displayed in order, starting from the brightest. Arranging Embroidery Designs (Layout & Editing) b Memo: About the Manual Select dialog box 4.
... 128. • To move the handles of the mask until it surrounds the desired part of colors that are listed, in the Design Page. → The image is updated. 2. Click Update Preview. → The previewed image is automatically hidden. 132 This order is the sewing order and cannot be added to the Use... the image size and position. Click Next. 6. Click Finish. → An embroidery pattern is created and displayed in order, starting from the brightest. Arranging Embroidery Designs (Layout & Editing) b Memo: About the Manual Select dialog box 4.
Users Manual - English
Page 135
...here. 6. Line interval Max. Specify the settings for . 9. Click Update Preview. → The previewed image is automatically hidden. Density Specifies the maximum density for areas of the image. Arranging Embroidery Designs (Layout & Editing) 2. Click Finish. → An embroidery pattern... is created and displayed in the Design Page. → The image is updated. 5. The embroidery pattern will be created with the ...
...here. 6. Line interval Max. Specify the settings for . 9. Click Update Preview. → The previewed image is automatically hidden. Density Specifies the maximum density for areas of the image. Arranging Embroidery Designs (Layout & Editing) 2. Click Finish. → An embroidery pattern... is created and displayed in the Design Page. → The image is updated. 5. The embroidery pattern will be created with the ...
Users Manual - English
Page 136
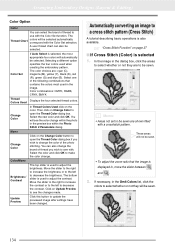
...Mono Change Color Click on Change Color to see the color change the brand of the photo stitching. Update Preview Click this button to change . You can also change within the Photo Stitch 2 Parameters dialog... brightness or to the left to make the color change the color of thread you wish to update the previewed image after settings have been changed. c "Cross Stitch Function" on the color. ... magenta (M), yellow (Y), black (K), red (R), green (G) and blue (B). Arranging Embroidery Designs (Layout & Editing) Color Option Color You can also be selected.
...Mono Change Color Click on Change Color to see the color change the brand of the photo stitching. Update Preview Click this button to change . You can also change within the Photo Stitch 2 Parameters dialog... brightness or to the left to make the color change the color of thread you wish to update the previewed image after settings have been changed. c "Cross Stitch Function" on the color. ... magenta (M), yellow (Y), black (K), red (R), green (G) and blue (B). Arranging Embroidery Designs (Layout & Editing) Color Option Color You can also be selected.

Users Manual - English
Page 210
..., or click the menu command Display Preview to create your fill/stamp stitch pattern. Repeat the entire procedure until the fill/stamp stitch pattern is updated as you create it. 1. If the Preview window isn't displayed, click Display, then Preview. Continue clicking to specify every point, and then double-click the...
..., or click the menu command Display Preview to create your fill/stamp stitch pattern. Repeat the entire procedure until the fill/stamp stitch pattern is updated as you create it. 1. If the Preview window isn't displayed, click Display, then Preview. Continue clicking to specify every point, and then double-click the...
Users Manual - English
Page 249
... patterns in the normal view. Optimizes the positions of the grid. Shortcut key Reference p. 69 Preview Specifies whether the patterns appear as stitches or in a Design Page for the embroidery pattern. Sets the preview attributes for easily creating appliqués. F11 p. 66 p. 69 p. 47 Menus/Tools 247 p. 62 Provides step-by... display and characteristics of the entry points and the exit points for multi-position embroidery frames (100 × 172 mm or 130 × 300 mm). Updates the screen.
... patterns in the normal view. Optimizes the positions of the grid. Shortcut key Reference p. 69 Preview Specifies whether the patterns appear as stitches or in a Design Page for the embroidery pattern. Sets the preview attributes for easily creating appliqués. F11 p. 66 p. 69 p. 47 Menus/Tools 247 p. 62 Provides step-by... display and characteristics of the entry points and the exit points for multi-position embroidery frames (100 × 172 mm or 130 × 300 mm). Updates the screen.
Users Manual - English
Page 250
... the online registration page from our Web site. Gives information about the version of the Design Page and the background. p. 217 p. 225 Design Property Design Page Property Edit User Thread Chart Displays a dialog box containing sewing information for the updated version on our Web site. p. 69 ■ Help menu Menu Instruction Manual Toolbar Purpose...
... the online registration page from our Web site. Gives information about the version of the Design Page and the background. p. 217 p. 225 Design Property Design Page Property Edit User Thread Chart Displays a dialog box containing sewing information for the updated version on our Web site. p. 69 ■ Help menu Menu Instruction Manual Toolbar Purpose...
Users Manual - English
Page 254
... the system units to millimeters. F9 Realistic Preview Realistic Preview Attribute Setting Refresh Window Displays a realistic image of the template image. Updates the screen. p. 169 Reference Window Hides/displays the Reference Window. Adjusts the size and position of the machine stitching. p. 159.... p. 161 252 Allows you to change the system units to change the size of the Design Page and the color of the Design Page and the background. p. 47 p. 199 p. 205 Design Page Property Allows you to inches. p. 153 ■ Option menu Menu Toolbar Purpose Shortcut...
... the system units to millimeters. F9 Realistic Preview Realistic Preview Attribute Setting Refresh Window Displays a realistic image of the template image. Updates the screen. p. 169 Reference Window Hides/displays the Reference Window. Adjusts the size and position of the machine stitching. p. 159.... p. 161 252 Allows you to change the system units to change the size of the Design Page and the color of the Design Page and the background. p. 47 p. 199 p. 205 Design Page Property Allows you to inches. p. 153 ■ Option menu Menu Toolbar Purpose Shortcut...
Users Manual - English
Page 265
... 52 Change Color 131, 134 changing thread color order 113 Changing the character spacing 86 Character Spacing 84, 86 Check for Updates 14 checking sewing order 117 stitching 66 Circle 71 Color button 95, 165 Color Option 131 combining pattern colors 118 concentric circle...stitch points 63 thread color charts 111 thread colors from charts 112 Design Center 145, 249 Design Database 187, 254 Design Page Property 68, 159, 182 Design Page size 68, 159 multi-position hoops 182 Design Property 137 Display Small Thumbnails 191 displaying background images 215 embroidery patterns ...
... 52 Change Color 131, 134 changing thread color order 113 Changing the character spacing 86 Character Spacing 84, 86 Check for Updates 14 checking sewing order 117 stitching 66 Circle 71 Color button 95, 165 Color Option 131 combining pattern colors 118 concentric circle...stitch points 63 thread color charts 111 thread colors from charts 112 Design Center 145, 249 Design Database 187, 254 Design Page Property 68, 159, 182 Design Page size 68, 159 multi-position hoops 182 Design Property 137 Display Small Thumbnails 191 displaying background images 215 embroidery patterns ...
Installation Guide
Page 14
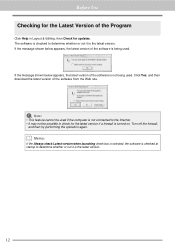
.... a Note: • This feature cannot be used if the computer is not connected to the Internet. • It may not be possible to check for updates. b Memo: If the Always check Latest version when launching check box is selected, the software is checked at startup to determine whether or not it...
.... a Note: • This feature cannot be used if the computer is not connected to the Internet. • It may not be possible to check for updates. b Memo: If the Always check Latest version when launching check box is selected, the software is checked at startup to determine whether or not it...
Installation Guide
Page 15
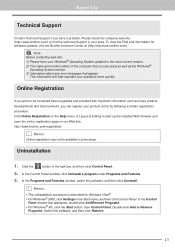
...® 2000, click Settings in some areas. b Memo: • The uninstallation procedure is described for software updates, visit the Brother Solutions Center at (http://solutions.brother.com/). Double-click Add or Remove Programs. Select this software, and then click Uninstall. Before Use Technical Support ...Contact Technical Support if you have your Windows® Operating System updated to the most current version. 2) The make...
...® 2000, click Settings in some areas. b Memo: • The uninstallation procedure is described for software updates, visit the Brother Solutions Center at (http://solutions.brother.com/). Double-click Add or Remove Programs. Select this software, and then click Uninstall. Before Use Technical Support ...Contact Technical Support if you have your Windows® Operating System updated to the most current version. 2) The make...


