Network Users Manual - English
Page 3
...mask and Gateway 4 Using the control panel...4 Using the BRAdmin Light utility ...4 Other Management Utilities ...7 Web Based Management (web browser) (MFC-J5910DW only 7 BRAdmin Professional 3 utility (Windows 7 3 Configuring your machine for a wireless network 8 Overview...8 Confirm your network environment...9 Connected...mode)...10 Wireless configuration temporarily using a USB cable 11 For Windows® users (Recommended 11 For Macintosh users ...12 Wireless configuration temporarily using an Ethernet cable (For MFC-J825DW/J835DW/J5910DW and DCP-J925DW) ...14 One push configuration ...
...mask and Gateway 4 Using the control panel...4 Using the BRAdmin Light utility ...4 Other Management Utilities ...7 Web Based Management (web browser) (MFC-J5910DW only 7 BRAdmin Professional 3 utility (Windows 7 3 Configuring your machine for a wireless network 8 Overview...8 Confirm your network environment...9 Connected...mode)...10 Wireless configuration temporarily using a USB cable 11 For Windows® users (Recommended 11 For Macintosh users ...12 Wireless configuration temporarily using an Ethernet cable (For MFC-J825DW/J835DW/J5910DW and DCP-J925DW) ...14 One push configuration ...
Network Users Manual - English
Page 12
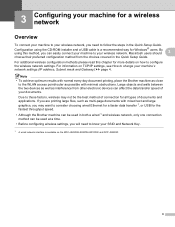
...such as multi-page documents with minimal obstructions. By using the CD-ROM installer and a USB cable is available on TCP/IP settings, see How to change your machine's network settings (IP ...4. Note • To achieve optimum results with normal every day document printing, place the Brother machine as close to the WLAN access point/router as interference from the choices covered in..., you can easily connect your machine to your wireless network. For information on the MFC-J825DW/J835DW/J5910DW and DCP-J925DW. 8 Configuration using this chapter for all types of connection for more...
...such as multi-page documents with minimal obstructions. By using the CD-ROM installer and a USB cable is available on TCP/IP settings, see How to change your machine's network settings (IP ...4. Note • To achieve optimum results with normal every day document printing, place the Brother machine as close to the WLAN access point/router as interference from the choices covered in..., you can easily connect your machine to your wireless network. For information on the MFC-J825DW/J835DW/J5910DW and DCP-J925DW. 8 Configuration using this chapter for all types of connection for more...

Network Users Manual - English
Page 13
... See Wireless configuration temporarily using a USB cable uu page 11. Wireless configuration temporarily using an Ethernet cable See Wireless configuration temporarily using an Ethernet cable (For MFC-J825DW/J835DW/J5910DW and DCP-J925DW) uu page 14. ... One push wireless configuration using WPS or AOSS™ See One push configuration using Wi-Fi Protected Setup or AOSS™ uu page 17. Wireless configuration using the Setup Wizard from the control panel See Configuration using a USB cable (Recommended for installing your Brother...
... See Wireless configuration temporarily using a USB cable uu page 11. Wireless configuration temporarily using an Ethernet cable See Wireless configuration temporarily using an Ethernet cable (For MFC-J825DW/J835DW/J5910DW and DCP-J925DW) uu page 14. ... One push wireless configuration using WPS or AOSS™ See One push configuration using Wi-Fi Protected Setup or AOSS™ uu page 17. Wireless configuration using the Setup Wizard from the control panel See Configuration using a USB cable (Recommended for installing your Brother...
Network Users Manual - English
Page 15
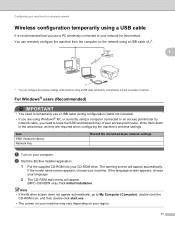
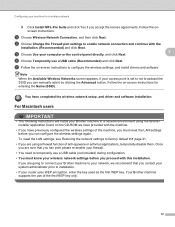
... the area below, as they are using Windows® XP, or currently using a USB cable temporarily connected to your computer. b Start the Brother installer application. 1 Put the supplied CD-ROM into your machine. The opening screen will appear. (MFC-J5910DW only) Click Initial Installation. You can remotely configure the machine from the computer on...
... the area below, as they are using Windows® XP, or currently using a USB cable temporarily connected to your computer. b Start the Brother installer application. 1 Put the supplied CD-ROM into your machine. The opening screen will appear. (MFC-J5910DW only) Click Initial Installation. You can remotely configure the machine from the computer on...
Network Users Manual - English
Page 16
...function of anti-spyware or antivirus applications, temporarily disable them. If you are going to connect your Brother machine to temporarily use a USB cable (Recommended) and click Next. Your Brother machine supports the use of the machine, you must know your wireless network settings before you can... d Choose Change the Firewall port settings to factory default uu page 41. • If you are sure that you are using the Brother installer application found on -screen instructions for a wireless network 3 Click Install MFL-Pro Suite and click Yes if you accept the license...
...function of anti-spyware or antivirus applications, temporarily disable them. If you are going to connect your Brother machine to temporarily use a USB cable (Recommended) and click Next. Your Brother machine supports the use of the machine, you must know your wireless network settings before you can... d Choose Change the Firewall port settings to factory default uu page 41. • If you are sure that you are using the Brother installer application found on -screen instructions for a wireless network 3 Click Install MFL-Pro Suite and click Yes if you accept the license...

Network Users Manual - English
Page 17
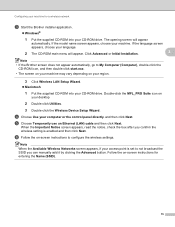
... Name): Network Key 3 b Turn on your desktop. 2 Double-click Utilities. 3 Double-click the Wireless Device Setup Wizard. f Choose Temporarily use a USB cable (Recommended) and then click Next. Confirm your settings by clicking the Advanced button. You have completed the wireless network setup. Configuring your machine for a wireless...add it by following the on -screen instructions to configure the wireless settings. g Follow the on -screen instructions. 13 c Start the Brother installer application. 1 Put the supplied CD-ROM into your computer or the control panel directly.
... Name): Network Key 3 b Turn on your desktop. 2 Double-click Utilities. 3 Double-click the Wireless Device Setup Wizard. f Choose Temporarily use a USB cable (Recommended) and then click Next. Confirm your settings by clicking the Advanced button. You have completed the wireless network setup. Configuring your machine for a wireless...add it by following the on -screen instructions to configure the wireless settings. g Follow the on -screen instructions. 13 c Start the Brother installer application. 1 Put the supplied CD-ROM into your computer or the control panel directly.
Network Users Manual - English
Page 18
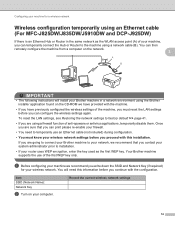
..., temporarily disable them. You will install your Brother machine in a network environment using the Brother installer application found on the CD-ROM we recommend you write down the SSID and Network Key (if required) for a wireless network Wireless configuration temporarily using an Ethernet cable (For MFC-J825DW/J835DW/J5910DW and DCP-J925DW) 3 If there is...
..., temporarily disable them. You will install your Brother machine in a network environment using the Brother installer application found on the CD-ROM we recommend you write down the SSID and Network Key (if required) for a wireless network Wireless configuration temporarily using an Ethernet cable (For MFC-J825DW/J835DW/J5910DW and DCP-J925DW) 3 If there is...
Network Users Manual - English
Page 19
...If the model name screen appears, choose your computer or the control panel directly. Click Advanced or Initial Installation. 3 Note • If the Brother screen does not appear automatically, go to My Computer (Computer), double-click the CD-ROM icon, and then double-click start.exe. •...you confirm the wireless setting is set to configure the wireless settings. The opening screen will appear. e Choose Temporarily use an Ethernet (LAN) cable and then click Next. Follow the on -screen instructions to not broadcast the SSID you can manually add it by clicking the Advanced button. ...
...If the model name screen appears, choose your computer or the control panel directly. Click Advanced or Initial Installation. 3 Note • If the Brother screen does not appear automatically, go to My Computer (Computer), double-click the CD-ROM icon, and then double-click start.exe. •...you confirm the wireless setting is set to configure the wireless settings. The opening screen will appear. e Choose Temporarily use an Ethernet (LAN) cable and then click Next. Follow the on -screen instructions to not broadcast the SSID you can manually add it by clicking the Advanced button. ...
Network Users Manual - English
Page 38
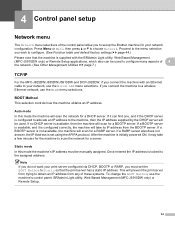
...be used to configure many aspects of 4 the network. (See Other Management Utilities uu page 7.) TCP/IP 4 For the MFC-J825DW/J835DW/J5910DW and DCP-J925DW, if you to set up the Brother machine for your print server configured via DHCP, BOOTP or RARP, you connect the machine to the assigned address. If... no DHCP server is set the BOOT Method to Static so that the machine is supplied with an Ethernet cable ...
...be used to configure many aspects of 4 the network. (See Other Management Utilities uu page 7.) TCP/IP 4 For the MFC-J825DW/J835DW/J5910DW and DCP-J925DW, if you to set up the Brother machine for your print server configured via DHCP, BOOTP or RARP, you connect the machine to the assigned address. If... no DHCP server is set the BOOT Method to Static so that the machine is supplied with an Ethernet cable ...
Network Users Manual - English
Page 78
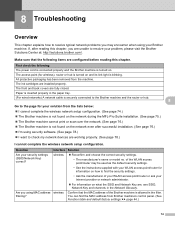
...front and back covers are , see SSID, Network Key and channels in the paper tray. (For wired networks) A network cable is securely connected to the Brother machine and the router or hub. 8 Go to the page for information on the network even after reading this chapter. ...Overview 8 This chapter explains how to resolve typical network problems you using MAC address filtering? All protective packaging has been removed from Brother machine's control panel. (See Function table and default factory settings uu page 44.) 74 Interface wireless wireless Solution Reconfirm ...
...front and back covers are , see SSID, Network Key and channels in the paper tray. (For wired networks) A network cable is securely connected to the Brother machine and the router or hub. 8 Go to the page for information on the network even after reading this chapter. ...Overview 8 This chapter explains how to resolve typical network problems you using MAC address filtering? All protective packaging has been removed from Brother machine's control panel. (See Function table and default factory settings uu page 44.) 74 Interface wireless wireless Solution Reconfirm ...
Quick Setup Guide - English
Page 1
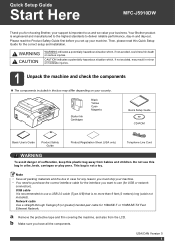
... is engineered and manufactured to the highest standards to us and we value your country. Network cable Use a straight-through Category5 (or greater) twisted-pair cable for choosing Brother, your support is important to deliver reliable performance, day-in death or serious injuries. CAUTION indicates... interface you set up your machine. b Make sure you for 10BASE-T or 100BASE-TX Fast Ethernet Network. Your Brother product is not a toy. Quick Setup Guide Start Here MFC-J5910DW Thank you have all packing materials and the box in cribs, beds, carriages or play pens.
... is engineered and manufactured to the highest standards to us and we value your country. Network cable Use a straight-through Category5 (or greater) twisted-pair cable for choosing Brother, your support is important to deliver reliable performance, day-in death or serious injuries. CAUTION indicates... interface you set up your machine. b Make sure you for 10BASE-T or 100BASE-TX Fast Ethernet Network. Your Brother product is not a toy. Quick Setup Guide Start Here MFC-J5910DW Thank you have all packing materials and the box in cribs, beds, carriages or play pens.
Quick Setup Guide - English
Page 4
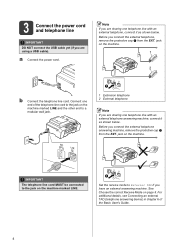
...line cord MUST be connected to the jack on the machine marked LINE. 1 Set the receive mode to External TAD if you are using a USB cable). Before you connect the external telephone answering machine, remove the protective cap a from the EXT. For additional details, see Connecting an external TAD (... telephone line with an external telephone, connect it as shown below . 3 Connect the power cord and telephone line IMPORTANT DO NOT connect the USB cable yet (if you have an external answering machine. jack on the machine. Note If you are sharing one end of the Basic User's Guide. ...
...line cord MUST be connected to the jack on the machine marked LINE. 1 Set the receive mode to External TAD if you are using a USB cable). Before you connect the external telephone answering machine, remove the protective cap a from the EXT. For additional details, see Connecting an external TAD (... telephone line with an external telephone, connect it as shown below . 3 Connect the power cord and telephone line IMPORTANT DO NOT connect the USB cable yet (if you have an external answering machine. jack on the machine. Note If you are sharing one end of the Basic User's Guide. ...
Quick Setup Guide - English
Page 13
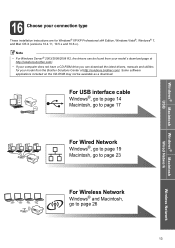
For USB interface cable Windows®, go to page 14 Macintosh, go to page 17 For Wired ...Wired Network Wireless Network Windows® Macintosh USB 16 Choose your model from your model's download page at http://solutions.brother.com/. Note • For Windows Server® 2003/2008/2008 R2, the drivers can download the latest drivers, ...10.5.x and 10.6.x). Some software applications included on the CD-ROM may not be found from the Brother Solutions Center at http://solutions.brother.com/. • If your computer does not have a CD-ROM drive you can be available as a download....
For USB interface cable Windows®, go to page 14 Macintosh, go to page 17 For Wired ...Wired Network Wireless Network Windows® Macintosh USB 16 Choose your model from your model's download page at http://solutions.brother.com/. Note • For Windows Server® 2003/2008/2008 R2, the drivers can download the latest drivers, ...10.5.x and 10.6.x). Some software applications included on the CD-ROM may not be found from the Brother Solutions Center at http://solutions.brother.com/. • If your computer does not have a CD-ROM drive you can be available as a download....
Quick Setup Guide - English
Page 14
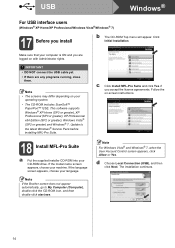
IMPORTANT • DO NOT connect the USB cable yet. • If there are logged on -screen instructions. 18 Install MFL-Pro Suite a Put the supplied installer CD-ROM into your language. Note If the Brother screen does not appear automatically, go to the latest Windows® Service Pack before installing MFL-Pro Suite...
IMPORTANT • DO NOT connect the USB cable yet. • If there are logged on -screen instructions. 18 Install MFL-Pro Suite a Put the supplied installer CD-ROM into your language. Note If the Brother screen does not appear automatically, go to the latest Windows® Service Pack before installing MFL-Pro Suite...

Quick Setup Guide - English
Page 15
...screens during the installation. Gently push the scanner cover support down b and close the scanner cover c using both hands. 1 b Connect the USB cable to the next step. The installation screens appear one after another. Note For Windows Vista® and Windows® 7, when the Windows® ...USB port inside the machine on the right as shown below. 3 2 USB e The installation will continue automatically. IMPORTANT Make sure that the cable does not restrict the cover from closing, or an error may take a few seconds for all screens to your computer. IMPORTANT DO NOT ...
...screens during the installation. Gently push the scanner cover support down b and close the scanner cover c using both hands. 1 b Connect the USB cable to the next step. The installation screens appear one after another. Note For Windows Vista® and Windows® 7, when the Windows® ...USB port inside the machine on the right as shown below. 3 2 USB e The installation will continue automatically. IMPORTANT Make sure that the cable does not restrict the cover from closing, or an error may take a few seconds for all screens to your computer. IMPORTANT DO NOT ...

Quick Setup Guide - English
Page 17
... your Macintosh. USB Note For Mac OS X 10.4.0 to 10.4.10 users, upgrade to Mac OS X 10.4.11 - 10.6.x. 18 Connect the USB cable IMPORTANT • DO NOT connect the machine to a USB port on a keyboard or a non-powered USB hub. • Connect the machine directly to your ...Macintosh. a Lift the scanner cover until it locks securely into the cable channel and out the back of the machine. c Carefully guide the USB cable into the open position. b Connect the USB cable to the power and your Macintosh is connected to the USB port marked with Administrator...
... your Macintosh. USB Note For Mac OS X 10.4.0 to 10.4.10 users, upgrade to Mac OS X 10.4.11 - 10.6.x. 18 Connect the USB cable IMPORTANT • DO NOT connect the machine to a USB port on a keyboard or a non-powered USB hub. • Connect the machine directly to your ...Macintosh. a Lift the scanner cover until it locks securely into the cable channel and out the back of the machine. c Carefully guide the USB cable into the open position. b Connect the USB cable to the power and your Macintosh is connected to the USB port marked with Administrator...
Quick Setup Guide - English
Page 19
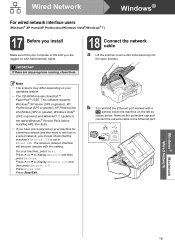
...the machine on your machine, press Menu. The wireless network interface will find the Ethernet port marked with Administrator rights. 18 Connect the network cable a Lift the scanner cover until it up on a wired network, you are any programs running, close them. Wired Network Windows®...Vista®/Windows® 7) 17 Before you install Make sure that the machine's Network I /F. Remove the protective cap and connect the network cable to display Network, and then press Network. Note • The screens may differ depending on the left as shown below. This software supports...
...the machine on your machine, press Menu. The wireless network interface will find the Ethernet port marked with Administrator rights. 18 Connect the network cable a Lift the scanner cover until it up on a wired network, you are any programs running, close them. Wired Network Windows®...Vista®/Windows® 7) 17 Before you install Make sure that the machine's Network I /F. Remove the protective cap and connect the network cable to display Network, and then press Network. Note • The screens may differ depending on the left as shown below. This software supports...
Quick Setup Guide - English
Page 20
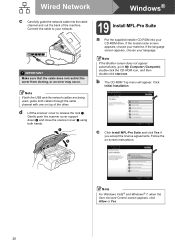
... accept the license agreements. Gently push the scanner cover support down b and close the scanner cover c using both cables through the cable channel with one on -screen instructions. Click Initial Installation. Note If the Brother screen does not appear automatically, go to release the lock a. Note For Windows Vista® and Windows®...
... accept the license agreements. Gently push the scanner cover support down b and close the scanner cover c using both cables through the cable channel with one on -screen instructions. Click Initial Installation. Note If the Brother screen does not appear automatically, go to release the lock a. Note For Windows Vista® and Windows®...
Quick Setup Guide - English
Page 23
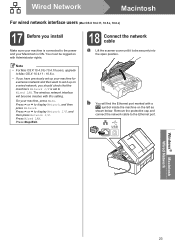
... the scanner cover until it up on the left as shown below. Remove the protective cap and connect the network cable to display Network, and then press Network. USB Windows® Macintosh Wired Network 23 Press s or t to the Ethernet port. Wired Network Macintosh For wired ...
... the scanner cover until it up on the left as shown below. Remove the protective cap and connect the network cable to display Network, and then press Network. USB Windows® Macintosh Wired Network 23 Press s or t to the Ethernet port. Wired Network Macintosh For wired ...

Quick Setup Guide - English
Page 24
... on top of the machine. Note If both the USB and the network cables are being used, guide both hands. 1 3 2 c Choose Wired Network Connection (Ethernet), and then click Next. d Please wait for the Brother device. After the installation, the Brother software will take a few moments to install. e If the machine is configured for...
... on top of the machine. Note If both the USB and the network cables are being used, guide both hands. 1 3 2 c Choose Wired Network Connection (Ethernet), and then click Next. d Please wait for the Brother device. After the installation, the Brother software will take a few moments to install. e If the machine is configured for...


