
Quick Setup Guide - English
Page 15
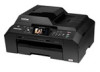
... DO NOT cancel any of the machine. c Carefully guide the USB cable into the open position. Windows® Macintosh USB 19 Connect the USB cable a Lift the scanner cover until it locks securely into the cable channel and out the back of the screens during the installation. Note For Windows Vista...screen appears, click the check box and click Install to release the lock a. IMPORTANT Make sure that the cable does not restrict the cover from closing, or an error may take a few seconds for all screens to the USB port marked with a symbol. d Lift the scanner cover to complete the installation...
... DO NOT cancel any of the machine. c Carefully guide the USB cable into the open position. Windows® Macintosh USB 19 Connect the USB cable a Lift the scanner cover until it locks securely into the cable channel and out the back of the screens during the installation. Note For Windows Vista...screen appears, click the check box and click Install to release the lock a. IMPORTANT Make sure that the cable does not restrict the cover from closing, or an error may take a few seconds for all screens to the USB port marked with a symbol. d Lift the scanner cover to complete the installation...
Quick Setup Guide - English
Page 19
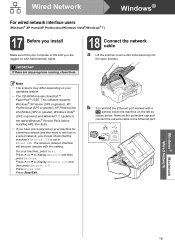
...; The screens may differ depending on your machine, press Menu. Update to Wired LAN. Press Wired LAN. Remove the protective cap and connect the network cable to display Network, and then press Network. Wired Network Windows® For wired network interface users (Windows® XP ... that your computer is set it up on a wired network, you should check that the machine's Network I /F. IMPORTANT If there are logged on with Administrator rights. 18 Connect the network cable a Lift the scanner cover until it locks securely into the open position. The wireless network interface...
...; The screens may differ depending on your machine, press Menu. Update to Wired LAN. Press Wired LAN. Remove the protective cap and connect the network cable to display Network, and then press Network. Wired Network Windows® For wired network interface users (Windows® XP ... that your computer is set it up on a wired network, you should check that the machine's Network I /F. IMPORTANT If there are logged on with Administrator rights. 18 Connect the network cable a Lift the scanner cover until it locks securely into the open position. The wireless network interface...
Quick Setup Guide - English
Page 23
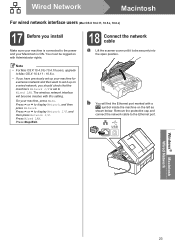
... cable to display Network, and then press Network. On your Macintosh is ON. Press Wired LAN. Press Stop/Exit. 18 Connect the network cable a Lift the scanner cover until it up your machine for a wireless network and then want to set it locks securely into the open position. ...Wired Network Macintosh For wired network interface users (Mac OS X 10.4.11, 10.5.x, 10.6.x) 17 Before you should check that the machine's Network I /F....
... cable to display Network, and then press Network. On your Macintosh is ON. Press Wired LAN. Press Stop/Exit. 18 Connect the network cable a Lift the scanner cover until it up your machine for a wireless network and then want to set it locks securely into the open position. ...Wired Network Macintosh For wired network interface users (Mac OS X 10.4.11, 10.5.x, 10.6.x) 17 Before you should check that the machine's Network I /F....
Software Users Manual - English
Page 127
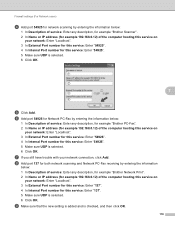
...Add. g If you still have trouble with your network connection, click Add. Firewall settings (For Network users) d Add port 54925 for network scanning by entering the information below: 1 In Description of service: Enter any description, for example "Brother Scanner". 2 In Name or IP address (for example 192....168.0.12) of the computer hosting this service on your network: Enter "Localhost". 3 In External Port number for this service: Enter "54925". 4 In Internal Port number for this service: Enter "54925". 5 Make sure UDP is checked...
...Add. g If you still have trouble with your network connection, click Add. Firewall settings (For Network users) d Add port 54925 for network scanning by entering the information below: 1 In Description of service: Enter any description, for example "Brother Scanner". 2 In Name or IP address (for example 192....168.0.12) of the computer hosting this service on your network: Enter "Localhost". 3 In External Port number for this service: Enter "54925". 4 In Internal Port number for this service: Enter "54925". 5 Make sure UDP is checked...
Software Users Manual - English
Page 132
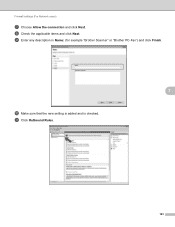
Firewall settings (For Network users) g Choose Allow the connection and click Next. h Check the applicable items and click Next. k Click Outbound Rules. 123 i Enter any description in Name: (for example "Brother Scanner" or "Brother PC-Fax") and click Finish. 7 j Make sure that the new setting is added and is checked.
Firewall settings (For Network users) g Choose Allow the connection and click Next. h Check the applicable items and click Next. k Click Outbound Rules. 123 i Enter any description in Name: (for example "Brother Scanner" or "Brother PC-Fax") and click Finish. 7 j Make sure that the new setting is added and is checked.

Software Users Manual - English
Page 134
q Enter any description in Name: (for example "Brother Scanner" or "Brother PC-Fax") and click Finish. 7 r Make sure that the new setting is added and is checked. 125 p Check the applicable items and click Next. Firewall settings (For Network users) o Choose Allow the connection and click Next.
q Enter any description in Name: (for example "Brother Scanner" or "Brother PC-Fax") and click Finish. 7 r Make sure that the new setting is added and is checked. 125 p Check the applicable items and click Next. Firewall settings (For Network users) o Choose Allow the connection and click Next.


