

Terminator C3V User Manual
Page 4
... Info 4.1 Introduction 4-2 4.2 Motherboard layout 4-2 4.3 Jumpers 4-3 4.4 Connectors 4-5 Chapter 5: BIOS Information 5.1 Managing and updating your BIOS 5-2 5.1.1 Creating a bootable floppy disk 5-2 5.1.2 Updating the BIOS using the AwardBIOS Flash Utility 5-3 5.1.3 Recovering the BIOS with CrashFree BIOS 5-5 5.1.4 ASUS Update 5-6 5.2 BIOS Setup program 5-7 5.2.1 BIOS menu bar 5-8 5.2.2 Legend bar 5-8 5.3 Main Menu 5-10 5.3.1 System Time 5-10 5.3.2 System Date 5-10 5.3.3 Legacy Diskette...
... Info 4.1 Introduction 4-2 4.2 Motherboard layout 4-2 4.3 Jumpers 4-3 4.4 Connectors 4-5 Chapter 5: BIOS Information 5.1 Managing and updating your BIOS 5-2 5.1.1 Creating a bootable floppy disk 5-2 5.1.2 Updating the BIOS using the AwardBIOS Flash Utility 5-3 5.1.3 Recovering the BIOS with CrashFree BIOS 5-5 5.1.4 ASUS Update 5-6 5.2 BIOS Setup program 5-7 5.2.1 BIOS menu bar 5-8 5.2.2 Legend bar 5-8 5.3 Main Menu 5-10 5.3.1 System Time 5-10 5.3.2 System Date 5-10 5.3.3 Legacy Diskette...

Terminator C3V User Manual
Page 46
... polling intervals or refresh times of the PC's hard disk drives and the file allocation table or file system used and free space of the PC's temperature, fan rotation, and voltages. Hard Drives Shows the used . 3-10 Chapter 3: Starting up CPU Cooling System Setup Lets you record the monitoring activity of a certain...
... polling intervals or refresh times of the PC's hard disk drives and the file allocation table or file system used and free space of the PC's temperature, fan rotation, and voltages. Hard Drives Shows the used . 3-10 Chapter 3: Starting up CPU Cooling System Setup Lets you record the monitoring activity of a certain...

Terminator C3V User Manual
Page 64
... restore the BIOS in Windows® environment.) Refer to create a bootable floppy disk. A w a r d B I O S (Updates the BIOS using the ASUS Update utility. 5.1.1 Creating a bootable floppy disk 1. DOS environment Insert a 1.44 MB floppy disk into the drive. b. At the DOS prompt, type: f o r ...setup. 1. Double-click on S t a r t, then select M y C o m p u t e r. Click on the S t a r t u p D i s k tab, then on these utilities. d. A S U S C r a s h F r e e B I O S F l a s h U t i l i t y (Updates the BIOS using the ASUS Update or AFLASH utilities. • Visit the ASUS...
... restore the BIOS in Windows® environment.) Refer to create a bootable floppy disk. A w a r d B I O S (Updates the BIOS using the ASUS Update utility. 5.1.1 Creating a bootable floppy disk 1. DOS environment Insert a 1.44 MB floppy disk into the drive. b. At the DOS prompt, type: f o r ...setup. 1. Double-click on S t a r t, then select M y C o m p u t e r. Click on the S t a r t u p D i s k tab, then on these utilities. d. A S U S C r a s h F r e e B I O S F l a s h U t i l i t y (Updates the BIOS using the ASUS Update or AFLASH utilities. • Visit the ASUS...
Terminator C3V User Manual
Page 72
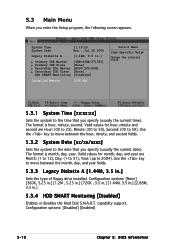
...Diskette A [1.44M, 3.5 in .] 5.3.4 HDD SMART Monitoring [Disabled] Enables or disables the Hard Disk S.M.A.R.T. 5.3 Main Menu When you specify (usually the current date). Valid values for hour, minute...12), Day: (1 to 31), Year: (up to the time that you enter the Setup program, the following screen appears. The format is month, day, year. capability support. ...Master Primary IDE Slave Secondary IDe Master Secondary IDE Slave HDD SMART Monitoring [IBM-DJNA-371350] [None] [ASUS DVD-ROM] [None] [Disabled] Installed Memory [256 MB] Select Menu Item Specific Help Change the internal ...
...Diskette A [1.44M, 3.5 in .] 5.3.4 HDD SMART Monitoring [Disabled] Enables or disables the Hard Disk S.M.A.R.T. 5.3 Main Menu When you specify (usually the current date). Valid values for hour, minute...12), Day: (1 to 31), Year: (up to the time that you enter the Setup program, the following screen appears. The format is month, day, year. capability support. ...Master Primary IDE Slave Secondary IDe Master Secondary IDE Slave HDD SMART Monitoring [IBM-DJNA-371350] [None] [ASUS DVD-ROM] [None] [Disabled] Installed Memory [256 MB] Select Menu Item Specific Help Change the internal ...
Terminator C3V User Manual
Page 73
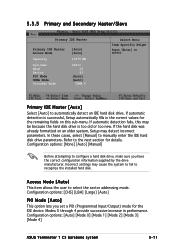
If automatic detection fails, this may be because the hard disk drive is successful, Setup automatically fills in performance. Refer to select the sector addressing mode. If the hard disk was already formatted on this sub-menu. Access Mode [Auto] This item allows the user...an older system, Setup may cause the system to fail to manually enter the IDE hard disk drive parameters. Primary IDE Master [Auto] Select [Auto] to automatically detect an IDE hard disk drive. Configuration options: [Auto] [Mode 0] [Mode 1] [Mode 2] [Mode 3] [Mode 4] ASUS Terminator 1 C3 barebone system 5-11
If automatic detection fails, this may be because the hard disk drive is successful, Setup automatically fills in performance. Refer to select the sector addressing mode. If the hard disk was already formatted on this sub-menu. Access Mode [Auto] This item allows the user...an older system, Setup may cause the system to fail to manually enter the IDE hard disk drive parameters. Primary IDE Master [Auto] Select [Auto] to automatically detect an IDE hard disk drive. Configuration options: [Auto] [Mode 0] [Mode 1] [Mode 2] [Mode 3] [Mode 4] ASUS Terminator 1 C3 barebone system 5-11


