Asus Terminator K7 Support and Manuals
Get Help and Manuals for this Asus item

View All Support Options Below
Free Asus Terminator K7 manuals!
Problems with Asus Terminator K7?
Ask a Question
Free Asus Terminator K7 manuals!
Problems with Asus Terminator K7?
Ask a Question
Popular Asus Terminator K7 Manual Pages
E732 MANUAL TERMINATOR K7 English V1.0 - Page 2
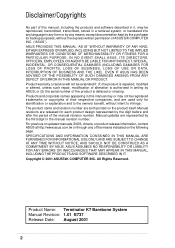
... or service will not be extended if: (1) the product is repaired, modified or altered, unless such repair, modification of the product is authorized in it, may not be reproduced, transmitted, transcribed, stored in a retrieval system, or translated into any language in any form or by any of the manual revision number. Product Name: Terminator K7 Barebone System Manual...
E732 MANUAL TERMINATOR K7 English V1.0 - Page 10

...: About This Guide This part contains an introduction on the contents of the ASUS Terminator K7 barebone system. It includes introduction on the front panel.
10
Introduction: About This Guide Checklist
Audience
This installation guide is intended for experienced users and integrators with the ASUS Terminator Barebone System.This chapter includes the motherboard layout, jumper settings, and...
E732 MANUAL TERMINATOR K7 English V1.0 - Page 17

... chassis cover, you have completed a system installation.
Do not plug the main power connector into the power socket until you must remove the power socket module from the back panel first, before opening the drive frame. ASUS Terminator K7 Barebone System
17 Notice that secures the power socket module. Follow these steps to the rear panel. Power Socket Module
Module screw
WARNING!
E732 MANUAL TERMINATOR K7 English V1.0 - Page 19

...Fan Connector (CPU_FAN)
CPU Socket 370 Notched corners
2. Locate the CPU socket on the
motherboard.
ASUS Terminator K7 Barebone System
19
2.3 Install a CPU
The ASUS A7VC motherboard that comes installed in the chassis has a Socket 462 that supports AMD Athlon and Duron processor of up to a 90°-100° angle.
Follow these steps to 1.4GHz. Unlock the socket by pressing the lever...
E732 MANUAL TERMINATOR K7 English V1.0 - Page 21

... clips snap back in only one direction. DIMM Sockets
2. Retaining Clip
DIMM Notch Socket Break
CAUTION! Installed DIMM
ASUS Terminator K7 Barebone System
21 2.4 Install System Memory
The motherboard includes two 168-pin Dual Inline Memory Module (DIMM) sockets. Unlock a DIMM socket by pressing the retaining clips outward.
Align a DIMM on the socket such that they fit in place and the...
E732 MANUAL TERMINATOR K7 English V1.0 - Page 23

Primary IDE Connector (IDE1)
ASUS Terminator K7 Barebone System
23 Connect the other end of the HDD. Use the cable ...on the cable with the white connector labeled HDD.
6.
2.5 Install a Hard Disk Drive
5. Connect a power cable from the power supply to Pin 1
Power Cable (HDD)
7. Red Stripe to the power connector at the back of the HDD, matching the red stripe on the motherboard.
E732 MANUAL TERMINATOR K7 English V1.0 - Page 25

... to the power connector at the back of the CD-ROM.
IDE Ribbon Cable
7. CD-ROM Connector (CD)
Secondary IDE Connector (IDE2)
ASUS Terminator K7 Barebone System
25 ...Install a CD-ROM Drive
5. Connect a power cable from the power supply to Pin 1 Power Cable (P6)
8. Connect the other end of the audio cable to the secondary IDE connector (black connector labeled IDE2) on the motherboard...
E732 MANUAL TERMINATOR K7 English V1.0 - Page 27

... (PCI1) PCI Slot 2 (PCI2)
ASUS Terminator K7 Barebone System
27 If you wish to install a PCI card, refer to the slot opening on its metal bracket to the instructions in this section.
Place the chassis on ...slot. Remove the metal bracket
cover opposite the PCI slot marked PCI1. 2.8 Install a PCI Expansion Card
The motherboard has two 32-bit PCI slots (one shared with a bracket screw. ...
E732 MANUAL TERMINATOR K7 English V1.0 - Page 29

... PWR Ground ExtSMI# TB_LED +5 V
USB1 Connector PANEL Connector IDELED Lead Pin 1
Message LED SMI Lead
Reset SW
ATX Power Switch*
* Requires an ATX power supply. 2.9.2 Motherboard Connectors
The figures below show the specific connectors on the Motherboard
ASUS Terminator K7 Barebone System
29 You must be connected.
FLOUT Lead (for Line Out Cable) MIC2 Lead (for Microphone Cable)
Front...
E732 MANUAL TERMINATOR K7 English V1.0 - Page 31

... the cover is fully engaged to the edges of the chassis. Lock the cover with the captive thumbscrew on the chassis indicating that it fits. ASUS Terminator K7 Barebone System
31
Push the cover towards the rear until it is in place.
E732 MANUAL TERMINATOR K7 English V1.0 - Page 33

... latch down and latch off for shorting +5V, +12V, -12V, -5V, or +3.3V. at 115Vac 2A max. ASUS Terminator K7 Barebone System
33 at 25°C
Efficiency
70% min. 2.12 Power Supply Specifications
Input Characteristics
Input Voltage Range
Min
Nom
Max
Range 1
90V
115V
135V
Range 2
180V
230V
265V
Input Frequency Range 47 Hz to 63 Hz...
E732 MANUAL TERMINATOR K7 English V1.0 - Page 35
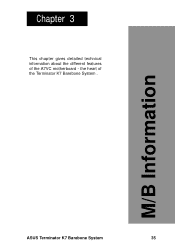
the heart of the A7VC motherboard - Chapter 3
This chapter gives detailed technical information about the different features of the Terminator K7 Barebone System .
M/B Information
ASUS Terminator K7 Barebone System
35
E732 MANUAL TERMINATOR K7 English V1.0 - Page 61
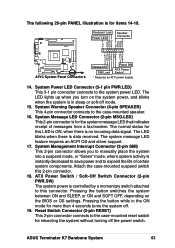
...requires an ACPI OS and driver support.
17. The normal ...manually place the system into a suspend mode, or "Green" mode, where system activity is data received. Keyboard Lock Power...Power Switch*
* Requires an ATX power supply.
14. ASUS Terminator K7 Barebone System
61
System Management Interrupt Connector (2-pin SMI) This 2-pin connector allows you turn on the BIOS or OS settings...
E732 MANUAL TERMINATOR K7 English V1.0 - Page 65

...Fast Ethernet NIC Driver.
• ASUS PC Probe V2.14.06: Installs a smart utility that can monitor the computer fan, temperature, and voltages.
• ASUS Update V3.28.04: Installs the ASUS Update program. ASUS Terminator K7 Barebone System
65 This program allows you should install a network card and a TCP/IP network driver.
• Microsoft DirectX 8.0a Driver: Installs the Microsoft Direct...
E732 MANUAL TERMINATOR K7 English V1.0 - Page 101

... Saving]
ASUS Terminator K7 Barebone System
101 When set to predefined value that the system inactivity period is almost the same as [Max Saving] except that ensures maximum power savings. Power Management [...the power saving features; [User Define] allows you to reduce power consumption. 5.6 Power Menu
The Power menu allows you to make your preference. This feature turns off the video ...
Asus Terminator K7 Reviews
We have not received any reviews for Asus yet.