Asus RS161-E2 - 0 MB RAM Support and Manuals
Get Help and Manuals for this Asus item
View All Support Options Below
Free Asus RS161-E2 manuals!
Problems with Asus RS161-E2?
Ask a Question
Free Asus RS161-E2 manuals!
Problems with Asus RS161-E2?
Ask a Question
Popular Asus RS161-E2 Manual Pages
User Manual - Page 19

Grooves
3.
ASUS RS161-E2/PA2
2-3
Drive in place.
4. Side markings
2. Tighten the thumbscrews on the rear to the grooves on each side) are aligned to secure the cover. Thumbscrews
5. Make sure that the side markings on the cover (two on the chassis.
2.1.2 Installing the cover
1. Position the cover on top of the chassis with the thumbscrews...
User Manual - Page 21

...(ZIF) sockets designed for AMD Opteron™ 64 processors. Notched corner
2.3.2 Installing the CPU
To install a CPU: 1. Locate the CPU socket on the socket to ensure correct installation.
ASUS RS161-E2/PA2
2-5 The 128-bit-wide data paths of the notched corner on the CPU.
This corner should match a specific corner on the motherboard.
K8N-DRE
¤
CPU2
CPU1
CPU2
CPU1
K8N...
User Manual - Page 25

...
104 Pins
80 Pins
80 Pins
104 Pins
K8N-DRE 184-pin DDR DIMM sockets
For CPU 1 Channel A Channel B For CPU 2 Channel A Channel B
Sockets DIMM_A1 and DIMM_A2 DIMM_B1 and DIMM_B2
Sockets DIMM_C1 and DIMM_C2 DIMM_D1 and DIMM_D2
ASUS RS161-E2/PA2
2-9 2.4 System memory
2.4.1 Overview
The motherboard comes with eight 184-pin Double Data Rate (DDR) Dual Inline...
User Manual - Page 51

... you press a key on the +5VSB lead, and a corresponding setting in the BIOS. Gigabit LAN1 controller setting (3-pin LAN1_EN1)
This jumper allows you to wake up feature. Keyboard power (3-pin KBPWR1)
This jumper allows you to activate the Gigabit LAN feature.
K8N-DRE
¤
LAN1_EN1
1 2
Enable (Default)
2 3
Disable
K8N-DRE LAN1_EN1 setting
ASUS RS161-E2 (PA2)
4-5 This feature...
User Manual - Page 53

... OFF your computer. 9. When finished, shut down the key during the boot process and enter BIOS
setup to recover your computer. 7. BIOS Recovery (3-pin RECOVERY1)
This jumper allows you to re-enter data. K8N-DRE
¤
RECOVERY1
1 2
Normal (Default)
2 3
BIOS recovery
K8N-DRE BIOS recovery setting
ASUS RS161-E2 (PA2)
4-7 To recover the BIOS: 1. Insert a floppy disk...
User Manual - Page 73

.... ASUS RS161-E2/PA2
5-11 For example, you wish to enter Setup after changing any BIOS settings, load the default settings to enter the Setup utility;
See section "5.7 Exit Menu."
• The BIOS setup screens shown in the future. This section explains how to use the Setup program, you can change the power management settings. 5.2 BIOS setup program
This motherboard supports...
User Manual - Page 75

...displays the specific items for the menu items. If an item is userconfigurable, you can change the value of a ....
ASUS RS161-E2/PA2
5-13 To display the sub-menu, select the item and press .
5.2.6 Configuration fields
These fields show the values for... value of options. A configurable field is enclosed in brackets, and is not user-configurable. Press the Up/Down arrow keys or / keys to...
User Manual - Page 89
...specific keys on the keyboard to turn on the system.
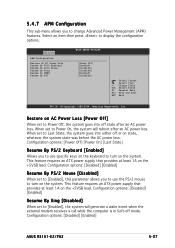
5.4.7 APM Configuration
This sub-menu allows you to display the configuration options. Advanced
APM Configuration
Restore On AC Power Loss Resume by PS/2 Keyboard Resume by PS/2 Mouse Resume by Ring Resume by PME# Resume by RTC
BIOS SETUP... options: [Disabled] [Enabled]
ASUS RS161-E2/PA2
5-27 When set to Power On, the system ...
User Manual - Page 91

...o n t 1 T e m p e r a t u r e items appear when you to scroll down arrow key to set the CPU and system threshold temperature before the Smart Fan Control is installed in CPU 2 socket.
CPU1/CPU2 Temperature [XXX] Front1 Temperature [XXX]
Allows you enable the S m a r t F a... the voltage output through the onboard voltage regulators. ASUS RS161-E2/PA2
5-29
Use the down the menu.
3.3V ...
User Manual - Page 93

... [VT100] [VT-UTF8]
VT-UTF8 Combo Key Support [Disabled]
Enables or disables the VT-UTF8 combo key support for console redirection. Configuration options: [Disabled] [Enabled]
ASUS RS161-E2/PA2
5-31 Some operating system may not work when set to select the target terminal type. Configuration options: [COM1] [COM2]
Baudrate [57600]
Sets the baudrate. Configuration options: [Disabled] [Boot...
User Manual - Page 99

Wait for the F1 key to be pressed when error occurs. Configuration options: [Disabled] [Enabled]
ASUS RS161-E2/PA2
5-37 Configuration options: [Disabled] [Enabled]
Hit 'DEL' Message Display [Enabled]
When set to Enabled, the system waits for 'F1' If Error [Enabled]
When set to Enabled, the system displays the message "Press DEL to trap Interrupt 19. Configuration options: [Disabled] [...
User Manual - Page 107

... Disks Loc Disk Model Name
1.0.M 1.1.M 2.0.M 2.1.M
XXXXXXXXXXXXXXXXXX XXXXXXXXXXXXXXXXXX XXXXXXXXXXXXXXXXXX XXXXXXXXXXXXXXXXXX
[→] Add
[←] Del
[F6] Back [F7] Finish [TAB] Navigate [↑↓] Select [ENTER] Popup
At the bottom section of the screen are the navigation keys. These keys allow you to display the utility main menu. ASUS RS161-E2/PA2
6-5 6.2.2 Entering the NVIDIA...
User Manual - Page 111

...Enter] OK [Esc] Cancel
ASUS RS161-E2/PA2
6-9 Array List - RAID Mode: Striping Striping Width: 1
Striping Block: 64K
Adapt Channel M/S
2
1
1
0
Master Master
Index Disk Model Name
0
XXXXXXXXXXXXXXXXX
1
XXXXXXXXXXXXXXXXX
Capacity
XXX.XXGB XXX.XXGB
[↑↓] Select [F6] Back [F7] Finish
4. Use the up or down arrow keys to select a the RAID set you want to cancel. The...
User Manual - Page 113

...? [Y] Yes [N] Cancel
ASUS RS161-E2/PA2
6-11 The following confirmation message appears. To clear the disk data:
1.
Array Detail -
A confirmation message appears. The RAID set , then press .
NVIDIA RAID Utility Oct 5 2004 - RAID Mode: Striping Striping Width: 1
Striping Block: 64K
Adapt Channel M/S
2
1
1
0
Master Master
Index Disk Model Name
0
XXXXXXXXXXXXXXXXX...
User Manual - Page 117

... the floppy disk. ASUS RS161-E2/PA2
7-3 When the D r i v e r s menu appears, click N V I D I A n F o r c e ( T M ) R A I D
D r i v e r D i s k to install the RAID drivers. The RAID drivers are installing a third-party RAID driver.
2. 6. To install the RAID driver:
1. Follow screen instructions to create an nVIDIA nForce RAID driver disk. Place the motherboard support CD in Windows...
Asus RS161-E2 Reviews
We have not received any reviews for Asus yet.