Asus S1-P112 - S-presso - 0 MB RAM Support and Manuals
Get Help and Manuals for this Asus item
View All Support Options Below
Free Asus S1-P112 manuals!
Problems with Asus S1-P112?
Ask a Question
Free Asus S1-P112 manuals!
Problems with Asus S1-P112?
Ask a Question
Popular Asus S1-P112 Manual Pages
Spresso Hardware User Manual - Page 4
...
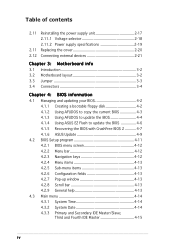
2.11
2.11 2.12
Reinstalling the power supply unit 2-17 2.11.1 Voltage selector 2-18 2.11.2 Power supply specifications 2-19 Replacing the cover 2-20 Connecting external devices 2-21
Chapter 3: Motherboard info
3.1 Introduction 3-2 3.2 Motherboard layout 3-2 3.3 Jumper 3-3 3.4 Connectors 3-4
Chapter 4: BIOS information
4.1 Managing and updating your BIOS 4-2 4.1.1 Creating a bootable...
Spresso Hardware User Manual - Page 8
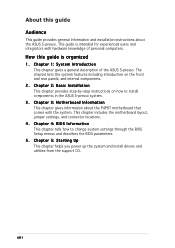
...BIOS Setup menus and describes the BIOS parameters.
5. This chapter includes the motherboard layout, jumper settings, and connector locations.
4.
Chapter 2: Basic Installation This chapter provides step-by-step instructions on the front and rear panels, and internal components.
2. Chapter 3: Motherboard Information This chapter gives information about the ASUS S-presso. This guide is...
Spresso Hardware User Manual - Page 10
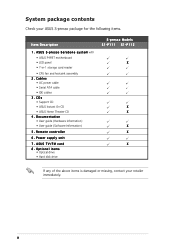
...• Serial ATA cable • IDE cables 3. Power supply unit
7 . CDs • Support CD • ASUS Instant On CD • ASUS Home Theater CD 4 . Remote controller
6 . Optional items
• Optical drive • Hard disk drive
S-presso Models S1-P111 S1-P112
X
X X X X X
If any of the above items is damaged or missing, contact your ASUS S-presso package for the following items.
Item...
Spresso Hardware User Manual - Page 12
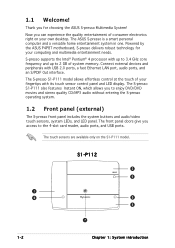
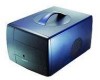
... LED panel. The S-presso S1-P111 model allows effortless control at the touch of system memory. Powered by the ASUS P4P8T motherboard, S-presso delivers robust technology for choosing the ASUS S-presso Multimedia System!
The touch sensors are available only on your own desktop.
S1-P112
3 4
1
2
5
6
7
1-2
Chapter 1: System introduction The S-presso S1-P111 also features Instant...
Spresso Hardware User Manual - Page 25
...
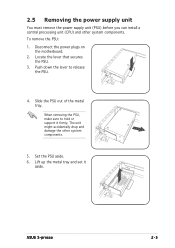
the PSU. 3. Push down the lever to hold or support it
aside. Set the PSU aside. 6. Disconnect the power plugs on
the motherboard. 2. When removing the PSU, make sure to release
the PSU.
4. ASUS S-presso
2-5 2.5 Removing the power supply unit
You must remove the power supply unit (PSU) before you can install a central processing unit (CPU) and other system components...
Spresso Hardware User Manual - Page 33
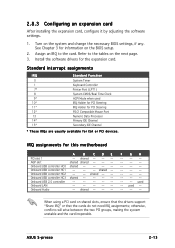
... IDE Channel
* These IRQs are usually available for information on the next page.
3. ASUS S-presso
2-13
shared -- -- -- 2.8.3 Configuring an expansion card
After installing the expansion card, configure it by adjusting the software settings.
1. Turn on shared slots, ensure that the drivers support "Share IRQ" or that the cards do not need IRQ assignments;
Onboard USB controller...
Spresso Hardware User Manual - Page 35
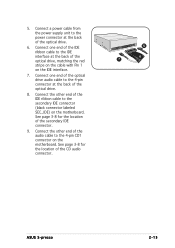
... the back of the optical drive.
6. Connect a power cable from the power supply unit to the IDE interface at the back of the optical drive, matching the red stripe on the cable with Pin 1 on the motherboard. Connect the other end of the CD audio connector.
5 6 7
ASUS S-presso
2-15 Connect the other end of the...
Spresso Hardware User Manual - Page 37

2.11 Reinstalling the power supply unit
Re-install the power supply unit (PSU) after installing the system components and reconnecting the cables. Replace the metal tray. See next page for details.
Make sure
that the PSU cables do not interfere with the CPU and/or chassis fans. Connect the power plugs to their respective grooves.
2.
ASUS S-presso
2-17 Slide the PSU...
Spresso Hardware User Manual - Page 39
ASUS S-presso
2-19
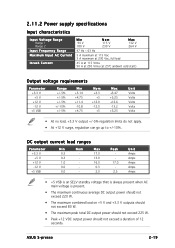
2.11.2 Power supply specifications
Input characteristics
Input Voltage Range Range 1 Range 2
Input Frequency Range Maximum Input AC Current
...standby voltage that is always present when AC main voltage is present.
• The maximum continuous average DC output power should not exceed 220 W.
• The maximum combined load on +5 V and +3.3 V outputs should not exceed 80 ...
Spresso Hardware User Manual - Page 49
... boot up.
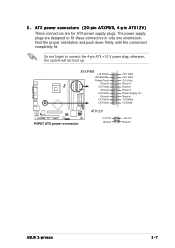
The power supply plugs are for ATX power supply plugs. ATXPWR
+12.0Volts +5V Standby Power Good
Ground +5.0 Volts
Ground +5.0 Volts
Ground +3.3 Volts +3.3 Volts
P4P8T
®
P4P8T ATX power connector
ATX12V
+12V DC Ground
+5.0 Volts +5.0 Volts -5.0 Volts Ground Ground Ground Power Supply On Ground -12.0Volts +3.3Volts
+12V DC Ground
ASUS S-presso
3-7 5 .
Find the proper...
Spresso Hardware User Manual - Page 53
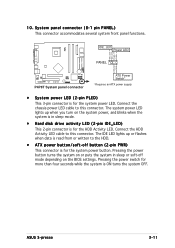
... settings. Pressing the power switch for more than four seconds while the system is for the system power button. IDE_LED Power LED
IDE_LEDIDE_LED+ PLEDPLED+
PANEL
Ground PWR
P4P8T
®
P4P8T System panel connector
ATX Power Switch*
* Requires an ATX power supply.
• System power LED (2-pin PLED)
This 3-pin connector is read from or written to this connector. ASUS S-presso...
Spresso Hardware User Manual - Page 63
X X. ASUS S-presso
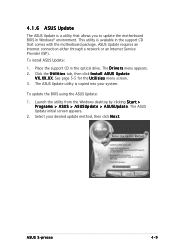
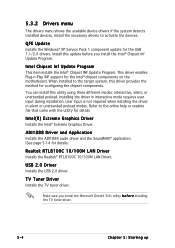
4-9 4.1.6 ASUS Update
The ASUS Update is available in the support CD that allows you to update the motherboard BIOS in the optical drive. X X .
This utility is a utility that comes with the motherboard package. Place the support CD in Windows® environment. To update the BIOS using the ASUS Update:
1. Launch the utility from the Windows desktop by ...
Spresso Hardware User Manual - Page 81
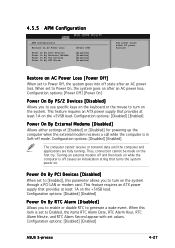
... By PCI Devices Power On By RTC Alarm
[Power Off]
[Disabled] [Disabled] [Disabled] [Disabled]
Set power state after AC power failure. This feature requires an ATX power supply that provides at least 1A on the +5VSB lead. When this parameter allows you to enable or disable RTC to turn on .
Configuration options: [Disabled] [Enabled]
ASUS S-presso
4-27 Configuration options...
Spresso Hardware User Manual - Page 94
...Update
Installs the Windows® XP Service Pack 1 component update for configuring the chipset components. Install this utility using three different modes: interactive, silent, or unattended preload. Intel Chipset Inf Update Program
This item installs the Intel® Chipset INF Update Program. When installed to the target system, this driver provides the method for the USB 1.1/2.0 drivers...
Spresso Hardware User Manual - Page 104
...t s and Virtual Ear.
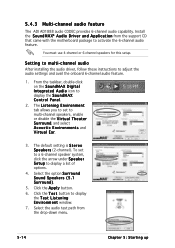
3. Setting to multi-channel audio
After installing the audio driver, follow these instructions to activate the 6-channel audio feature. Select the option S u r r o u n d Sound Speakers (5.1 S u r r o u n d ).
5.
Select the audio test path from the support CD that came with the motherboard package to adjust the audio settings and avail the onboard 6-channel audio feature...
Asus S1-P112 Reviews
We have not received any reviews for Asus yet.