User Manual
Page 4
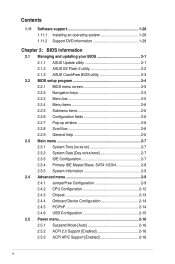
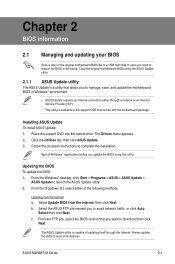
....2 Support DVD information 1-28 Chapter 2: BIOS information 2.1 Managing and updating your BIOS 2-1 2.1.1 ASUS Update utility 2-1 2.1.2 ASUS EZ Flash 2 utility 2-2 2.1.3 ASUS CrashFree BIOS utility 2-3 2.2 BIOS setup program 2-4 2.2.1 BIOS menu screen 2-5 2.2.3 Navigation keys 2-5 2.2.2 Menu bar 2-5 2.2.4 Menu items 2-6 2.2.5 Submenu items 2-6 2.2.6 Configuration fields 2-6 2.2.7 Pop-up window 2-6 2.2.8 Scroll bar 2-6 2.2.9 General help 2-6 2.3 Main menu 2-7 2.3.1 System Time [xx:xx:xx 2-7 2.3.2 System...
....2 Support DVD information 1-28 Chapter 2: BIOS information 2.1 Managing and updating your BIOS 2-1 2.1.1 ASUS Update utility 2-1 2.1.2 ASUS EZ Flash 2 utility 2-2 2.1.3 ASUS CrashFree BIOS utility 2-3 2.2 BIOS setup program 2-4 2.2.1 BIOS menu screen 2-5 2.2.3 Navigation keys 2-5 2.2.2 Menu bar 2-5 2.2.4 Menu items 2-6 2.2.5 Submenu items 2-6 2.2.6 Configuration fields 2-6 2.2.7 Pop-up window 2-6 2.2.8 Scroll bar 2-6 2.2.9 General help 2-6 2.3 Main menu 2-7 2.3.1 System Time [xx:xx:xx 2-7 2.3.2 System...
User Manual
Page 9
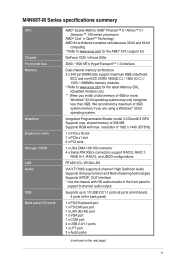
... RGB with HD audio module in the front panel to support 8-channel audio output. Integrated Programmable Shader model 3.0 DirectX 9 GPU Supports max. M4N68T-M Series specifications summary CPU Chipset Front side bus Memory Graphics Expansion slots Storage / RAID LAN Audio USB Back panel I/O ports AMD® Socket...x 240-pin DIMM slots support maximum 8GB unbuffered ECC and non-ECC DDR3 1800(O.C.) / 1600 (O.C.) / 1333 / 1066MHz memory modules * Refer to www.asus.com for the latest Memory QVL (Qualified Vendors List). ** When you are using a Windows® 32-bit operating system.
... RGB with HD audio module in the front panel to support 8-channel audio output. Integrated Programmable Shader model 3.0 DirectX 9 GPU Supports max. M4N68T-M Series specifications summary CPU Chipset Front side bus Memory Graphics Expansion slots Storage / RAID LAN Audio USB Back panel I/O ports AMD® Socket...x 240-pin DIMM slots support maximum 8GB unbuffered ECC and non-ECC DDR3 1800(O.C.) / 1600 (O.C.) / 1333 / 1066MHz memory modules * Refer to www.asus.com for the latest Memory QVL (Qualified Vendors List). ** When you are using a Windows® 32-bit operating system.
User Manual
Page 22
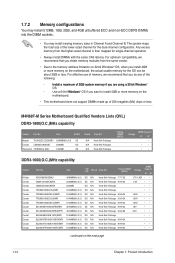
...65533;w��s® OS. - For effective use of memory, we recommend that you install 4GB or more memory on 32-bit Windows® OS, when you do any of 256 megabits (Mb) chips or less. Size SS/DS Brand Chip NO. Use a 64...Any excess memory from the same vendor. • Due to install 4GB or more memory on the next page 1-12 Chapter 1: Product introduction M4N68T-M Series Motherboard Qualified Vendors Lists (QVL) DDR3-1800(O.C.)MHz capability Vendor Part No. AD31600X002GMU CM3X1G1600C9DHX CM3X2G1600C9DHX TR3X6G1600C8 G(XMP) TR3X6G1600C8D G(XMP) TR3X6G1600C9 G(...
...65533;w��s® OS. - For effective use of memory, we recommend that you install 4GB or more memory on 32-bit Windows® OS, when you do any of 256 megabits (Mb) chips or less. Size SS/DS Brand Chip NO. Use a 64...Any excess memory from the same vendor. • Due to install 4GB or more memory on the next page 1-12 Chapter 1: Product introduction M4N68T-M Series Motherboard Qualified Vendors Lists (QVL) DDR3-1800(O.C.)MHz capability Vendor Part No. AD31600X002GMU CM3X1G1600C9DHX CM3X2G1600C9DHX TR3X6G1600C8 G(XMP) TR3X6G1600C8D G(XMP) TR3X6G1600C9 G(...
User Manual
Page 34
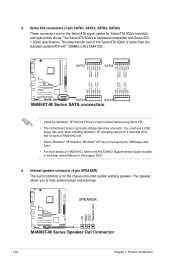
... GND RSATA_TXP2 RSATA_TXN2 GND RSATA_RXP2 RSATA_RXN2 GND GND RSATA_RXN3 RSATA_RXP3 GND RSATA_TXN3 RSATA_TXP3 GND GND RSATA_RXN1 RSATA_RXP1 GND RSATA_TXN1 RSATA_TXP1 GND M4N68T-M V2 SATA1 SATA3 M4N68T-M Series SATA connectors • Install the Windows® XP Service Pack 2 or later versions before using Serial ATA. • The motherboard does not provide a floppy disk drive...
... GND RSATA_TXP2 RSATA_TXN2 GND RSATA_RXP2 RSATA_RXN2 GND GND RSATA_RXN3 RSATA_RXP3 GND RSATA_TXN3 RSATA_TXP3 GND GND RSATA_RXN1 RSATA_RXP1 GND RSATA_TXN1 RSATA_TXP1 GND M4N68T-M V2 SATA1 SATA3 M4N68T-M Series SATA connectors • Install the Windows® XP Service Pack 2 or later versions before using Serial ATA. • The motherboard does not provide a floppy disk drive...
User Manual
Page 38
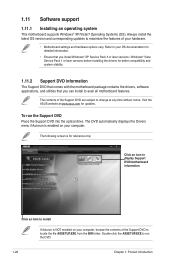
...that you can install to locate the file ASSETUP.EXE from the BIN folder. 1.11 Software support 1.11.1 Installing an operating system This motherboard supports Windows® XP/Vista/7 Operating Systems (OS). The contents of the Support DVD to avail all motherboard features. To run the DVD. 1-28 Chapter 1:...run the Support DVD Place the Support DVD into the optical drive. Double-click the ASSETUP.EXE to change at www.asus.com for reference only. Visit the ASUS website at any time without notice. Refer to install If Autorun is for updates. Click an icon to display Support ...
...that you can install to locate the file ASSETUP.EXE from the BIN folder. 1.11 Software support 1.11.1 Installing an operating system This motherboard supports Windows® XP/Vista/7 Operating Systems (OS). The contents of the Support DVD to avail all motherboard features. To run the DVD. 1-28 Chapter 1:...run the Support DVD Place the Support DVD into the optical drive. Double-click the ASSETUP.EXE to change at www.asus.com for reference only. Visit the ASUS website at any time without notice. Refer to install If Autorun is for updates. Click an icon to display Support ...
User Manual
Page 39
... Service Provider (ISP). • This utility is capable of the following methods: Updating from the Internet, then click Next. c. ASUS M4N68T-M Series 2-1 Select Update BIOS from the Internet a. The Drivers menu appears. 2. Quit all its features. b. From the FTP site... the utility to launch the ASUS Update utility. 2. From the Windows® desktop, click Start > Programs > ASUS > ASUS Update > ASUS Update to avail all Windows® applications before you update the BIOS using the ASUS Update utility. 2.1.1 ASUS Update utility The ASUS Update is a utility that ...
... Service Provider (ISP). • This utility is capable of the following methods: Updating from the Internet, then click Next. c. ASUS M4N68T-M Series 2-1 Select Update BIOS from the Internet a. The Drivers menu appears. 2. Quit all its features. b. From the FTP site... the utility to launch the ASUS Update utility. 2. From the Windows® desktop, click Start > Programs > ASUS > ASUS Update > ASUS Update to avail all Windows® applications before you update the BIOS using the ASUS Update utility. 2.1.1 ASUS Update utility The ASUS Update is a utility that ...
User Manual
Page 40
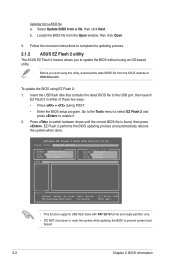
..., then click Next. ASUSTek EZ Flash 2 BIOS ROM Utility V3.44 FLASH TYPE: WINBOND W25X80 Current ROM BOARD: M4N68T-M-V2 VER: 0303 (H:00 B:01) DATE: xx/07/2010 Update ROM BOARD: Unknown VER: Unknown DATE: Unknown ...: • Press + during POST. • Enter the BIOS setup program. Updating from the Open window, then click Open. 3. Insert the USB flash disk that contains the latest BIOS file to switch between...Before you to complete the updating process. 2.1.2 ASUS EZ Flash 2 utility The ASUS EZ Flash 2 feature allows you start using EZ Flash 2: 1. b. Select Update BIOS from...
..., then click Next. ASUSTek EZ Flash 2 BIOS ROM Utility V3.44 FLASH TYPE: WINBOND W25X80 Current ROM BOARD: M4N68T-M-V2 VER: 0303 (H:00 B:01) DATE: xx/07/2010 Update ROM BOARD: Unknown VER: Unknown DATE: Unknown ...: • Press + during POST. • Enter the BIOS setup program. Updating from the Open window, then click Open. 3. Insert the USB flash disk that contains the latest BIOS file to switch between...Before you to complete the updating process. 2.1.2 ASUS EZ Flash 2 utility The ASUS EZ Flash 2 feature allows you start using EZ Flash 2: 1. b. Select Update BIOS from...
User Manual
Page 44
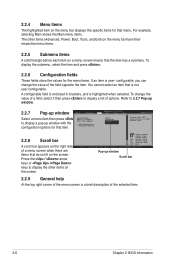
...enclosed in brackets, and is user- To change the value of the field opposite the item. Refer to 2.2.7 Pop-up window. 2.2.7 Pop-up window Main Advanced M4N68T-M-V2 UTILITY Power Boot Tools Exit Select a menu item then press Suspend Mode ACPI 2.0 Support ACPI APIC support to display... Item +- For example, selecting Main shows the Main menu items. The other items on a menu screen means that menu. Pop-up window with the APM Configuration configuration options for that the item has a submenu. 2.2.4 Menu items The highlighted item on the screen. Hardware Monitor...
...enclosed in brackets, and is user- To change the value of the field opposite the item. Refer to 2.2.7 Pop-up window. 2.2.7 Pop-up window Main Advanced M4N68T-M-V2 UTILITY Power Boot Tools Exit Select a menu item then press Suspend Mode ACPI 2.0 Support ACPI APIC support to display... Item +- For example, selecting Main shows the Main menu items. The other items on a menu screen means that menu. Pop-up window with the APM Configuration configuration options for that the item has a submenu. 2.2.4 Menu items The highlighted item on the screen. Hardware Monitor...
User Manual
Page 57
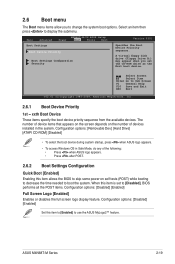
...-ROM] [Disabled] • To select the boot device during system startup, press when ASUS logo appears. • To access Windows OS in Safe Mode, do any of the following: • Press when ASUS logo appears. • Press after POST. 2.6.2 Boot Settings Configuration Quick Boot [Enabled]...all the POST items. Configuration options: [Disabled] [Enabled] Full Screen Logo [Enabled] Enables or disables the full screen logo display feature. ASUS M4N68T-M Series 2-19 2.6 Boot menu The Boot menu items allow you set to change the system boot options. When this item to [Enabled]...
...-ROM] [Disabled] • To select the boot device during system startup, press when ASUS logo appears. • To access Windows OS in Safe Mode, do any of the following: • Press when ASUS logo appears. • Press after POST. 2.6.2 Boot Settings Configuration Quick Boot [Enabled]...all the POST items. Configuration options: [Disabled] [Enabled] Full Screen Logo [Enabled] Enables or disables the full screen logo display feature. ASUS M4N68T-M Series 2-19 2.6 Boot menu The Boot menu items allow you set to change the system boot options. When this item to [Enabled]...

User Manual
Page 62
Select one of the parameters on even when the PC is turned off. After selecting this option, a confirmation window appears. Select OK to discard the selections you made and restore the previously saved values. Exit & Save Changes Once you are saved to the CMOS .... An onboard backup battery sustains the CMOS RAM so it stays on the Setup menus. Select OK to save the changes that you press , a confirmation window appears. If you to discard any changes and load the previously saved values. Discard Changes This option allows you made to the BIOS items. Main...
Select one of the parameters on even when the PC is turned off. After selecting this option, a confirmation window appears. Select OK to discard the selections you made and restore the previously saved values. Exit & Save Changes Once you are saved to the CMOS .... An onboard backup battery sustains the CMOS RAM so it stays on the Setup menus. Select OK to save the changes that you press , a confirmation window appears. If you to discard any changes and load the previously saved values. Discard Changes This option allows you made to the BIOS items. Main...


