User Manual
Page 3
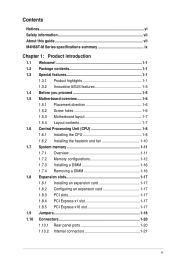
Contents Notices...vi Safety information vii About this guide vii M4N68T-M Series specifications summary ix Chapter 1: Product introduction 1.1 Welcome 1-1 1.2 Package contents 1-1 1.3 Special features 1-1 1.3.1 Product highlights 1-1 1.3.2 Innovative ASUS features 1-3 1.4 Before you proceed 1-5 1.5 Motherboard overview 1-6 1.5.1 Placement direction 1-6 1.5.2 Screw holes 1-6 1.5.3 Motherboard layout 1-7 1.5.4 Layout contents 1-7 1.6 Central Processing Unit (CPU 1-8 1.6.1 Installing the CPU 1-8 1.6.2 Installing the heatsink and fan 1-10...
Contents Notices...vi Safety information vii About this guide vii M4N68T-M Series specifications summary ix Chapter 1: Product introduction 1.1 Welcome 1-1 1.2 Package contents 1-1 1.3 Special features 1-1 1.3.1 Product highlights 1-1 1.3.2 Innovative ASUS features 1-3 1.4 Before you proceed 1-5 1.5 Motherboard overview 1-6 1.5.1 Placement direction 1-6 1.5.2 Screw holes 1-6 1.5.3 Motherboard layout 1-7 1.5.4 Layout contents 1-7 1.6 Central Processing Unit (CPU 1-8 1.6.1 Installing the CPU 1-8 1.6.2 Installing the heatsink and fan 1-10...
User Manual
Page 16
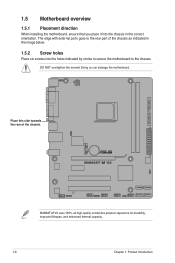
... indicated in the correct orientation. The edge with external ports goes to the chassis. M4N68T-M V2 M4N68T-M V2 uses 100% all high-quality conductive polymer capacitors for durability, improved lifespan, and enhanced thermal capacity. 1-6 Chapter 1: Product introduction 1.5 Motherboard overview 1.5.1 Placement direction When installing the motherboard, ensure that you place it into the chassis...
... indicated in the correct orientation. The edge with external ports goes to the chassis. M4N68T-M V2 M4N68T-M V2 uses 100% all high-quality conductive polymer capacitors for durability, improved lifespan, and enhanced thermal capacity. 1-6 Chapter 1: Product introduction 1.5 Motherboard overview 1.5.1 Placement direction When installing the motherboard, ensure that you place it into the chassis...
User Manual
Page 21
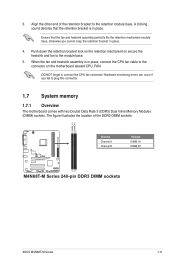
...Align the other end of the DDR3 DIMM sockets: DIMM_A1 DIMM_B1 M4N68T-M V2 Channel Channel A Channel B Sockets DIMM_A1 DIMM_B1 M4N68T-M Series 240-pin DDR3 DIMM sockets ASUS M4N68T-M Series 1-11 Push down the retention bracket lock on the ...motherboard labeled CPU_FAN. Ensure that the retention bracket is in place, connect the CPU fan cable to connect the CPU fan connector! 3. The figure illustrates the location of the retention bracket to plug this connector. 1.7 System memory 1.7.1 Overview...
...Align the other end of the DDR3 DIMM sockets: DIMM_A1 DIMM_B1 M4N68T-M V2 Channel Channel A Channel B Sockets DIMM_A1 DIMM_B1 M4N68T-M Series 240-pin DDR3 DIMM sockets ASUS M4N68T-M Series 1-11 Push down the retention bracket lock on the ...motherboard labeled CPU_FAN. Ensure that the retention bracket is in place, connect the CPU fan cable to connect the CPU fan connector! 3. The figure illustrates the location of the retention bracket to plug this connector. 1.7 System memory 1.7.1 Overview...
User Manual
Page 45
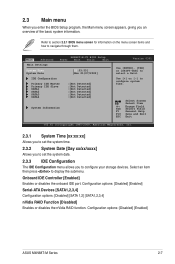
... information on the menu screen items and how to select a field. Main Advanced Main Settings M4N68T-M-V2 BIOS Setup Power Boot Tools Exit System Time [22:03:55] System Date [Mon 01...to navigate through them. Onboard IDE Controller [Enabled] Enables or disables the onboard IDE port. Configuration options: [Disabled] [Enabled] ASUS M4N68T-M Series 2-7 2.3 Main menu When you enter the BIOS Setup program, the Main menu screen appears, giving you to configure your... date. 2.3.3 IDE Configuration The IDE Configuration menu allows you an overview of the basic system information.
... information on the menu screen items and how to select a field. Main Advanced Main Settings M4N68T-M-V2 BIOS Setup Power Boot Tools Exit System Time [22:03:55] System Date [Mon 01...to navigate through them. Onboard IDE Controller [Enabled] Enables or disables the onboard IDE port. Configuration options: [Disabled] [Enabled] ASUS M4N68T-M Series 2-7 2.3 Main menu When you enter the BIOS Setup program, the Main menu screen appears, giving you to configure your... date. 2.3.3 IDE Configuration The IDE Configuration menu allows you an overview of the basic system information.
User Manual
Page 47
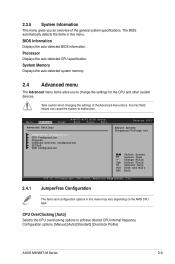
...Advanced menu items allow you an overview of the Advanced menu items. Incorrect field values can cause the system to achieve desired CPU internal frequency. Configuration options: [Manual] [Auto] [Standard] [Overclock Profile] ASUS M4N68T-M Series 2-9 Select Screen Select... Item +- Main Advanced Advanced Settings Power M4N68T-M-V2 BIOS Setup Boot Tools Exit JumperFree Configuration CPU Configuration Chipset Onboard Devices Configuration...
...Advanced menu items allow you an overview of the Advanced menu items. Incorrect field values can cause the system to achieve desired CPU internal frequency. Configuration options: [Manual] [Auto] [Standard] [Overclock Profile] ASUS M4N68T-M Series 2-9 Select Screen Select... Item +- Main Advanced Advanced Settings Power M4N68T-M-V2 BIOS Setup Boot Tools Exit JumperFree Configuration CPU Configuration Chipset Onboard Devices Configuration...