Asus V2-P5P43 Support and Manuals
Get Help and Manuals for this Asus item
View All Support Options Below
Free Asus V2-P5P43 manuals!
Problems with Asus V2-P5P43?
Ask a Question
Free Asus V2-P5P43 manuals!
Problems with Asus V2-P5P43?
Ask a Question
Popular Asus V2-P5P43 Manual Pages
Installation Manual - Page 1
English
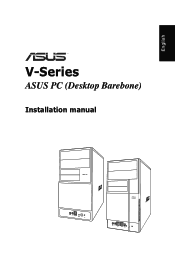
V-Series
ASUS PC (Desktop Barebone)
Installation manual
Installation Manual - Page 2
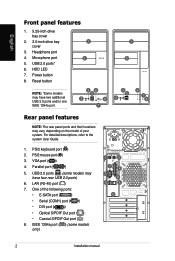
... to the system User Guide.
1. One of your system. Headphone port
4. LAN (RJ-45) port ( )
7. USB 2.0 ports*
6. Power button
8. Reset button
NOTE: *Some models may have two additional USB...)
8. VGA port ( )
4. USB 2.0 ports ( ) (some models only)
1
2
7
4
3 8
5
6
9
Installation manual English
Front panel features
1. 5.25-inch drive bay cover
2. 3.5-inch drive...
Installation Manual - Page 3
... English
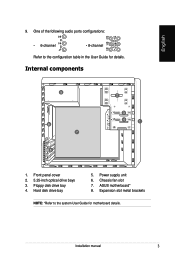
9. One of the following audio ports configurations:
• 6-channel
• 8-channel
Refer to the system User Guide for details. Expansion slot metal brackets
NOTE: *Refer to the configuration table in the User Guide for motherboard details. ASUS motherboard* 8. Front panel cover 2. 5.25-inch optical drive bays 3. Installation manual
Power supply unit 6.
Installation Manual - Page 4
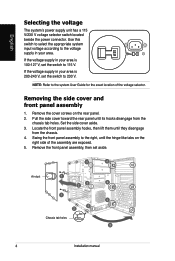
..., then set the switch to 115 V. Set the side cover aside. 3. Use this switch to select the appropriate system input voltage according to the system User Guide for the... If the voltage supply in your area is 100‑127 V, set aside.
3
4
Air duct
1
23
4
1 4
3 2
Chassis tab holes 3
Installation manual Removing the side cover and front panel assembly
1. English
Selecting the ...
Installation Manual - Page 5
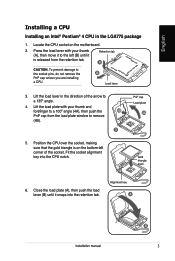
... the socket alignment key into the retention tab. Locate the CPU socket on the bottom‑left (B) until it is on the motherboard.
2.
Alignment key A
Installation manual
B Press the load lever with your thumb (A), then move it to remove
(4B).
3
PnP cap Load plate
4A
5. Retention tab A
CAUTION.
Lift the load lever...
Installation Manual - Page 6

...; Pentium® 4 CPU heatsink and fan
1. A B
B A
1 1
Installation manual
Push down two fasteners at a time in a diagonal sequence to secure the heatsink and ... with the gold
triangle matches the socket corner with a small triangle. 3. Place the heatsink on the motherboard. Install the CPU to the connector on top of the CPU into the socket may bend the pins and severely damage ...
Installation Manual - Page 7

... Retention module base
Installation manual
IMPORTANT. CAUTION. Make ...error can not lock the retention bracket.
2. Place the heatsink on the motherboard.
otherwise you can occur if you fail to the retention module base until it clicks in this connector.
If the instructions in place.
NOTE. Connect the CPU fan cable to the retention module base. 3.
English
Installing...
Installation Manual - Page 8
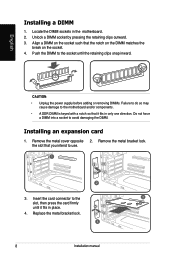
... is keyed with a notch so that you intend to the socket until it fits in only one direction. Remove the metal bracket lock.
Replace the metal bracket lock.
4
Installation manual Push the DIMM to use.
1
2
3.
the slot that it fits in the motherboard. 2. Remove the metal cover opposite 2. Align a DIMM on the socket...
Installation Manual - Page 9
... cover.
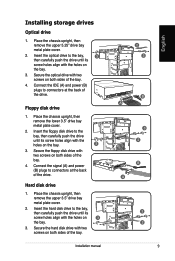
2. Insert the hard disk drive to the
bay, then carefully push the drive
until its screw holes align with two screws on
3
the bay.
3. Installation manual
2 3
B A
3 2 B A
3 2
English
Connect the signal (A) and power (B) plugs to connectors at the back of the drive. Hard disk drive
1.
Connect the IDE (A) and power (B) plugs to...
Installation Manual - Page 10
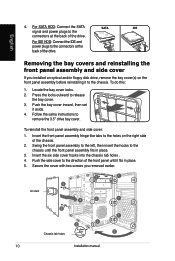
...duct
2
1
5
4
2
1
5
3 Chassis tab holes
1 2
2
10
Installation manual For SATA HDD: Connect the SATA
SATA
IDE
signal and power plugs to the chassis....drive bay cover. Push the bay cover inward, then set
it fits in place.
3.
Push the side cover to...installed an optical and/or floppy disk drive, remove the bay cover(s) on the right side of the drive. Follow the same instructions...
Asus V2-P5P43 Reviews
We have not received any reviews for Asus yet.