
Acer S5-391 Notebook Service Guide
Page 4
Test Compatible Components Microsoft® Windows® 7 Environment Test 7-2 Aspire S5-391 7-2 Chapter 8. FRU (Field Replaceable Unit) List Exploded Diagram 6-3 Main Assembly 6-3 Lower Case Assembly 6-5 Upper Case Assembly 6-6 LCD Assembly 6-7 FRU List 6-9 Screw List 6-14 Chapter 7. Online ...
Test Compatible Components Microsoft® Windows® 7 Environment Test 7-2 Aspire S5-391 7-2 Chapter 8. FRU (Field Replaceable Unit) List Exploded Diagram 6-3 Main Assembly 6-3 Lower Case Assembly 6-5 Upper Case Assembly 6-6 LCD Assembly 6-7 FRU List 6-9 Screw List 6-14 Chapter 7. Online ...
Acer S5-391 Notebook Service Guide
Page 9
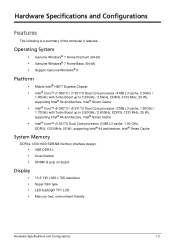
Hardware Specifications and Configurations Features The following is a summary of the computer's features: Operating System • Genuine Windows® 7 Home Premium (64-bit) • Genuine Windows® 7 Home Basic (64-bit) • Support Genuine Windows® 8 Platform • Mobile Intel® HM77 Express Chipset • Intel® Core™ i7-3667U / i7-3517U Dual...
Hardware Specifications and Configurations Features The following is a summary of the computer's features: Operating System • Genuine Windows® 7 Home Premium (64-bit) • Genuine Windows® 7 Home Basic (64-bit) • Support Genuine Windows® 8 Platform • Mobile Intel® HM77 Express Chipset • Intel® Core™ i7-3667U / i7-3517U Dual...
Acer S5-391 Notebook Service Guide
Page 10
... ALC1-VB6 • Combo Audio Jack • Support Dolby HT rev 4.0 or above Communication Webcam • 1.0M high-definition camera • With LED, complies with Windows 8 requirement WLAN • • 802.11 a/b/g/n 2X2 WLAN WiFi, Foxconn MD222 with IOAC LGA package on board WPAN • Support BT 4.0 1-3 Hardware Specifications and Configurations
... ALC1-VB6 • Combo Audio Jack • Support Dolby HT rev 4.0 or above Communication Webcam • 1.0M high-definition camera • With LED, complies with Windows 8 requirement WLAN • • 802.11 a/b/g/n 2X2 WLAN WiFi, Foxconn MD222 with IOAC LGA package on board WPAN • Support BT 4.0 1-3 Hardware Specifications and Configurations
Acer S5-391 Notebook Service Guide
Page 20
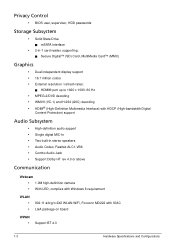
... key has the same effect as clicking the right mouse button. 1-13 Hardware Specifications and Configurations Keyboard Basics 1 23 4 Figure 1-8. See Windows Key on , all alphabetic characters are typed in uppercase. Press to launch the Start menu. • When used with other key combinations ...to perform special functions. • Press to open the context menu of functions. Keyboard # Item 1 Caps Lock Key 2 Fn Function Key 3 Windows Key 4 Application Key Description When Caps Lock is on page 1-14. Use with other keys, provides a variety of the current application.
... key has the same effect as clicking the right mouse button. 1-13 Hardware Specifications and Configurations Keyboard Basics 1 23 4 Figure 1-8. See Windows Key on , all alphabetic characters are typed in uppercase. Press to launch the Start menu. • When used with other key combinations ...to perform special functions. • Press to open the context menu of functions. Keyboard # Item 1 Caps Lock Key 2 Fn Function Key 3 Windows Key 4 Application Key Description When Caps Lock is on page 1-14. Use with other keys, provides a variety of the current application.
Acer S5-391 Notebook Service Guide
Page 21
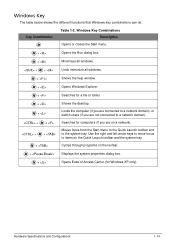
... keys to move focus to items on the toolbar. + Displays the system properties dialog box. + Opens Ease of Access Center (for Windows XP only). Locks the computer (if you are connected to a network domain), or switch users (if you are not connected to the system... tray. Windows Key The table below shows the different functions that Windows key combinations can do: Key Combination Table 1-2. Searches for a file or folder. + + + + + + + Shows the desktop....
... keys to move focus to items on the toolbar. + Displays the system properties dialog box. + Opens Ease of Access Center (for Windows XP only). Locks the computer (if you are connected to a network domain), or switch users (if you are not connected to the system... tray. Windows Key The table below shows the different functions that Windows key combinations can do: Key Combination Table 1-2. Searches for a file or folder. + + + + + + + Shows the desktop....
Acer S5-391 Notebook Service Guide
Page 27
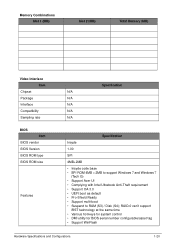
... type BIOS ROM size Features Specification N/A N/A N/A N/A N/A Specification Insyde 1.00 SPI 4MB+2MB • Insyde code base • SPI ROM 4MB + 2MB to support Windows 7 and Windows 7 (Tech G) • Support Acer UI • Complying with Intel Ultrabook Anti-Theft requirement • Support OA 3.0 • UEFI boot as default • Pro-Shield Ready • Support...
... type BIOS ROM size Features Specification N/A N/A N/A N/A N/A Specification Insyde 1.00 SPI 4MB+2MB • Insyde code base • SPI ROM 4MB + 2MB to support Windows 7 and Windows 7 (Tech G) • Support Acer UI • Complying with Intel Ultrabook Anti-Theft requirement • Support OA 3.0 • UEFI boot as default • Pro-Shield Ready • Support...
Acer S5-391 Notebook Service Guide
Page 28
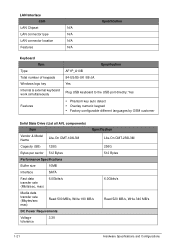
LAN Interface Item LAN Chipset N/A LAN connector type N/A LAN connector location N/A Features N/A Specification Keyboard Item Type Total number of keypads Windows logo key Internal & external keyboard work simultaneously Features AF1P_A10B 84-US/85-UK /88-JA Yes Specification Plug USB keyboard to the USB port directly: ...
LAN Interface Item LAN Chipset N/A LAN connector type N/A LAN connector location N/A Features N/A Specification Keyboard Item Type Total number of keypads Windows logo key Internal & external keyboard work simultaneously Features AF1P_A10B 84-US/85-UK /88-JA Yes Specification Plug USB keyboard to the USB port directly: ...

Acer S5-391 Notebook Service Guide
Page 50
IMPORTANT: • Ensure the AC power adaptor is connected to the power source. • If the Warning message below is shown, check if the AC power adaptor is shown as below. Warning Message • Do not disconnect the AC power adapter. 2-14 System Utilities Figure 2-15. The BIOS flash window is properly connected or not. Figure 2-14. Flash process begins. Updating Flash BIOS The system restarts automatically when finished.
IMPORTANT: • Ensure the AC power adaptor is connected to the power source. • If the Warning message below is shown, check if the AC power adaptor is shown as below. Warning Message • Do not disconnect the AC power adapter. 2-14 System Utilities Figure 2-15. The BIOS flash window is properly connected or not. Figure 2-14. Flash process begins. Updating Flash BIOS The system restarts automatically when finished.

Acer S5-391 Notebook Service Guide
Page 51
WinFlash Utility NOTE: Plug the AC power adaptor to use the WinFlash Utility: 1. Initializing WinFlash Utility System Utilities 2-15 Perform the following to a power source before performing the WinFlash Utility. Double-click on the utility file. Figure 2-16. Boot into Windows OS and search for WinFlash Utility 2. Browsing for WinFlash Utility file. Figure 2-17.
WinFlash Utility NOTE: Plug the AC power adaptor to use the WinFlash Utility: 1. Initializing WinFlash Utility System Utilities 2-15 Perform the following to a power source before performing the WinFlash Utility. Double-click on the utility file. Figure 2-16. Boot into Windows OS and search for WinFlash Utility 2. Browsing for WinFlash Utility file. Figure 2-17.

Acer S5-391 Notebook Service Guide
Page 54
...Write Asset Tag to EEPROM and used in the DMI pool for hardware management. Write Serial Number to the operating system (Windows, etc.). At the command prompt, execute dmitools [argument] [string] with the hardware before sending it to EEPROM Input...: Input: dmitools /r Output: Manufacturer (Type1, Offset04h): Acer Product Name (Type1, Offset05h): Aspire xxxx Serial Number (Type1, Offset07h): 01234567890123456789 UUID String (Type1, Offset08h): xxxxxxxx-xxxx-xxxx-xxxxxxxxxxxxxxxx Asset Tag (Type3, Offset04h): Acer Asstag 2. Read DMI Information from DOS. 2. Miscellaneous Tools...
...Write Asset Tag to EEPROM and used in the DMI pool for hardware management. Write Serial Number to the operating system (Windows, etc.). At the command prompt, execute dmitools [argument] [string] with the hardware before sending it to EEPROM Input...: Input: dmitools /r Output: Manufacturer (Type1, Offset04h): Acer Product Name (Type1, Offset05h): Aspire xxxx Serial Number (Type1, Offset07h): 01234567890123456789 UUID String (Type1, Offset08h): xxxxxxxx-xxxx-xxxx-xxxxxxxxxxxxxxxx Asset Tag (Type3, Offset04h): Acer Asstag 2. Read DMI Information from DOS. 2. Miscellaneous Tools...
Acer S5-391 Notebook Service Guide
Page 61
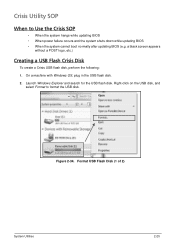
... 2) System Utilities 2-25 a black screen appears without a POST logo, etc.) Creating a USB Flash Crisis Disk To create a Crisis USB flash disk, perform the following: 1. Launch Windows Explorer and search for the USB flash disk. Crisis Utility SOP When to format the USB disk. On a machine with...
... 2) System Utilities 2-25 a black screen appears without a POST logo, etc.) Creating a USB Flash Crisis Disk To create a Crisis USB flash disk, perform the following: 1. Launch Windows Explorer and search for the USB flash disk. Crisis Utility SOP When to format the USB disk. On a machine with...

Acer S5-391 Notebook Service Guide
Page 63
... USB flash disk. System Utilities 2-27 in the root directory of the USB flash disk. Command Line Window 9. Copy the files "Q3ZMC100.bin" and "K99E100A.ROM" to bring out the Command Line window. Combine *.ROM and *.BIN Files NOTE: Make sure the size of "Q3ZMCX64.fd" is 6.12MB ...BIOS (6144 KB) into one ROM (6272 KB) file by typing the following: Copy /b [EC ROM filename] + [BIOS filename] Q3ZMCX64.fd Microsoft Windows [Version 6.1.7601] Copyright (c) 2009 Microsoft Corporation. In Windows OS, unzip the compressed BIOS package (e.g. All rights reserved. F:\> Figure 2-40. 6.
... USB flash disk. System Utilities 2-27 in the root directory of the USB flash disk. Command Line Window 9. Copy the files "Q3ZMC100.bin" and "K99E100A.ROM" to bring out the Command Line window. Combine *.ROM and *.BIN Files NOTE: Make sure the size of "Q3ZMCX64.fd" is 6.12MB ...BIOS (6144 KB) into one ROM (6272 KB) file by typing the following: Copy /b [EC ROM filename] + [BIOS filename] Q3ZMCX64.fd Microsoft Windows [Version 6.1.7601] Copyright (c) 2009 Microsoft Corporation. In Windows OS, unzip the compressed BIOS package (e.g. All rights reserved. F:\> Figure 2-40. 6.

Acer S5-391 Notebook Service Guide
Page 79
... highest brightness setting, the LCD is faulty and should be replaced. Check the display resolution is correctly configured: • Minimize or close all Windows. • If display size is only abnormal in an application, check the view settings and control/ mouse wheel zoom feature in the same... There are no red Xs or yellow exclamation marks • There are no device conflicts • No hardware is discovered. 11. Run the Windows Memory Diagnostic from the operating system DVD and follow the on adjusting the settings. NOTE: Make sure that : • The device is still not...
... highest brightness setting, the LCD is faulty and should be replaced. Check the display resolution is correctly configured: • Minimize or close all Windows. • If display size is only abnormal in an application, check the view settings and control/ mouse wheel zoom feature in the same... There are no red Xs or yellow exclamation marks • There are no device conflicts • No hardware is discovered. 11. Run the Windows Memory Diagnostic from the operating system DVD and follow the on adjusting the settings. NOTE: Make sure that : • The device is still not...

Acer S5-391 Notebook Service Guide
Page 250
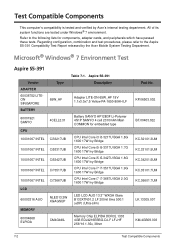
CHAPTER 7 Test Compatible Components Test Compatible Components 7-2 Microsoft® Windows® 7 Environment Test 7-2
CHAPTER 7 Test Compatible Components Test Compatible Components 7-2 Microsoft® Windows® 7 Environment Test 7-2
Acer S5-391 Notebook Service Guide
Page 251
Refer to the Aspire S5-391 Compatibility Test Report released by Acer's internal testing department. Aspire S5-391 Description 65W_HF Adapter LITE-ON 65W_HF 19V 1.1x3.0x7.5 Yellow PA-1650-80AH LF 4CELL2.31 Battery SANYO AP12B3F Li-Polymer 4S1P SANYO 4...33101.5UM KC.34201.5UM KC.35101.7UM KC.36601.7UM LK.13305.007 KM.4GB09.003 7-2 Test Compatible Components Microsoft® Windows® 7 Environment Test Aspire S5-391 Vendor ADAPTER 60036752 LITEON SINGAPORE BATTERY 60001921 SANYO CPU 10001067 INTEL 10001067 INTEL 10001067 INTEL 10001067 INTEL 10001067 INTEL LCD 60003316 AUO MEMORY ...
Refer to the Aspire S5-391 Compatibility Test Report released by Acer's internal testing department. Aspire S5-391 Description 65W_HF Adapter LITE-ON 65W_HF 19V 1.1x3.0x7.5 Yellow PA-1650-80AH LF 4CELL2.31 Battery SANYO AP12B3F Li-Polymer 4S1P SANYO 4...33101.5UM KC.34201.5UM KC.35101.7UM KC.36601.7UM LK.13305.007 KM.4GB09.003 7-2 Test Compatible Components Microsoft® Windows® 7 Environment Test Aspire S5-391 Vendor ADAPTER 60036752 LITEON SINGAPORE BATTERY 60001921 SANYO CPU 10001067 INTEL 10001067 INTEL 10001067 INTEL 10001067 INTEL 10001067 INTEL LCD 60003316 AUO MEMORY ...
User Manual
Page 3
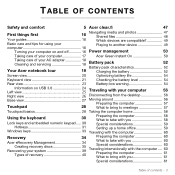
... another device 49 computer 16 Turning your computer on and off 16 Power management 50 Taking care of your computer 17 Acer Green Instant On 50 Taking care of your AC adapter 18 Cleaning and servicing 18 Battery pack 52 Battery pack characteristics 52 Your...keys and embedded numeric keypad..... 30 Special considerations 59 Hotkeys 31 Setting up a home office 59 Windows keys 33 Traveling with the computer 60 Recovery 34 Preparing the computer 60 Acer eRecovery Management 34 Creating recovery discs 35 Recovering your system 39 Types of recovery 40 What to take...
... another device 49 computer 16 Turning your computer on and off 16 Power management 50 Taking care of your computer 17 Acer Green Instant On 50 Taking care of your AC adapter 18 Cleaning and servicing 18 Battery pack 52 Battery pack characteristics 52 Your...keys and embedded numeric keypad..... 30 Special considerations 59 Hotkeys 31 Setting up a home office 59 Windows keys 33 Traveling with the computer 60 Recovery 34 Preparing the computer 60 Acer eRecovery Management 34 Creating recovery discs 35 Recovering your system 39 Types of recovery 40 What to take...

User Manual
Page 14
... level for enhanced text readability and graphics clarity. Eliminate glare and reflections by: placing your display in such a way that the side faces the window or any light source, minimizing room light by looking at the center of your desk to keep your eyes from drying out. Eyes Rest...
... level for enhanced text readability and graphics clarity. Eliminate glare and reflections by: placing your display in such a way that the side faces the window or any light source, minimizing room light by looking at the center of your desk to keep your eyes from drying out. Eyes Rest...
User Manual
Page 17
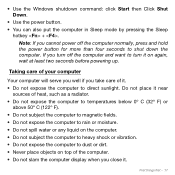
... display when you turn off the computer normally, press and hold the power button for more than four seconds to direct sunlight. • Use the Windows shutdown command: click Start then Click Shut Down. • Use the power button. • You can also put the computer in Sleep mode by pressing...
... display when you turn off the computer normally, press and hold the power button for more than four seconds to direct sunlight. • Use the Windows shutdown command: click Start then Click Shut Down. • Use the power button. • You can also put the computer in Sleep mode by pressing...

User Manual
Page 30
... Lock is on and off. Using the keyboard USING THE KEYBOARD The keyboard has full-sized keys and an embedded numeric keypad, separate cursor, lock, Windows, function and special keys. The embedded numeric keypad functions like a desktop numeric keypad. Use this section may not apply to do a lot of the 30...
... Lock is on and off. Using the keyboard USING THE KEYBOARD The keyboard has full-sized keys and an embedded numeric keypad, separate cursor, lock, Windows, function and special keys. The embedded numeric keypad functions like a desktop numeric keypad. Use this section may not apply to do a lot of the 30...

User Manual
Page 33
Windows keys The keyboard has two keys that perform Windows-specific functions. Key Description Windows key Pressed alone it opens the application's context menu. Application This key has the same effect as clicking the right key mouse button; It can also be used with other keys for special functions, please check Windows Help. Using the keyboard - 33 it launches the Start menu.
Windows keys The keyboard has two keys that perform Windows-specific functions. Key Description Windows key Pressed alone it opens the application's context menu. Application This key has the same effect as clicking the right key mouse button; It can also be used with other keys for special functions, please check Windows Help. Using the keyboard - 33 it launches the Start menu.


