Acer S5-391 Notebook Service Guide
Page 2
...Clearing the Password Check and BIOS Password 2-22 Crisis Utility SOP 2-25 When to Use the Crisis SOP 2-25 Creating a USB Flash Crisis Disk 2-25 Using the Crisis Utility Disk 2-28 Chapter 3. Troubleshooting General Information 4-2 Power On Issues 4-3 No Display Issues 4-4 LCD Picture Failure 4-6 Internal Keyboard Failure 4-7 i Jumper and Connector Locations Mainboard Top View 3-2 Mainboard Bottom View 3-3 LED Board View 3-4 Audio Board View 3-5 Battery Board View 3-6 Card Reader Board View 3-7 Motor Board View 3-8 Clear CMOS Jumper 3-9 Chapter 4. Hardware Specifications...
...Clearing the Password Check and BIOS Password 2-22 Crisis Utility SOP 2-25 When to Use the Crisis SOP 2-25 Creating a USB Flash Crisis Disk 2-25 Using the Crisis Utility Disk 2-28 Chapter 3. Troubleshooting General Information 4-2 Power On Issues 4-3 No Display Issues 4-4 LCD Picture Failure 4-6 Internal Keyboard Failure 4-7 i Jumper and Connector Locations Mainboard Top View 3-2 Mainboard Bottom View 3-3 LED Board View 3-4 Audio Board View 3-5 Battery Board View 3-6 Card Reader Board View 3-7 Motor Board View 3-8 Clear CMOS Jumper 3-9 Chapter 4. Hardware Specifications...
Acer S5-391 Notebook Service Guide
Page 4
...Board Removal 5-91 Card Reader Board Installation 5-93 LCD Module Removal 5-95 LCD Module Installation 5-101 LCD Bezel Removal 5-108 LCD Bezel Installation 5-112 LCD Panel Removal 5-114 LCD Panel Installation 5-117 CCD Module Removal 5-120 CCD Module Installation 5-121 EDP Cable Removal 5-122 EDP Cable Installation 5-124 WLAN Antenna (Auxiliary) Removal 5-126 WLAN Antenna (Auxiliary) Installation 5-127 WLAN Antenna (Main) Removal 5-128 WLAN Antenna (Main) Installation 5-130 Chapter 6. Test Compatible Components Microsoft® Windows® 7 Environment Test 7-2 Aspire S5-391...
...Board Removal 5-91 Card Reader Board Installation 5-93 LCD Module Removal 5-95 LCD Module Installation 5-101 LCD Bezel Removal 5-108 LCD Bezel Installation 5-112 LCD Panel Removal 5-114 LCD Panel Installation 5-117 CCD Module Removal 5-120 CCD Module Installation 5-121 EDP Cable Removal 5-122 EDP Cable Installation 5-124 WLAN Antenna (Auxiliary) Removal 5-126 WLAN Antenna (Auxiliary) Installation 5-127 WLAN Antenna (Main) Removal 5-128 WLAN Antenna (Main) Installation 5-130 Chapter 6. Test Compatible Components Microsoft® Windows® 7 Environment Test 7-2 Aspire S5-391...
Acer S5-391 Notebook Service Guide
Page 12
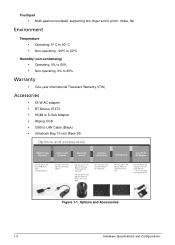
...ºC Humidity (non-condensing) • Operating: 0% to 80% • Non-operating: 0% to 80% Warranty • One-year International Travellers Warranty (ITW) Accessories • 65 W AC adapter • BT Mouse VT470 • HDMI to D-Sub Adapter • Wiping Cloth • USB to LAN Cable (Black) • Ultrabook Bag 13-inch Black S5 Options and accessories HDMI to VGA Converter USB to LAN Converter Bluetooth mouse Carrying sleeve bag Wiping Cloth...
...ºC Humidity (non-condensing) • Operating: 0% to 80% • Non-operating: 0% to 80% Warranty • One-year International Travellers Warranty (ITW) Accessories • 65 W AC adapter • BT Mouse VT470 • HDMI to D-Sub Adapter • Wiping Cloth • USB to LAN Cable (Black) • Ultrabook Bag 13-inch Black S5 Options and accessories HDMI to VGA Converter USB to LAN Converter Bluetooth mouse Carrying sleeve bag Wiping Cloth...
Acer S5-391 Notebook Service Guide
Page 22
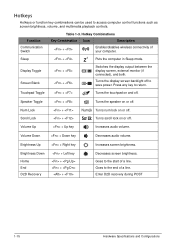
.... Enter D2D recovery during POST 1-15 Hardware Specifications and Configurations Sleep + Puts the computer in Sleep mode. Touchpad Toggle + Turns the touchpad on or off . Speaker Toggle + Turns the speaker on or off . Turns scroll lock on or off . Goes to save power. Volume Down + Down key Decreases audio volume. Hotkey Combinations Key Combination Icon Description + Enables/disables wireless connectivity of your computer. Turns the display screen backlight off to the start of a line. Goes to access computer control functions such...
.... Enter D2D recovery during POST 1-15 Hardware Specifications and Configurations Sleep + Puts the computer in Sleep mode. Touchpad Toggle + Turns the touchpad on or off . Speaker Toggle + Turns the speaker on or off . Turns scroll lock on or off . Goes to save power. Volume Down + Down key Decreases audio volume. Hotkey Combinations Key Combination Icon Description + Enables/disables wireless connectivity of your computer. Turns the display screen backlight off to the start of a line. Goes to access computer control functions such...
Acer S5-391 Notebook Service Guide
Page 33
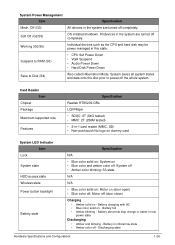
... • Amber blinking - Working (G0/S0) Individual devices such as the CPU and hard disk may be power managed in critical low state • Amber color off (door close) Charging • Amber solid on - Battery abnormal stop charge or batter in -1 card reader (MMC, SD) • Non-push-push No logo on dummy card System LED Indicator Item Lock System state HDD access state Wireless state Power button backlight Battery state Specification N/A • Blue...
... • Amber blinking - Working (G0/S0) Individual devices such as the CPU and hard disk may be power managed in critical low state • Amber color off (door close) Charging • Amber solid on - Battery abnormal stop charge or batter in -1 card reader (MMC, SD) • Non-push-push No logo on dummy card System LED Indicator Item Lock System state HDD access state Wireless state Power button backlight Battery state Specification N/A • Blue...
Acer S5-391 Notebook Service Guide
Page 38
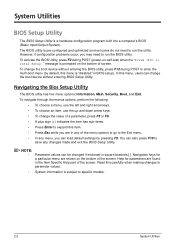
... sign (+) indicates the item has sub-items. • Press Enter to expand this carefully when making changes to parameter values. • System information is a hardware configuration program built into a computer's BIOS (Basic Input/Output System). However, if configuration problems occur, you can change the boot device without entering the BIOS utility, press F12 during POST (power-on the bottom of screen. Navigating the Bios Setup Utility The BIOS utility has five menu options: Information...
... sign (+) indicates the item has sub-items. • Press Enter to expand this carefully when making changes to parameter values. • System information is a hardware configuration program built into a computer's BIOS (Basic Input/Output System). However, if configuration problems occur, you can change the boot device without entering the BIOS utility, press F12 during POST (power-on the bottom of screen. Navigating the Bios Setup Utility The BIOS utility has five menu options: Information...
Acer S5-391 Notebook Service Guide
Page 39
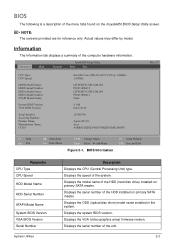
... Aspire S5-391 Acer A0BB1CDD23EF45G678HIJK9LM012NOP3 Rev. 3.7 F1 Help Esc Exit Select Item Select Menu F5/F6 Change Values Enter Select Sub-Menu Figure 2-1. BIOS Information F9 Setup Defaults F10 Save and Exit Parameter CPU Type CPU Speed HDD Model Name HDD Serial Number ATAPI Model Name System BIOS Version VGA BIOS Version Serial Number System Utilities Description Displays the CPU (Central Processing Unit) type. Displays the VGA (video graphics array) firmware version. Displays the serial number of the HDD (hard disk drive) installed on primary SATA master. NOTE: The screens...
... Aspire S5-391 Acer A0BB1CDD23EF45G678HIJK9LM012NOP3 Rev. 3.7 F1 Help Esc Exit Select Item Select Menu F5/F6 Change Values Enter Select Sub-Menu Figure 2-1. BIOS Information F9 Setup Defaults F10 Save and Exit Parameter CPU Type CPU Speed HDD Model Name HDD Serial Number ATAPI Model Name System BIOS Version VGA BIOS Version Serial Number System Utilities Description Displays the CPU (Central Processing Unit) type. Displays the VGA (video graphics array) firmware version. Displays the serial number of the HDD (hard disk drive) installed on primary SATA master. NOTE: The screens...
Acer S5-391 Notebook Service Guide
Page 42
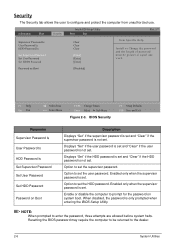
... Menu F5/F6 Change Values Enter Select Sub-Menu Figure 2-3. When disabled, the password is set the supervisor password. Security The Security tab allows the user to enter the password, three attempts are allowed before system halts. Displays "Set" if the HDD password is set and "Clear" if the HDD password is set . Option to be greater or equal one word. Enabled only when the supervisor password is only prompted when entering the BIOS Setup Utility. Resetting the BIOS password...
... Menu F5/F6 Change Values Enter Select Sub-Menu Figure 2-3. When disabled, the password is set the supervisor password. Security The Security tab allows the user to enter the password, three attempts are allowed before system halts. Displays "Set" if the HDD password is set and "Clear" if the HDD password is set . Option to be greater or equal one word. Enabled only when the supervisor password is only prompted when entering the BIOS Setup Utility. Resetting the BIOS password...
Acer S5-391 Notebook Service Guide
Page 47
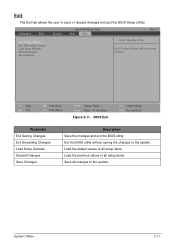
F1 Help Esc Exit Select Item Select Menu F5/F6 Change Values Enter Select Sub-Menu Figure 2-11. Information Main Security InsydeH20 Setup Utility Boot Exit Rev. 3.7 Exit Saving Changes Exit Discarding Changes Load Setup Defaults Discard Changes Save Changes Item Specific Help Exit System Setup and save or discard changes and quit the BIOS Setup Uitility. Load the default values of all setup items. Load the previous values of all...
F1 Help Esc Exit Select Item Select Menu F5/F6 Change Values Enter Select Sub-Menu Figure 2-11. Information Main Security InsydeH20 Setup Utility Boot Exit Rev. 3.7 Exit Saving Changes Exit Discarding Changes Load Setup Defaults Discard Changes Save Changes Item Specific Help Exit System Setup and save or discard changes and quit the BIOS Setup Uitility. Load the default values of all setup items. Load the previous values of all...
Acer S5-391 Notebook Service Guide
Page 78
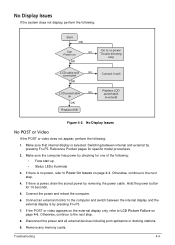
... internal and external by removing the power cable. Hold the power button for specific model procedures. 2. Troubleshooting 4-4 Switching between the internal display and the external display is power, drain the stored power by pressing Fn+F5. No Display Issues If the system does not display, perform the following : • Fans start up • Status LEDs illuminate 3. Otherwise, continue to the next step. 8. Connect an external monitor to no power, refer to LCD Picture Failure on page 4-3. Remove any memory cards...
... internal and external by removing the power cable. Hold the power button for specific model procedures. 2. Troubleshooting 4-4 Switching between the internal display and the external display is power, drain the stored power by pressing Fn+F5. No Display Issues If the system does not display, perform the following : • Fans start up • Status LEDs illuminate 3. Otherwise, continue to the next step. 8. Connect an external monitor to no power, refer to LCD Picture Failure on page 4-3. Remove any memory cards...

Acer S5-391 Notebook Service Guide
Page 79
... device is not normal, right-click on the desktop and select Personalize Display Settings. • Click and drag the Resolution slider to the User Manual for instructions on -screen prompts. 8. Start the computer. Abnormal Video If the video appears abnormal, perform the following: 1. Readjust if necessary. 4. Run the Windows Memory Diagnostic from the operating system DVD and follow the on adjusting the settings. Roll back the video driver...
... device is not normal, right-click on the desktop and select Personalize Display Settings. • Click and drag the Resolution slider to the User Manual for instructions on -screen prompts. 8. Start the computer. Abnormal Video If the video appears abnormal, perform the following: 1. Readjust if necessary. 4. Run the Windows Memory Diagnostic from the operating system DVD and follow the on adjusting the settings. Roll back the video driver...
Acer S5-391 Notebook Service Guide
Page 103
..., mouse, and other external devices • Battery pack • Hard disk drive • DIMM • CD-ROM/Diskette drive Module • PC Cards 4. If HDD information is missing from the computer. 2. When analyzing an intermittent problem, perform the following procedures to Online Support Information on page 2-2) for damage. Determine if the problem has changed. 6. If the problem does not recur, connect the removed devices until failing FRU is detected, replace the...
..., mouse, and other external devices • Battery pack • Hard disk drive • DIMM • CD-ROM/Diskette drive Module • PC Cards 4. If HDD information is missing from the computer. 2. When analyzing an intermittent problem, perform the following procedures to Online Support Information on page 2-2) for damage. Determine if the problem has changed. 6. If the problem does not recur, connect the removed devices until failing FRU is detected, replace the...
Acer S5-391 Notebook Service Guide
Page 207
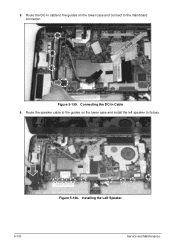
5. Route the speaker cable to the guides on the lower case and connect to its bay. 5-103 Figure 5-160. Figure 5-159. Connecting the DC-In Cable 6. Installing the Left Speaker Service and Maintenance Route the DC-In cable to the guides on the lower case and install the left speaker to the mainboard connector.
5. Route the speaker cable to the guides on the lower case and connect to its bay. 5-103 Figure 5-160. Figure 5-159. Connecting the DC-In Cable 6. Installing the Left Speaker Service and Maintenance Route the DC-In cable to the guides on the lower case and install the left speaker to the mainboard connector.
Acer S5-391 Notebook Service Guide
Page 212
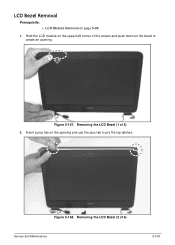
Hold the LCD module on the upper left corner of the screen and push down on the bezel to pry the top latches. Figure 5-167. Figure 5-168. Insert a pico tab on page 5-95 1. Removing the LCD Bezel (1 of 6) Service and Maintenance 5-108 Removing the LCD Bezel (2 of 6) 2. LCD Bezel Removal Prerequisite: LCD Module Removal on the opening and use the pico tab to create an opening.
Hold the LCD module on the upper left corner of the screen and push down on the bezel to pry the top latches. Figure 5-167. Figure 5-168. Insert a pico tab on page 5-95 1. Removing the LCD Bezel (1 of 6) Service and Maintenance 5-108 Removing the LCD Bezel (2 of 6) 2. LCD Bezel Removal Prerequisite: LCD Module Removal on the opening and use the pico tab to create an opening.
User Manual
Page 16
... started with setting up your computer. The Quick Guide introduces you to be more on and off To turn the power off, do any of the power button. Please refer to the Aspire User's Manual. For more productive, please refer to the setup poster for using your computer Turning your notebook. To turn on such subjects as system utilities, data recovery, expansion options and troubleshooting. It is available from your new...
... started with setting up your computer. The Quick Guide introduces you to be more on and off To turn the power off, do any of the power button. Please refer to the Aspire User's Manual. For more productive, please refer to the setup poster for using your computer Turning your notebook. To turn on such subjects as system utilities, data recovery, expansion options and troubleshooting. It is available from your new...
User Manual
Page 32
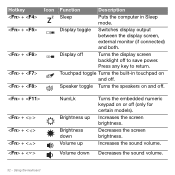
... sound volume. 32 - Speaker toggle Turns the speakers on and off. + + < > + < > + < > + < > NumLk Brightness up Brightness down Volume up Volume down Turns the embedded numeric keypad on and off (only for certain models). Using the keyboard Display toggle Switches display output between the display screen, external monitor (if connected) and both. Touchpad toggle Turns the built-in Sleep mode. Hotkey + + + + + Icon Function Description Sleep Puts the computer in touchpad on or off . Press any key to save power. Increases the screen brightness...
... sound volume. 32 - Speaker toggle Turns the speakers on and off. + + < > + < > + < > + < > NumLk Brightness up Brightness down Volume up Volume down Turns the embedded numeric keypad on and off (only for certain models). Using the keyboard Display toggle Switches display output between the display screen, external monitor (if connected) and both. Touchpad toggle Turns the built-in Sleep mode. Hotkey + + + + + Icon Function Description Sleep Puts the computer in touchpad on or off . Press any key to save power. Increases the screen brightness...
User Manual
Page 39
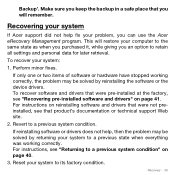
... problem, you will restore your system If Acer support did not help , then the problem may be solved by reinstalling the software or the device drivers. Recovering your computer to the same state as when you purchased it, while giving you keep the backup in a safe place that were pre-installed at the factory, see "Recovering pre-installed software and drivers" on page 41. Reset your system: 1. Backup'. For instructions...
... problem, you will restore your system If Acer support did not help , then the problem may be solved by reinstalling the software or the device drivers. Recovering your computer to the same state as when you purchased it, while giving you keep the backup in a safe place that were pre-installed at the factory, see "Recovering pre-installed software and drivers" on page 41. Reset your system: 1. Backup'. For instructions...
User Manual
Page 45
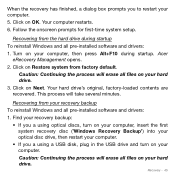
... startup To reinstall Windows and all pre-installed software and drivers: 1. Your hard drive's original, factory-loaded contents are recovered. This process will erase all files on Next. Recovering from the hard drive during startup. Follow the onscreen prompts for first-time system setup. Caution: Continuing the process will erase all files on Restore system from factory default. Click on your hard drive. Click on your hard drive. 3. Acer eRecovery Management opens. 2. When the recovery...
... startup To reinstall Windows and all pre-installed software and drivers: 1. Your hard drive's original, factory-loaded contents are recovered. This process will erase all files on Next. Recovering from the hard drive during startup. Follow the onscreen prompts for first-time system setup. Caution: Continuing the process will erase all files on Restore system from factory default. Click on your hard drive. Click on your hard drive. 3. Acer eRecovery Management opens. 2. When the recovery...

User Manual
Page 50
Open the lid or press any activity involving one or more of the following devices: keyboard, mouse, hard disk, peripherals connected to wake up from Deep Sleep or Sleep mode. Power management After a certain amount of these devices in Sleep mode, the power indicator LED will be turned off. When you close the lid, or select Shut Down > Sleep from Sleep mode in Deep Sleep the system will consume significantly less power compared with Sleep mode, but it...
Open the lid or press any activity involving one or more of the following devices: keyboard, mouse, hard disk, peripherals connected to wake up from Deep Sleep or Sleep mode. Power management After a certain amount of these devices in Sleep mode, the power indicator LED will be turned off. When you close the lid, or select Shut Down > Sleep from Sleep mode in Deep Sleep the system will consume significantly less power compared with Sleep mode, but it...
User Manual
Page 84
Look at the power indicator: • If it and press + + to restart the system. Check the following : • Is a disc in the optical drive? The computer's power management system automatically blanks the screen to save power. Press any key to turn the display back on the power, but the computer does not start or boot up. Connect the AC adapter to recharge the battery pack. • Make sure that...
Look at the power indicator: • If it and press + + to restart the system. Check the following : • Is a disc in the optical drive? The computer's power management system automatically blanks the screen to save power. Press any key to turn the display back on the power, but the computer does not start or boot up. Connect the AC adapter to recharge the battery pack. • Make sure that...


