Acer S5-391 Notebook Service Guide
Page 2
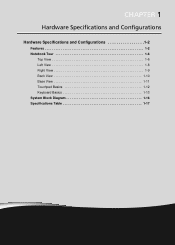
... 3-3 LED Board View 3-4 Audio Board View 3-5 Battery Board View 3-6 Card Reader Board View 3-7 Motor Board View 3-8 Clear CMOS Jumper 3-9 Chapter 4. Hardware Specifications and Configurations Features 1-2 Notebook Tour 1-6 Top View 1-6 Left View 1-8 Right View 1-9 Back View 1-10 Base View 1-11 Touchpad Basics 1-12 Keyboard Basics 1-13 System Block Diagram 1-16 Specifications Table...
... 3-3 LED Board View 3-4 Audio Board View 3-5 Battery Board View 3-6 Card Reader Board View 3-7 Motor Board View 3-8 Clear CMOS Jumper 3-9 Chapter 4. Hardware Specifications and Configurations Features 1-2 Notebook Tour 1-6 Top View 1-6 Left View 1-8 Right View 1-9 Back View 1-10 Base View 1-11 Touchpad Basics 1-12 Keyboard Basics 1-13 System Block Diagram 1-16 Specifications Table...
Acer S5-391 Notebook Service Guide
Page 8
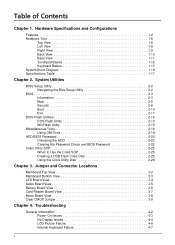
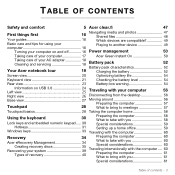
CHAPTER 1 Hardware Specifications and Configurations Hardware Specifications and Configurations 1-2 Features 1-2 Notebook Tour 1-6 Top View 1-6 Left View 1-8 Right View 1-9 Back View 1-10 Base View 1-11 Touchpad Basics 1-12 Keyboard Basics 1-13 System Block Diagram 1-16 Specifications Table 1-17
CHAPTER 1 Hardware Specifications and Configurations Hardware Specifications and Configurations 1-2 Features 1-2 Notebook Tour 1-6 Top View 1-6 Left View 1-8 Right View 1-9 Back View 1-10 Base View 1-11 Touchpad Basics 1-12 Keyboard Basics 1-13 System Block Diagram 1-16 Specifications Table 1-17
Acer S5-391 Notebook Service Guide
Page 13
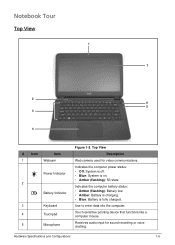
...; Amber (flashing): S3 state Indicates the computer battery status: • Amber (flashing): Battery low. • Amber: Battery is charging. • Blue: Battery is fully charged. Notebook Tour Top View 1 7 2 6 5 3 4 # Icon Item 1 Webcam Power Indicator 2 Battery Indicator 3 Keyboard 4 Touchpad 5 Microphone Figure 1-2. Hardware Specifications and Configurations 1-6
...; Amber (flashing): S3 state Indicates the computer battery status: • Amber (flashing): Battery low. • Amber: Battery is charging. • Blue: Battery is fully charged. Notebook Tour Top View 1 7 2 6 5 3 4 # Icon Item 1 Webcam Power Indicator 2 Battery Indicator 3 Keyboard 4 Touchpad 5 Microphone Figure 1-2. Hardware Specifications and Configurations 1-6

Acer S5-391 Notebook Service Guide
Page 107
... X 4 4 M 2.0 X 2.0 12 M 2.0 X 4.0 4 M 1.4 x 1.2 60 M 0.8 x 2.0 2 5-3 Service and Maintenance Recommended Equipment The following tools are required to remove and install components on the notebook: • Wrist grounding strap and conductive mat • Flat screwdriver • Philips screwdrivers • Pointed plastic pry or similar object • Pico tab Screw Name...5-9. Service and Maintenance Introduction This chapter contains general information about the notebook, a list of tools needed to perform the required maintenance and step by step procedures on how...
... X 4 4 M 2.0 X 2.0 12 M 2.0 X 4.0 4 M 1.4 x 1.2 60 M 0.8 x 2.0 2 5-3 Service and Maintenance Recommended Equipment The following tools are required to remove and install components on the notebook: • Wrist grounding strap and conductive mat • Flat screwdriver • Philips screwdrivers • Pointed plastic pry or similar object • Pico tab Screw Name...5-9. Service and Maintenance Introduction This chapter contains general information about the notebook, a list of tools needed to perform the required maintenance and step by step procedures on how...

Acer S5-391 Notebook Service Guide
Page 123
Removing the Lower Case Screws 2. Removing the Middle Cover (1 of 2) 3. Remove the four (4) screws on page 5-13 1. Figure 5-20. Using your fingertip, pry the middle cover to its maximum angle. 5-19 Service and Maintenance With the middle cover unlatched, open the notebook lid to release the latches. Figure 5-21. Upper Case Removal Prerequisite: Battery Module Removal on the lower case.
Removing the Lower Case Screws 2. Removing the Middle Cover (1 of 2) 3. Remove the four (4) screws on page 5-13 1. Figure 5-20. Using your fingertip, pry the middle cover to its maximum angle. 5-19 Service and Maintenance With the middle cover unlatched, open the notebook lid to release the latches. Figure 5-21. Upper Case Removal Prerequisite: Battery Module Removal on the lower case.

Acer S5-391 Notebook Service Guide
Page 130
Figure 5-32. Securing the Middle Cover (2 of 2) 6. Close the notebook lid, then secure the middle cover to the lower case. Securing the Middle Cover (1 of 2) Service and Maintenance 5-26 Figure 5-33. Align and place the middle cover to the latches on the lower case. 5.
Figure 5-32. Securing the Middle Cover (2 of 2) 6. Close the notebook lid, then secure the middle cover to the lower case. Securing the Middle Cover (1 of 2) Service and Maintenance 5-26 Figure 5-33. Align and place the middle cover to the latches on the lower case. 5.
Acer S5-391 Notebook Service Guide
Page 254
...email contacts for ways to optimize and improve our services, do not hesitate to direct any suggestions or comments to a local Acer branch office. and password. Also contained on this website are always looking for all models • Bios updates • ... list of our technical materials. We are : • Detailed information on all of Acer's Notebook, Desktop and Server models including: • Service guides for all your technical queries. Acer's Website offers convenient and valuable support resources. Online Support Information Introduction This section describes online...
...email contacts for ways to optimize and improve our services, do not hesitate to direct any suggestions or comments to a local Acer branch office. and password. Also contained on this website are always looking for all models • Bios updates • ... list of our technical materials. We are : • Detailed information on all of Acer's Notebook, Desktop and Server models including: • Service guides for all your technical queries. Acer's Website offers convenient and valuable support resources. Online Support Information Introduction This section describes online...
User Manual
Page 3
...Instant On 50 Taking care of your AC adapter 18 Cleaning and servicing 18 Battery pack 52 Battery pack characteristics 52 Your Acer notebook tour 19 Charging the battery 52 Screen view 20 Optimizing battery life 54 Keyboard view 21 Rear view 23 Checking the battery...considerations 59 Hotkeys 31 Setting up a home office 59 Windows keys 33 Traveling with the computer 60 Recovery 34 Preparing the computer 60 Acer eRecovery Management 34 Creating recovery discs 35 Recovering your system 39 Types of recovery 40 What to take with you 60 Special considerations 60...
...Instant On 50 Taking care of your AC adapter 18 Cleaning and servicing 18 Battery pack 52 Battery pack characteristics 52 Your Acer notebook tour 19 Charging the battery 52 Screen view 20 Optimizing battery life 54 Keyboard view 21 Rear view 23 Checking the battery...considerations 59 Hotkeys 31 Setting up a home office 59 Windows keys 33 Traveling with the computer 60 Recovery 34 Preparing the computer 60 Acer eRecovery Management 34 Creating recovery discs 35 Recovering your system 39 Types of recovery 40 What to take with you 60 Special considerations 60...
User Manual
Page 16
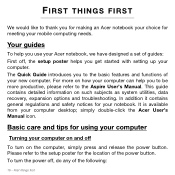
... any of your new computer. For more productive, please refer to the Aspire User's Manual. Please refer to the setup poster for the location of guides: First off, the setup poster helps you for making an Acer notebook your choice for meeting your mobile computing needs. simply double-click the...In addition it contains general regulations and safety notices for using your computer Turning your computer on how your computer can help you use your Acer notebook, we have designed a set of the power button. FIRST THINGS FIRST We would like to thank you get started with setting up your...
... any of your new computer. For more productive, please refer to the Aspire User's Manual. Please refer to the setup poster for the location of guides: First off, the setup poster helps you for making an Acer notebook your choice for meeting your mobile computing needs. simply double-click the...In addition it contains general regulations and safety notices for using your computer Turning your computer on how your computer can help you use your Acer notebook, we have designed a set of the power button. FIRST THINGS FIRST We would like to thank you get started with setting up your...
User Manual
Page 19
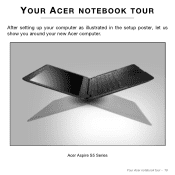
YOUR ACER NOTEBOOK TOUR After setting up your computer as illustrated in the setup poster, let us show you around your new Acer computer. Acer Aspire S5 Series Your Acer notebook tour - 19
YOUR ACER NOTEBOOK TOUR After setting up your computer as illustrated in the setup poster, let us show you around your new Acer computer. Acer Aspire S5 Series Your Acer notebook tour - 19
User Manual
Page 20
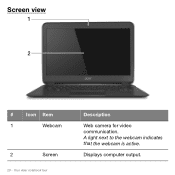
Your Acer notebook tour Description Web camera for video communication. A light next to the webcam indicates that the webcam is active. Displays computer output. Screen view 1 2 # Icon Item 1 Webcam 2 Screen 20 -
Your Acer notebook tour Description Web camera for video communication. A light next to the webcam indicates that the webcam is active. Displays computer output. Screen view 1 2 # Icon Item 1 Webcam 2 Screen 20 -

User Manual
Page 21
Keyboard view 1 5 4 2 3 # Icon Item Description 1 Power indicator Indicates the computer's power status. Fully charged: The light is charging. Battery indicator Indicates battery status. Charging: The light is amber when the battery is blue. Your Acer notebook tour - 21
Keyboard view 1 5 4 2 3 # Icon Item Description 1 Power indicator Indicates the computer's power status. Fully charged: The light is charging. Battery indicator Indicates battery status. Charging: The light is amber when the battery is blue. Your Acer notebook tour - 21
User Manual
Page 22
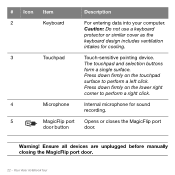
.... 22 - Press down firmly on the lower right corner to perform a left click. # Icon Item Description 2 Keyboard For entering data into your computer. Warning! Your Acer notebook tour The touchpad and selection buttons form a single surface.
.... 22 - Press down firmly on the lower right corner to perform a left click. # Icon Item Description 2 Keyboard For entering data into your computer. Warning! Your Acer notebook tour The touchpad and selection buttons form a single surface.
User Manual
Page 23
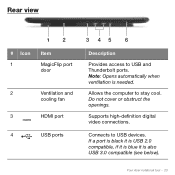
Do not cover or obstruct the openings. Supports high-definition digital video connections. Your Acer notebook tour - 23 If a port is black it is USB 2.0 compatible, if it is blue it is needed. Note: Opens automatically when ventilation is also USB 3.0 compatible (see below). Connects to stay cool. Allows the computer to USB devices. Rear view # Icon 1 12 Item MagicFlip port door 2 Ventilation and cooling fan 3 HDMI port 4 USB ports 3 45 6 Description Provides access to USB and Thunderbolt ports.
Do not cover or obstruct the openings. Supports high-definition digital video connections. Your Acer notebook tour - 23 If a port is black it is USB 2.0 compatible, if it is blue it is needed. Note: Opens automatically when ventilation is also USB 3.0 compatible (see below). Connects to stay cool. Allows the computer to USB devices. Rear view # Icon 1 12 Item MagicFlip port door 2 Ventilation and cooling fan 3 HDMI port 4 USB ports 3 45 6 Description Provides access to USB and Thunderbolt ports.
User Manual
Page 24
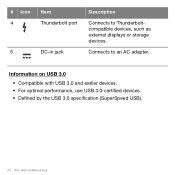
Your Acer notebook tour Connects to Thunderboltcompatible devices, such as external displays or storage devices. # Icon 4 5 Item Thunderbolt port DC-in jack Description Connects to an AC adapter. Information on USB 3.0 • Compatible with USB 3.0 and earlier devices. • For optimal performance, use USB 3.0-certified devices. • Defined by the USB 3.0 specification (SuperSpeed USB). 24 -
Your Acer notebook tour Connects to Thunderboltcompatible devices, such as external displays or storage devices. # Icon 4 5 Item Thunderbolt port DC-in jack Description Connects to an AC adapter. Information on USB 3.0 • Compatible with USB 3.0 and earlier devices. • For optimal performance, use USB 3.0-certified devices. • Defined by the USB 3.0 specification (SuperSpeed USB). 24 -
User Manual
Page 25
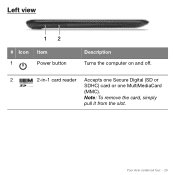
Left view 12 # Icon 1 Item Power button Description Turns the computer on and off. 2 2-in-1 card reader Accepts one Secure Digital (SD or SDHC) card or one MultiMediaCard (MMC). Your Acer notebook tour - 25 Note: To remove the card, simply pull it from the slot.
Left view 12 # Icon 1 Item Power button Description Turns the computer on and off. 2 2-in-1 card reader Accepts one Secure Digital (SD or SDHC) card or one MultiMediaCard (MMC). Your Acer notebook tour - 25 Note: To remove the card, simply pull it from the slot.
User Manual
Page 26
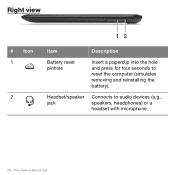
Your Acer notebook tour Headset/speaker jack Connects to reset the computer (simulates removing and reinstalling the battery). Right view # Icon 1 2 12 Item Description Battery reset pinhole Insert a paperclip into the hole and press for four seconds to audio devices (e.g., speakers, headphones) or a headset with microphone. 26 -
Your Acer notebook tour Headset/speaker jack Connects to reset the computer (simulates removing and reinstalling the battery). Right view # Icon 1 2 12 Item Description Battery reset pinhole Insert a paperclip into the hole and press for four seconds to audio devices (e.g., speakers, headphones) or a headset with microphone. 26 -

User Manual
Page 27
Base view 1 1 # Icon 1 Item Speakers Description Deliver stereo audio output. Your Acer notebook tour - 27
Base view 1 1 # Icon 1 Item Speakers Description Deliver stereo audio output. Your Acer notebook tour - 27

User Manual
Page 66
... to activate Acer Theft Shield. 66 - Acer Theft Shield Using Acer Theft Shield General Once you have downloaded the Android app to your phone to start setting up Acer Theft Shield. Once you have selected the method to use, you will allow your phone, click Next to detect the notebook. Click Start... to turn on your notebook's Wi-Fi hotspot feature, this will be shown the ...
... to activate Acer Theft Shield. 66 - Acer Theft Shield Using Acer Theft Shield General Once you have downloaded the Android app to your phone to start setting up Acer Theft Shield. Once you have selected the method to use, you will allow your phone, click Next to detect the notebook. Click Start... to turn on your notebook's Wi-Fi hotspot feature, this will be shown the ...

User Manual
Page 67
You can press the hotkey combination to protect your computer at any time. Tip: To view the QR code to change the SSID that your notebook will broadcast while linking to your Android cellphone. Tap Edit under Alarm mode settings. Acer Theft Shield - 67 Settings The Settings page allows you to download the Android app again, click the icon. You can also change the alarm notification duration from the drop-down menu under Configure your notebook's Wi-Fi hotspot network to change alarm settings and also set up notifications on your Android phone.
You can press the hotkey combination to protect your computer at any time. Tip: To view the QR code to change the SSID that your notebook will broadcast while linking to your Android cellphone. Tap Edit under Alarm mode settings. Acer Theft Shield - 67 Settings The Settings page allows you to download the Android app again, click the icon. You can also change the alarm notification duration from the drop-down menu under Configure your notebook's Wi-Fi hotspot network to change alarm settings and also set up notifications on your Android phone.


