User Guide
Page 6
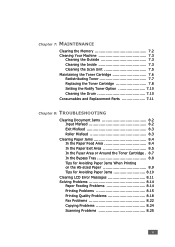
... 8: TROUBLESHOOTING Clearing Document Jams 8.2 Input Misfeed 8.2 Exit Misfeed 8.3 Roller Misfeed 8.3 Clearing Paper Jams 8.4 In the Paper Feed Area 8.4 In the Paper Exit Area 8.5 In the Fuser Area or Around the Toner Cartridge . 8.7 In the Bypass Tray 8.8 Tips for Avoiding Paper Jams When Printing on the A5-sized Paper 8.9 Tips for Avoiding...
... 8: TROUBLESHOOTING Clearing Document Jams 8.2 Input Misfeed 8.2 Exit Misfeed 8.3 Roller Misfeed 8.3 Clearing Paper Jams 8.4 In the Paper Feed Area 8.4 In the Paper Exit Area 8.5 In the Fuser Area or Around the Toner Cartridge . 8.7 In the Bypass Tray 8.8 Tips for Avoiding Paper Jams When Printing on the A5-sized Paper 8.9 Tips for Avoiding...
User Guide
Page 106
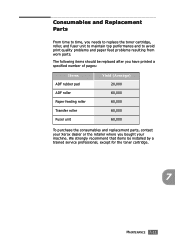
... that items be replaced after you have printed a specified number of pages: Items ADF rubber pad ADF roller Paper feeding roller Transfer roller Fuser unit Yield (Average) 20,000 60,000 60,000 60,000 60,000 To purchase the consumables and replacement parts, contact your machine.... Consumables and Replacement Parts From time to time, you bought your Xerox dealer or the retailer where you needs to replace the toner cartridge, roller, and fuser unit to maintain top performance and to avoid print quality problems and paper feed problems resulting from...
... that items be replaced after you have printed a specified number of pages: Items ADF rubber pad ADF roller Paper feeding roller Transfer roller Fuser unit Yield (Average) 20,000 60,000 60,000 60,000 60,000 To purchase the consumables and replacement parts, contact your machine.... Consumables and Replacement Parts From time to time, you bought your Xerox dealer or the retailer where you needs to replace the toner cartridge, roller, and fuser unit to maintain top performance and to avoid print quality problems and paper feed problems resulting from...
User Guide
Page 111
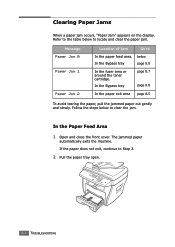
... Jam 0 Paper Jam 1 Paper Jam 2 Location of Jam Go to Step 2. 2 Pull the paper tray open. 8.4 TROUBLESHOOTING below In the Bypass tray page 8.8 In the fuser area or around the toner cartridge. Clearing Paper Jams When a paper jam occurs, "Paper Jam" appears on the display.
... Jam 0 Paper Jam 1 Paper Jam 2 Location of Jam Go to Step 2. 2 Pull the paper tray open. 8.4 TROUBLESHOOTING below In the Bypass tray page 8.8 In the fuser area or around the toner cartridge. Clearing Paper Jams When a paper jam occurs, "Paper Jam" appears on the display.

User Guide
Page 112
The jammed paper 8 automatically exits the machine. TROUBLESHOOTING 8.5 If the paper does not exit, continue to the fuser area around the toner cartridge. In the Paper Exit Area 1 Open and close the front cover to resume printing. See page 8.7. 4 Insert the paper tray into place. 5 Open and close the front cover. If there is any resistance and the paper does not move when you pull or if you cannot see the paper in this area, skip to Step 2. 3 Remove the jammed paper by gently pulling it snaps into the machine until it straight out.
The jammed paper 8 automatically exits the machine. TROUBLESHOOTING 8.5 If the paper does not exit, continue to the fuser area around the toner cartridge. In the Paper Exit Area 1 Open and close the front cover to resume printing. See page 8.7. 4 Insert the paper tray into place. 5 Open and close the front cover. If there is any resistance and the paper does not move when you pull or if you cannot see the paper in this area, skip to Step 2. 3 Remove the jammed paper by gently pulling it snaps into the machine until it straight out.
User Guide
Page 114
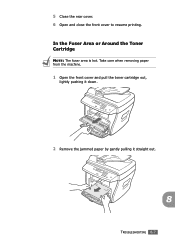
5 Close the rear cover. 6 Open and close the front cover to resume printing. In the Fuser Area or Around the Toner Cartridge NOTE: The fuser area is hot. Take care when removing paper from the machine. 1 Open the front cover and pull the toner cartridge out, lightly pushing it down. 2 Remove the jammed paper by gently pulling it straight out. 8 TROUBLESHOOTING 8.7
5 Close the rear cover. 6 Open and close the front cover to resume printing. In the Fuser Area or Around the Toner Cartridge NOTE: The fuser area is hot. Take care when removing paper from the machine. 1 Open the front cover and pull the toner cartridge out, lightly pushing it down. 2 Remove the jammed paper by gently pulling it straight out. 8 TROUBLESHOOTING 8.7

User Guide
Page 118
... when adding locations for service. You must use a speed dial number or dial a number manually using the number keypad. Just use a Xerox approved cartridge. You should send the remaining pages later when the memory is not securely latched. Ask the sender to select a group location number... where only a single location number can be used unauthorised cartridge. See page 8.2. Door Open CRU Fuser Error Heating Error Open Heat Error Over Heat Group Not Available The front or rear cover is available. Unplug the power cord and plug ...
... when adding locations for service. You must use a speed dial number or dial a number manually using the number keypad. Just use a Xerox approved cartridge. You should send the remaining pages later when the memory is not securely latched. Ask the sender to select a group location number... where only a single location number can be used unauthorised cartridge. See page 8.2. Door Open CRU Fuser Error Heating Error Open Heat Error Over Heat Group Not Available The front or rear cover is available. Unplug the power cord and plug ...

User Guide
Page 120
... from the Bypass tray. See page 7.8. Paper has jammed in the feeding area of the paper tray. Clear the jam. Paper has jammed in the fuser area. You can temporarily reestablish printing operations. 8 TROUBLESHOOTING 8.13 You need to start again the job which you can press Enter to immediately redial, or...
... from the Bypass tray. See page 7.8. Paper has jammed in the feeding area of the paper tray. Clear the jam. Paper has jammed in the fuser area. You can temporarily reestablish printing operations. 8 TROUBLESHOOTING 8.13 You need to start again the job which you can press Enter to immediately redial, or...


