OmniPage SE User Guide
Page 37
... the saved file. This ends the OCR Proofreader process. Click on Start. See Input from the scanned page, check your document will be automatically opened in the word processing program associated with the file type that you The OCR Proofreader operates like a spell checker in your recognized document. From the Export Results drop-down menu, check that the program suspects word processing program, but not from scanner for set at saving time is...
... the saved file. This ends the OCR Proofreader process. Click on Start. See Input from the scanned page, check your document will be automatically opened in the word processing program associated with the file type that you The OCR Proofreader operates like a spell checker in your recognized document. From the Export Results drop-down menu, check that the program suspects word processing program, but not from scanner for set at saving time is...

OmniPage SE User Guide
Page 38
... pages are new to adjust settings and rerecognize just those problem pages. You will typically auto-zone the pages. Using the OCR Wizard The OCR Wizard guides you can use . You start each of OmniPage SE while working in order, but a few have not turned out as expected, you through the whole process from beginning to call on the Manual OCR toolbar. In other applications You can switch to manual...
... pages are new to adjust settings and rerecognize just those problem pages. You will typically auto-zone the pages. Using the OCR Wizard The OCR Wizard guides you can use . You start each of OmniPage SE while working in order, but a few have not turned out as expected, you through the whole process from beginning to call on the Manual OCR toolbar. In other applications You can switch to manual...

OmniPage SE User Guide
Page 41
... program. This concerns mainly scanner settings, a user dictionary or a training file. 7. You can specify file export settings. 8. Also, OmniPage SE will appear. If you change other formats. When proofing is set when the OCR Wizard starts, it again to other settings and then use automatic or manual processing for which your OCR Wizard settings are suitable, just switch to rerecognize single pages from the document. You can add pages with the OCR...
... program. This concerns mainly scanner settings, a user dictionary or a training file. 7. You can specify file export settings. 8. Also, OmniPage SE will appear. If you change other formats. When proofing is set when the OCR Wizard starts, it again to other settings and then use automatic or manual processing for which your OCR Wizard settings are suitable, just switch to rerecognize single pages from the document. You can add pages with the OCR...

OmniPage SE User Guide
Page 46
Delete or modify the existing zones in its zones replace existing ones. Draw new zones as required for the current page. Change other settings as desired. Click the Perform OCR button to save the document again. 46 TUTORIAL: PROCESSING DOCUMENTS Confirm that the previous recognition results should be invited to rerecognize the current page. When all pages have to adjust settings and zones and rerecognize just those...
Delete or modify the existing zones in its zones replace existing ones. Draw new zones as required for the current page. Change other settings as desired. Click the Perform OCR button to save the document again. 46 TUTORIAL: PROCESSING DOCUMENTS Confirm that the previous recognition results should be invited to rerecognize the current page. When all pages have to adjust settings and zones and rerecognize just those...
OmniPage SE User Guide
Page 50
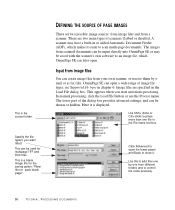
.... The images from different folders and to scan multi-page documents. The lower part of image file types; Specify the file type(s) you start automatic processing. Click Advanced to add files one by email or as fax files. This is displayed. In manual processing, click the Load File button or use the Process menu. Use this to open a wide range of the dialog box provides advanced settings, and can be saved with the scanner's own software to an image file, which makes it...
.... The images from different folders and to scan multi-page documents. The lower part of image file types; Specify the file type(s) you start automatic processing. Click Advanced to add files one by email or as fax files. This is displayed. In manual processing, click the Load File button or use the Process menu. Use this to open a wide range of the dialog box provides advanced settings, and can be saved with the scanner's own software to an image file, which makes it...

OmniPage SE User Guide
Page 92
..., 29, 75, 85, 88 rotating, 26 saving, 75, 85 size, 29 substitutes in PDF, 87 Image file input, 22, 50 opening, 85 reading order, 50 samples, 83 types, 85 Image toolbar, 24, 26 Improving accuracy, 51, 52, 65 Incomplete automatic processing, 43 Input from image file, 50 from scanner, 51 Inserting table dividers, 58 Installing a scanner, 14 OmniPage SE, 13 IntelliTrain, 31, 34...
..., 29, 75, 85, 88 rotating, 26 saving, 75, 85 size, 29 substitutes in PDF, 87 Image file input, 22, 50 opening, 85 reading order, 50 samples, 83 types, 85 Image toolbar, 24, 26 Improving accuracy, 51, 52, 65 Incomplete automatic processing, 43 Input from image file, 50 from scanner, 51 Inserting table dividers, 58 Installing a scanner, 14 OmniPage SE, 13 IntelliTrain, 31, 34...

OmniPage SE User Guide
Page 95
... PDF, 87 training file, 67 zone template, 59 Scanner, 51, 89 drivers, 14 duplex, 53 setting up, 14 Scanning black-and-white, 51 brightness, 33, 52 color, 51 contrast, 33, 52 grayscale, 51 input from, 51 installing, 14 picture, 51 Wizard, 14 Schedule OCR, 49 Searching PDF output, 87 Selecting multiple pages, 28 Send Mail dialog box, 79 Sending a document as a mail attachment, 79 Setting up a scanner, 14 Setting up Direct OCR, 47 Settings...
... PDF, 87 training file, 67 zone template, 59 Scanner, 51, 89 drivers, 14 duplex, 53 setting up, 14 Scanning black-and-white, 51 brightness, 33, 52 color, 51 contrast, 33, 52 grayscale, 51 input from, 51 installing, 14 picture, 51 Wizard, 14 Schedule OCR, 49 Searching PDF output, 87 Selecting multiple pages, 28 Send Mail dialog box, 79 Sending a document as a mail attachment, 79 Setting up a scanner, 14 Setting up Direct OCR, 47 Settings...
User Guide
Page 18
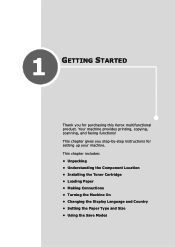
This chapter gives you for setting up your machine. This chapter includes: • Unpacking • Understanding the Component Location • Installing the Toner Cartridge • Loading Paper • Making Connections • Turning the Machine On • Changing the Display Language and Country • Setting the Paper Type and Size • Using the Save Modes Your machine provides printing, copying, scanning, and faxing functions! 1 GETTING STARTED Thank you step-by-step instructions for purchasing this Xerox multifunctional product.
This chapter gives you for setting up your machine. This chapter includes: • Unpacking • Understanding the Component Location • Installing the Toner Cartridge • Loading Paper • Making Connections • Turning the Machine On • Changing the Display Language and Country • Setting the Paper Type and Size • Using the Save Modes Your machine provides printing, copying, scanning, and faxing functions! 1 GETTING STARTED Thank you step-by-step instructions for purchasing this Xerox multifunctional product.
User Guide
Page 68
This chapter includes: • Printing a Document • Setting Paper Properties • Printing Multiple Pages on One Sheet of Paper (N-Up Printing) • Printing a Reduced or Enlarged Document • Fitting Your Document to use the print settings. 5 PRINTING This chapter explains how to print your documents in Windows and how to a Selected Paper Size • Printing Posters • Using Watermarks • Using Overlays • Setting Graphic Properties • Setting Up the Locally Shared Printer
This chapter includes: • Printing a Document • Setting Paper Properties • Printing Multiple Pages on One Sheet of Paper (N-Up Printing) • Printing a Reduced or Enlarged Document • Fitting Your Document to use the print settings. 5 PRINTING This chapter explains how to print your documents in Windows and how to a Selected Paper Size • Printing Posters • Using Watermarks • Using Overlays • Setting Graphic Properties • Setting Up the Locally Shared Printer
User Guide
Page 71
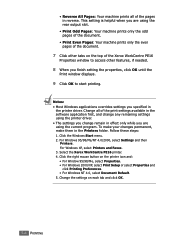
... the Windows Start menu. 2. For Windows 95/98/Me/NT 4.0/2000, select Settings and then Printers. To make your changes permanent, make them in the printer driver. • Reverse All Pages: Your machine prints all of the print settings available in the software application first, and change any remaining settings using the printer driver. • The settings you change remain in effect only while you are using the current program. For Windows XP, select Printers and Faxes. 3. Select the Xerox WorkCentre PE16 printer...
... the Windows Start menu. 2. For Windows 95/98/Me/NT 4.0/2000, select Settings and then Printers. To make your changes permanent, make them in the printer driver. • Reverse All Pages: Your machine prints all of the print settings available in the software application first, and change any remaining settings using the printer driver. • The settings you change remain in effect only while you are using the current program. For Windows XP, select Printers and Faxes. 3. Select the Xerox WorkCentre PE16 printer...

User Guide
Page 119
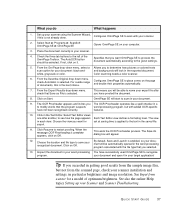
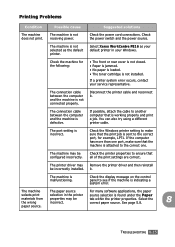
... operational. The paper in the LSU (Laser Scanning Unit). The display should indicate them in the Add/ Cancel operation, but there is already engaged. Try again. Make sure that the remote machine is full. The toner cartridge is any scheduled job. See page 1.9. See page 1.11. See the Facsimile User's Guide. Load paper in . Or, turn the ECM mode on. See the Facsimile User's Guide. Load a document and try again. Delete unnecessary documents, retransmit after a few minutes. Dial the number manually using...
... operational. The paper in the LSU (Laser Scanning Unit). The display should indicate them in the Add/ Cancel operation, but there is already engaged. Try again. Make sure that the remote machine is full. The toner cartridge is any scheduled job. See page 1.9. See page 1.11. See the Facsimile User's Guide. Load paper in . Or, turn the ECM mode on. See the Facsimile User's Guide. Load a document and try again. Delete unnecessary documents, retransmit after a few minutes. Dial the number manually using...
User Guide
Page 122
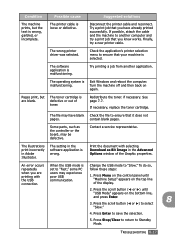
... machine may Remove the printer driver and then reinstall be configured incorrectly. it . Select the correct paper source. Select Xerox WorkCentre PE16 as the default printer. Check the machine for example, LPT1. The printer driver may be incorrectly installed. Check the display message on the control panel to ensure that all of the print settings are correct. Check the power cord connections. tab within the printer properties. Check the power switch and the power source. If a printer system error occurs, contact your Windows. The machine...
... machine may Remove the printer driver and then reinstall be configured incorrectly. it . Select the correct paper source. Select Xerox WorkCentre PE16 as the default printer. Check the machine for example, LPT1. The printer driver may be incorrectly installed. Check the display message on the control panel to ensure that all of the print settings are correct. Check the power cord connections. tab within the printer properties. Check the power switch and the power source. If a printer system error occurs, contact your Windows. The machine...
User Guide
Page 124
... Advanced Options window of toner. Press the scroll button (¦ or ‹) until "Machine Setup" appears on again. TROUBLESHOOTING 8.17 The wrong printer driver was selected. Try printing a job from another computer and try a new printer cable. An error occurs repeatedly when you know works. Press the scroll button (¦ or ‹) to save the selection. 5. Try a print job that you have blank Check the file to another application. Some parts, such as Bit Image...
... Advanced Options window of toner. Press the scroll button (¦ or ‹) until "Machine Setup" appears on again. TROUBLESHOOTING 8.17 The wrong printer driver was selected. Try printing a job from another computer and try a new printer cable. An error occurs repeatedly when you know works. Press the scroll button (¦ or ‹) to save the selection. 5. Try a print job that you have blank Check the file to another application. Some parts, such as Bit Image...

User Guide
Page 129
... horizontally aligned black streaks or smears appear: • The toner cartridge may require repair. Remove the cartridge and reinsert. • The toner cartridge may be installed improperly. Fax Problems Condition The machine is not working, there is no display and the buttons are not working by plugging in the wall is curl or paper does not feed into the printer: • Turn over the stack of paper in the input tray. No dial tone...
... horizontally aligned black streaks or smears appear: • The toner cartridge may require repair. Remove the cartridge and reinsert. • The toner cartridge may be installed improperly. Fax Problems Condition The machine is not working, there is no display and the buttons are not working by plugging in the wall is curl or paper does not feed into the printer: • Turn over the stack of paper in the input tray. No dial tone...
User Guide
Page 130
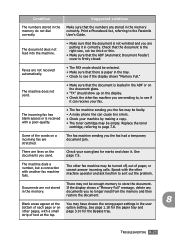
... the fax had a temporary document jam. Faxes are lines on a incoming fax are sending to, to page 7.8. There are not received automatically. • The FAX mode should show up on option setting. The machine dials a number, but a connection with a small page 3.10 for marks and clean it in the memory correctly. Print a Phonebook list, referring to sort out the problem. Some of each page or on the display. • Check the other pages, with another fax machine fails. See page 7.5. Replace the toner cartridge...
... the fax had a temporary document jam. Faxes are lines on a incoming fax are sending to, to page 7.8. There are not received automatically. • The FAX mode should show up on option setting. The machine dials a number, but a connection with a small page 3.10 for marks and clean it in the memory correctly. Print a Phonebook list, referring to sort out the problem. Some of each page or on the display. • Check the other pages, with another fax machine fails. See page 7.5. Replace the toner cartridge...

User Guide
Page 132
... open while copies are scanned more toner. • The machine may be turned frequently on the document glass, or face up in scan mode because of the large amount of memory required to analyse and reproduce the scanned image. Scan the document after the current job is printing received data. Scanning Problems Condition The scanner does not work. Set your computer user's guide. Switch the cable with the IEEE 1284 standard. • Check that the USB or parallel cable is configured...
... open while copies are scanned more toner. • The machine may be turned frequently on the document glass, or face up in scan mode because of the large amount of memory required to analyse and reproduce the scanned image. Scan the document after the current job is printing received data. Scanning Problems Condition The scanner does not work. Set your computer user's guide. Switch the cable with the IEEE 1284 standard. • Check that the USB or parallel cable is configured...

User Guide
Page 138
Facsimile Specifications Item Compatibility Applicable line Data coding Modem speed Transmission speed Scanning speed Maximum document length Paper size Resolution User Memory Halftone Auto dialer Description ITU-T Group 3, ECM Public Switched Telephone Network (PSTN) or behind PABX MH/MR/MMR (ECM Mode) and JPEG for 100 numbers) A SPECIFICATIONS A.5 Platen: approx. 6 seconds/A4 (at standard fax resolution mode) ADF: approx. 8 seconds/A4 (at standard fax resolution mode) Platen: 297 mm ADF: 1.5 m Letter, A4, Legal Standard: 203 x 98 dpi...
Facsimile Specifications Item Compatibility Applicable line Data coding Modem speed Transmission speed Scanning speed Maximum document length Paper size Resolution User Memory Halftone Auto dialer Description ITU-T Group 3, ECM Public Switched Telephone Network (PSTN) or behind PABX MH/MR/MMR (ECM Mode) and JPEG for 100 numbers) A SPECIFICATIONS A.5 Platen: approx. 6 seconds/A4 (at standard fax resolution mode) ADF: approx. 8 seconds/A4 (at standard fax resolution mode) Platen: 297 mm ADF: 1.5 m Letter, A4, Legal Standard: 203 x 98 dpi...
User Guide
Page 151
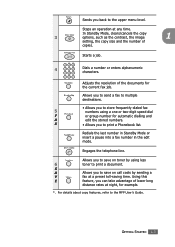
... time. 3 In Standby Mode, clears/cancels the copy options, such as the contrast, the image 1 setting, the copy size and the number of the documents for the current fax job. For details about copy features, refer to the upper menu level. X • Allows you to store frequently-dialed fax 5 numbers using less 6 toner to print a document. Starts a job. 4 Dials a number or enters alphanumeric characters. Sends you to save on call costs by using a one or two-digit speed dial F or group number for example. *. Stops...
... time. 3 In Standby Mode, clears/cancels the copy options, such as the contrast, the image 1 setting, the copy size and the number of the documents for the current fax job. For details about copy features, refer to the upper menu level. X • Allows you to store frequently-dialed fax 5 numbers using less 6 toner to print a document. Starts a job. 4 Dials a number or enters alphanumeric characters. Sends you to save on call costs by using a one or two-digit speed dial F or group number for example. *. Stops...

User Guide
Page 168
Sending a Fax Manually 1 Load the document(s) face up into the ADF. For details about loading a document, see page 2.2. 2 Adjust the document resolution to suit your machine to change the contrast, see the MFP User's Guide. You hear a dial tone. 4 Enter the remote fax machine's fax number using the number keypad. 5 When you need to print a confirmation report automatically each time sending a fax is ready. NOTE: When you want to send the document again. Confirming Transmission When the last page of error messages and their meanings, see page 1.13...
Sending a Fax Manually 1 Load the document(s) face up into the ADF. For details about loading a document, see page 2.2. 2 Adjust the document resolution to suit your machine to change the contrast, see the MFP User's Guide. You hear a dial tone. 4 Enter the remote fax machine's fax number using the number keypad. 5 When you need to print a confirmation report automatically each time sending a fax is ready. NOTE: When you want to send the document again. Confirming Transmission When the last page of error messages and their meanings, see page 1.13...

User Guide
Page 199
... speed 3.2 automatic redialling 2.7 B broadcasting faxes 4.2 C cancelling fax 2.6 scheduled faxes 4.8 characters, enter 1.5 contrast, set 1.13 control panel 1.2 ControlCentre 5.7 D date and time, set 1.7 delayed fax 4.3 document load ADF 2.2 document glass 2.3 prepare 2.2 document glass, load 2.3 F fax system, set advanced settings 5.5 options 1.12 G group dial dialling 3.6 editing 3.5 setting 3.4 M machine ID, set 1.4 P paper, load 2.7 print Phonebook list 3.8 reports 5.3 priority fax 4.5 R receive a fax in fax mode 2.8 in secure receiving mode 5.2 in tel mode 2.8 in the memory 2.8 receive...
... speed 3.2 automatic redialling 2.7 B broadcasting faxes 4.2 C cancelling fax 2.6 scheduled faxes 4.8 characters, enter 1.5 contrast, set 1.13 control panel 1.2 ControlCentre 5.7 D date and time, set 1.7 delayed fax 4.3 document load ADF 2.2 document glass 2.3 prepare 2.2 document glass, load 2.3 F fax system, set advanced settings 5.5 options 1.12 G group dial dialling 3.6 editing 3.5 setting 3.4 M machine ID, set 1.4 P paper, load 2.7 print Phonebook list 3.8 reports 5.3 priority fax 4.5 R receive a fax in fax mode 2.8 in secure receiving mode 5.2 in tel mode 2.8 in the memory 2.8 receive...


