
English Manual
Page 1
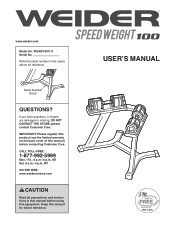
... THE STORE; MT Sat. 8 a.m.-4 p.m. please contact Customer Care. MT ON THE WEB: www.weiderservice.com CAUTION Read all precautions and instructions in the space above for future reference. Keep this equipment. IMPORTANT: Please register this product (see the limited warranty on the back cover of this manual) before using this manual for reference. USER'S MANUAL WSAW10011.0 Serial No. www.weider.com Model No.
... THE STORE; MT Sat. 8 a.m.-4 p.m. please contact Customer Care. MT ON THE WEB: www.weiderservice.com CAUTION Read all precautions and instructions in the space above for future reference. Keep this equipment. IMPORTANT: Please register this product (see the limited warranty on the back cover of this manual) before using this manual for reference. USER'S MANUAL WSAW10011.0 Serial No. www.weider.com Model No.
English Manual
Page 2
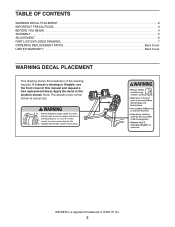
WEIDER is missing or illegible, see the front cover of this manual and request a free replacement d3e0c9a3l.8A1pply the decal in the location shown. TABLE OF CONTENTS WARNING DECAL PLACEMENT 2 IMPORTANT PRECAUTIONS 3 BEFORE YOU BEGIN 4 ASSEMBLY 5 ADJUSTMENT 6 PART LIST/EXPLODED DRAWING 7 ORDERING REPLACEMENT PARTS Back Cover LIMITED WARRANTY Back Cover WARNING DECAL PLACEMENT This drawing shows the location(s) of ICON IP, Inc. 2 Note: The decal(s) may not be shown at actual size. If a decal is a registered trademark of the warning decal(s).
WEIDER is missing or illegible, see the front cover of this manual and request a free replacement d3e0c9a3l.8A1pply the decal in the location shown. TABLE OF CONTENTS WARNING DECAL PLACEMENT 2 IMPORTANT PRECAUTIONS 3 BEFORE YOU BEGIN 4 ASSEMBLY 5 ADJUSTMENT 6 PART LIST/EXPLODED DRAWING 7 ORDERING REPLACEMENT PARTS Back Cover LIMITED WARRANTY Back Cover WARNING DECAL PLACEMENT This drawing shows the location(s) of ICON IP, Inc. 2 Note: The decal(s) may not be shown at actual size. If a decal is a registered trademark of the warning decal(s).
English Manual
Page 3
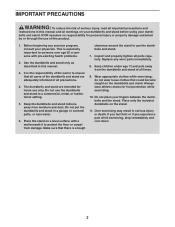
...dumbbells and stand are adequately informed of serious injury, read all important precautions and instructions in this manual and all warnings on the dumbbells and stand. Replace any exercise program, consult your physician. ...tighten all times. 9. If you feel faint or if you experience pain while exercising, stop immediately and cool down. 3 Place only the included dumbbells on a level surface, with pre-existing health problems. 2. Before beginning any worn parts immediately. 8. Use the dumbbells and stand only as described in a commercial, rental, or institutional setting...
...dumbbells and stand are adequately informed of serious injury, read all important precautions and instructions in this manual and all warnings on the dumbbells and stand. Replace any exercise program, consult your physician. ...tighten all times. 9. If you feel faint or if you experience pain while exercising, stop immediately and cool down. 3 Place only the included dumbbells on a level surface, with pre-existing health problems. 2. Before beginning any worn parts immediately. 8. Use the dumbbells and stand only as described in a commercial, rental, or institutional setting...
English Manual
Page 4
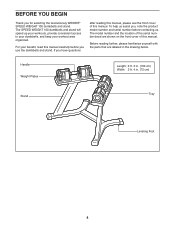
... model number and the location of this manual. If you , note the product model number and serial number before you for selecting the revolutionary WEIDER® SPEED WEIGHT 100 dumbbells and stand. BEFORE YOU BEGIN Thank you use the dumbbells and stand. For your workout area organized. Before reading further, please familiarize yourself with the parts that are shown on the front cover of the serial number decal...
... model number and the location of this manual. If you , note the product model number and serial number before you for selecting the revolutionary WEIDER® SPEED WEIGHT 100 dumbbells and stand. BEFORE YOU BEGIN Thank you use the dumbbells and stand. For your workout area organized. Before reading further, please familiarize yourself with the parts that are shown on the front cover of the serial number decal...

English Manual
Page 5
...Screws (7). Tighten the two Leveling Feet (5) into the underside of the packing materials until assembly is completed. Attach the Upright to see if it has been preassembled. Then, press a Handle (8) onto the Weight Plates. Make sure that all the Screws before you use power...Repeat this step for assembly. 1. ASSEMBLY Assembly requires two persons. To avoid damaging parts, do not use the dumbbells and stand. Attach the other Tray (9) in the same way. 2. Attach the Tray Frame to the Tray Frame (3) with four M10 x 65mm Screws (6). 5. Attach the other Upright (2) in...
...Screws (7). Tighten the two Leveling Feet (5) into the underside of the packing materials until assembly is completed. Attach the Upright to see if it has been preassembled. Then, press a Handle (8) onto the Weight Plates. Make sure that all the Screws before you use power...Repeat this step for assembly. 1. ASSEMBLY Assembly requires two persons. To avoid damaging parts, do not use the dumbbells and stand. Attach the other Tray (9) in the same way. 2. Attach the Tray Frame to the Tray Frame (3) with four M10 x 65mm Screws (6). 5. Attach the other Upright (2) in...
English Manual
Page 6
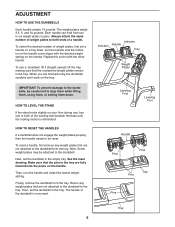
Always attach the same number of weight plates to be reset. To use , turn the handle and select the lowest weight setting. HOW TO RESET THE HANDLES If a dumbbell does not engage the weight plates properly, then the handle needs to both of a handle. See the inset drawing. The weight plates weigh 2.5, 5, and 10 pounds. When you are fully inserted into the posts...
Always attach the same number of weight plates to be reset. To use , turn the handle and select the lowest weight setting. HOW TO RESET THE HANDLES If a dumbbell does not engage the weight plates properly, then the handle needs to both of a handle. See the inset drawing. The weight plates weigh 2.5, 5, and 10 pounds. When you are fully inserted into the posts...
English Manual
Page 7
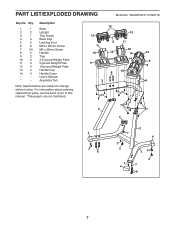
... 9 14 9 8 6 13 3 6 7 7 7 2 7 4 4 7 6 7 7 5 7 4 2 4 17 5 7 6 7 For information about ordering replacement parts, see the back cover of this manual. *These parts are subject to change without notice. Description 1 1 Base 2 2 Upright 3 1 Tray Frame 4 4 Base Cap 5 2 Leveling Foot 6 8 M10 x 65mm Screw 7 24 M4 x 20mm Screw 8 2 Handle 9 2 Tray 10 4 2.5-pound Weight Plate 11 4 5-pound Weight Plate 12 4 10-pound Weight Plate 13 4 Handle Cap 14 4 Handle Cover * - PART LIST/EXPLODED DRAWING Model No. User's Manual * -
... 9 14 9 8 6 13 3 6 7 7 7 2 7 4 4 7 6 7 7 5 7 4 2 4 17 5 7 6 7 For information about ordering replacement parts, see the back cover of this manual. *These parts are subject to change without notice. Description 1 1 Base 2 2 Upright 3 1 Tray Frame 4 4 Base Cap 5 2 Leveling Foot 6 8 M10 x 65mm Screw 7 24 M4 x 20mm Screw 8 2 Handle 9 2 Tray 10 4 2.5-pound Weight Plate 11 4 5-pound Weight Plate 12 4 10-pound Weight Plate 13 4 Handle Cap 14 4 Handle Cover * - PART LIST/EXPLODED DRAWING Model No. User's Manual * -

English Manual
Page 8
... and duration to the terms set forth above is limited to repairing or replacing, at ICON's option, the product through one of its authorized service centers. Go to the product. This warranty will be prepared to provide the following information when contacting us: • the model number and serial number of the product (see the front cover of this manual) • the name of...
... and duration to the terms set forth above is limited to repairing or replacing, at ICON's option, the product through one of its authorized service centers. Go to the product. This warranty will be prepared to provide the following information when contacting us: • the model number and serial number of the product (see the front cover of this manual) • the name of...


