

English Manual
Page 2
... in its authorized service centers with respect to state. This warranty extends only to the terms set forth above limitation may also have other warranty beyond that specifically set forth herein. All products for which vary from the date of its authorized service centers. No..., loss of enjoyment or use, costs of removal, installation or other warranties and any implied warranties of incidental or consequential damages. WEIDER is limited to you specific legal rights. This warranty gives you . Some states do not allow the exclusion or limitation of merchantability...
... in its authorized service centers with respect to state. This warranty extends only to the terms set forth above limitation may also have other warranty beyond that specifically set forth herein. All products for which vary from the date of its authorized service centers. No..., loss of enjoyment or use, costs of removal, installation or other warranties and any implied warranties of incidental or consequential damages. WEIDER is limited to you specific legal rights. This warranty gives you . Some states do not allow the exclusion or limitation of merchantability...
English Manual
Page 3
... all instructions in this manual and in any worn parts,immediately. 11. Always be sure that all parts often Replace any commercial, rental, or institutional setting.
... all instructions in this manual and in any worn parts,immediately. 11. Always be sure that all parts often Replace any commercial, rental, or institutional setting.
English Manual
Page 5
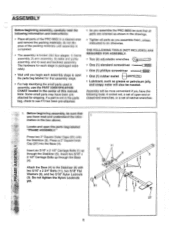
... 2) arm assembly, 3) cable and pulley assembly, and 4) seat and backrest assembly. do otherwise. Before beginning assembly, be more convenient if you assemble the PRO 9655 be needed. If a part is broken into the Base (4). 11 Insert six 5/16" x 2 1/2" Carriage Bolts (1) up through the Stabilizer (5). THE ...to see if it has been pre-attached. • As you have read the following tools: A socket set, a set of open-end or closed-end wrenches, or a set of this manual. ASSEMBLY Before beginning assembly, carefully read and understand the infor- 1 mation in the box ...
... 2) arm assembly, 3) cable and pulley assembly, and 4) seat and backrest assembly. do otherwise. Before beginning assembly, be more convenient if you assemble the PRO 9655 be needed. If a part is broken into the Base (4). 11 Insert six 5/16" x 2 1/2" Carriage Bolts (1) up through the Stabilizer (5). THE ...to see if it has been pre-attached. • As you have read the following tools: A socket set, a set of open-end or closed-end wrenches, or a set of this manual. ASSEMBLY Before beginning assembly, carefully read and understand the infor- 1 mation in the box ...
English Manual
Page 8
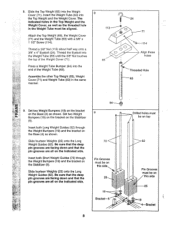
... Cover (71). 65 Press a Weight Tube Bumper (64) into the Top Weight and the Weight Cover. Threaded Hole • 63 Set two Weight Bumpers (19) on the bracket on the Stabilizer (5). Set two Weight Bumpers (19) on the bracket on the Base (4) as shown. Insert both Long Weight Guides (62) through the...
... Cover (71). 65 Press a Weight Tube Bumper (64) into the Top Weight and the Weight Cover. Threaded Hole • 63 Set two Weight Bumpers (19) on the bracket on the Stabilizer (5). Set two Weight Bumpers (19) on the bracket on the Base (4) as shown. Insert both Long Weight Guides (62) through the...
English Manual
Page 10
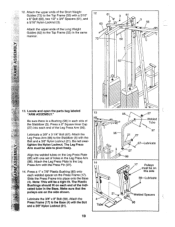
... each end of the Stabilizer (5). cated tube in the Leg Press Arm (96). Attach the Leg Press Plate to the Top Frame (55) with one set of the Short Weight Guides (73) to the Leg 14 Press Arm with the Bolt and a 3/8" Nylon Locknut (21). Press a 2" Square Inner Cap (27) into...
... each end of the Stabilizer (5). cated tube in the Leg Press Arm (96). Attach the Leg Press Plate to the Top Frame (55) with one set of the Short Weight Guides (73) to the Leg 14 Press Arm with the Bolt and a 3/8" Nylon Locknut (21). Press a 2" Square Inner Cap (27) into...
English Manual
Page 24
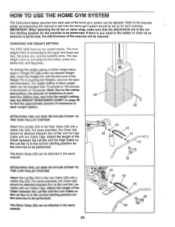
... chain as an exercise is connected to the Low Cable (23) with two Cable Clips. The Nylon Strap (39) can be changed from the weight setting. 25 Use the WEIGHT RESISTANCE CHART on page 26 to the High Cable (58) with two Cable Clips. Note: Due to the cables and pulleys... station may vary from 10 pounds to 150 pounds, in the same manner. 24 23 53 52 53 9 54 CHANGING THE WEIGHT SETTING The PRO 9655 features two weight stacks. The weight setting of either weight stack, insert a Weight Pin (26) under the desired Weight (25). Adjust the length of 10 pounds. Refer to...
... chain as an exercise is connected to the Low Cable (23) with two Cable Clips. The Nylon Strap (39) can be changed from the weight setting. 25 Use the WEIGHT RESISTANCE CHART on page 26 to the High Cable (58) with two Cable Clips. Note: Due to the cables and pulleys... station may vary from 10 pounds to 150 pounds, in the same manner. 24 23 53 52 53 9 54 CHANGING THE WEIGHT SETTING The PRO 9655 features two weight stacks. The weight setting of either weight stack, insert a Weight Pin (26) under the desired Weight (25). Adjust the length of 10 pounds. Refer to...
English Manual
Page 25
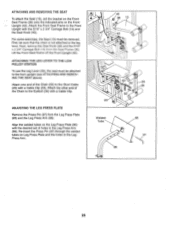
... Plate (95) with the 5/16" x 2 3/4" Carriage Bolt (14) and the Seat Knob (40). Attach the Front Seat Frame to the Front Upright with the desired set the bracket on the Front Seat Frame (36) onto the indicated pins on Leg Press Plate and the holes in the Leg Press Arm (96...). ATTACHING AND REMOVING THE SEAT To attach the Seat (13), set of the Chain (52) to the Short Cable (23) with a Cable Clip. ADJUSTING THE LEG PRESS PLATE Remove the Press Pin (97) from the Seat...
... Plate (95) with the 5/16" x 2 3/4" Carriage Bolt (14) and the Seat Knob (40). Attach the Front Seat Frame to the Front Upright with the desired set the bracket on the Front Seat Frame (36) onto the indicated pins on Leg Press Plate and the holes in the Leg Press Arm (96...). ATTACHING AND REMOVING THE SEAT To attach the Seat (13), set of the Chain (52) to the Short Cable (23) with a Cable Clip. ADJUSTING THE LEG PRESS PLATE Remove the Press Pin (97) from the Seat...


