

English Manual
Page 2
...not apply to you . LIMITED WARRANTY ICON Health & Fitness, Inc. (ICON), warrants this manual. This warranty extends only to be received by an ICON authorized service center, products used as ...repairing, at ICON's option, the product at one of ICON Health & Fitness, Inc. WEIDER is limited in lieu of any and all freight and other warranties and any economic loss,...consequential damages. Remove the PART IDENTIFICATION CHART and the PART LIST/EXPLODED DRAWING before beginning assembly. ICON's obligation under normal use , costs of removal, installation or other consequential ...
...not apply to you . LIMITED WARRANTY ICON Health & Fitness, Inc. (ICON), warrants this manual. This warranty extends only to be received by an ICON authorized service center, products used as ...repairing, at ICON's option, the product at one of ICON Health & Fitness, Inc. WEIDER is limited in lieu of any and all freight and other warranties and any economic loss,...consequential damages. Remove the PART IDENTIFICATION CHART and the PART LIST/EXPLODED DRAWING before beginning assembly. ICON's obligation under normal use , costs of removal, installation or other consequential ...
English Manual
Page 4
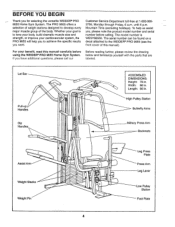
...8226; O ASSEMBLED DIMENSIONS: Height: 78 in. until 6 p.m. High Pulley Station Butterfly Arms Military Press Arm Backrests Assist Arm Weight Stacks -ir.AA - If you , please note the product model number and serial number before using the WEIDER® PRO 9655 Home Gym System. The PRO 9655 offers a selection... of weight stations designed to achieve the specific results you for selecting the versatile WEIDER® PRO 9655 Home Gym System. To help you to develop every major muscle group of this manual carefully ...
...8226; O ASSEMBLED DIMENSIONS: Height: 78 in. until 6 p.m. High Pulley Station Butterfly Arms Military Press Arm Backrests Assist Arm Weight Stacks -ir.AA - If you , please note the product model number and serial number before using the WEIDER® PRO 9655 Home Gym System. The PRO 9655 offers a selection... of weight stations designed to achieve the specific results you for selecting the versatile WEIDER® PRO 9655 Home Gym System. To help you to develop every major muscle group of this manual carefully ...
English Manual
Page 5
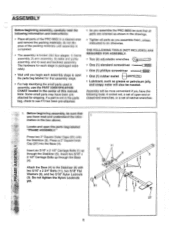
... manual. do otherwise. If a part is broken into the Base (4). 11 Insert six 5/16" x 2 1/2" Carriage Bolts (1) up through the Stabilizer (5). Assembly will also be sure that all parts are oriented as you have read the following tools: A socket set, a set of the PRO 9655 ...in the drawings. • Tighten all parts of open the parts bag labeled "FRAME ASSEMBLY." Before beginning assembly, be needed. Press two 2" Square Outer Caps (51) onto the Stabilizer (5). Insert two 5/16...
... manual. do otherwise. If a part is broken into the Base (4). 11 Insert six 5/16" x 2 1/2" Carriage Bolts (1) up through the Stabilizer (5). Assembly will also be sure that all parts are oriented as you have read the following tools: A socket set, a set of the PRO 9655 ...in the drawings. • Tighten all parts of open the parts bag labeled "FRAME ASSEMBLY." Before beginning assembly, be needed. Press two 2" Square Outer Caps (51) onto the Stabilizer (5). Insert two 5/16...
English Manual
Page 13
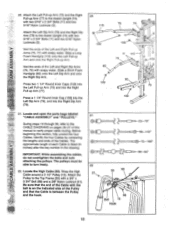
...Left and Right Dip Arms (78, 79) with two 5/16" x 2 3/4" Bolts (11) and two 5/16" Nylon Locknuts (3). Locate and open the parts bags labeled "CABLE ASSEMBLY" and "PULLEYS." Locate the High Cable (58). Be sure that the Cable is listed (in inches) after the key number in the drawing. Wet the...of the Left and Right Pull-up Arm. During steps 19 through 39, refer to the Assist Upright (74) with soapy water. Before beginning this manual to turn freely. ' 22. Identify the four Cables by comparing the lengths and ends of this section, fully unwind the four Cables. The pulleys ...
...Left and Right Dip Arms (78, 79) with two 5/16" x 2 3/4" Bolts (11) and two 5/16" Nylon Locknuts (3). Locate and open the parts bags labeled "CABLE ASSEMBLY" and "PULLEYS." Locate the High Cable (58). Be sure that the Cable is listed (in inches) after the key number in the drawing. Wet the...of the Left and Right Pull-up Arm. During steps 19 through 39, refer to the Assist Upright (74) with soapy water. Before beginning this manual to turn freely. ' 22. Identify the four Cables by comparing the lengths and ends of this section, fully unwind the four Cables. The pulleys ...
English Manual
Page 23
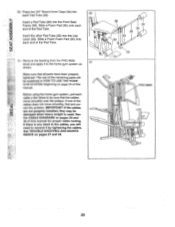
... each end of the Pad Tube. 51. See TROUBLE-SHOOTING AND MAINTE- ASSEMBLY 50. Insert a Pad Tube (28) into the Leg Lever (29). Insert the other Pad Tube (28) into the Front Seat Frame (36). Remove the backing from the PRO 9655 decal and apply it by tightening the cables. Press two 3/4" Round... on pages 27 and 28. 36 30 34 28 34 30 0 29 0 PRO 9655 0 0 23 See the CABLE DIAGRAMS on pages 29 and 30 of the cables does not move smoothly over the pulleys. NANCE on page 24 of this manual for proper cable routing. IMPORTANT: If the cables are not properly installed...
... each end of the Pad Tube. 51. See TROUBLE-SHOOTING AND MAINTE- ASSEMBLY 50. Insert a Pad Tube (28) into the Leg Lever (29). Insert the other Pad Tube (28) into the Front Seat Frame (36). Remove the backing from the PRO 9655 decal and apply it by tightening the cables. Press two 3/4" Round... on pages 27 and 28. 36 30 34 28 34 30 0 29 0 PRO 9655 0 0 23 See the CABLE DIAGRAMS on pages 29 and 30 of the cables does not move smoothly over the pulleys. NANCE on page 24 of this manual for proper cable routing. IMPORTANT: If the cables are not properly installed...
English Manual
Page 33
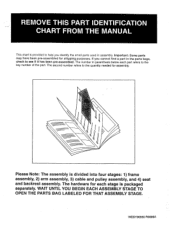
.... REMOVE THIS PART IDENTIFICATION CHART FROM THE MANUAL This chart is provided to help'you cannot find a part in the parts bags, check to see if it has been pre-assembled. WAIT UNTIL YOU BEGIN EACH ASSEMBLY STAGE TO OPEN THE PARTS BAG LABELED FOR THAT ASSEMBLY STAGE. The hardware for each part refers...
.... REMOVE THIS PART IDENTIFICATION CHART FROM THE MANUAL This chart is provided to help'you cannot find a part in the parts bags, check to see if it has been pre-assembled. WAIT UNTIL YOU BEGIN EACH ASSEMBLY STAGE TO OPEN THE PARTS BAG LABELED FOR THAT ASSEMBLY STAGE. The hardware for each part refers...


