
English Manual
Page 1
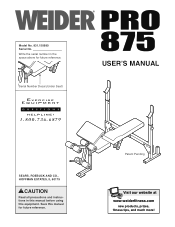
Write the serial number in this manual before using this manual for future reference. Save this equipment. Serial Number Decal (Under Seat) USER'S MANUAL SEARS, ROEBUCK AND CO., HOFFMAN ESTATES, IL 60179 CAUTION Read all precautions and instructions in the space above for future reference. Patent Pending Visit our website at www.weiderfitness.com new products, prizes, fitness tips, and much more! Model No. 831.150680 Serial No.
Write the serial number in this manual before using this manual for future reference. Save this equipment. Serial Number Decal (Under Seat) USER'S MANUAL SEARS, ROEBUCK AND CO., HOFFMAN ESTATES, IL 60179 CAUTION Read all precautions and instructions in the space above for future reference. Patent Pending Visit our website at www.weiderfitness.com new products, prizes, fitness tips, and much more! Model No. 831.150680 Serial No.

English Manual
Page 2
... 4 PART IDENTIFICATION CHART 5 ASSEMBLY 6 ADJUSTMENTS 10 EXERCISE GUIDELINES 12 PART LIST 14 EXPLODED DRAWING 15 ORDERING REPLACEMENT PARTS Back Cover FULL 90 DAY WARRANTY Back Cover WARNING DECAL PLACEMENT The decal shown at 1-800-736-6879, Monday through Saturday, 7 a.m. Apply the replacement decal in the location shown.... 2 If the decal is missing, or if it is not legible, please call our tollfree HELPLINE at the right has been applied to order a free replacement decal. until 7 p.m. Central Time (excluding holidays), to the weight bench...
... 4 PART IDENTIFICATION CHART 5 ASSEMBLY 6 ADJUSTMENTS 10 EXERCISE GUIDELINES 12 PART LIST 14 EXPLODED DRAWING 15 ORDERING REPLACEMENT PARTS Back Cover FULL 90 DAY WARRANTY Back Cover WARNING DECAL PLACEMENT The decal shown at 1-800-736-6879, Monday through Saturday, 7 a.m. Apply the replacement decal in the location shown.... 2 If the decal is missing, or if it is not legible, please call our tollfree HELPLINE at the right has been applied to order a free replacement decal. until 7 p.m. Central Time (excluding holidays), to the weight bench...
English Manual
Page 3
... the weight bench. 14. When adding or removing weights, always keep some weight on the leg lever to support a maximum user weight of weight on the leg lever. 12. Keep children under the age of serious injury, read the following important precau- Cover the floor beneath the weight bench to catch the barbell if you are inserted completely and tightened into the uprights before beginning any exercise program...
... the weight bench. 14. When adding or removing weights, always keep some weight on the leg lever to support a maximum user weight of weight on the leg lever. 12. Keep children under the age of serious injury, read the following important precau- Cover the floor beneath the weight bench to catch the barbell if you are inserted completely and tightened into the uprights before beginning any exercise program...
English Manual
Page 4
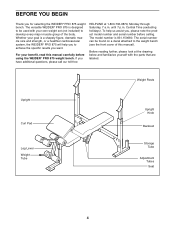
... manual carefully before calling. For your own weight set (not included) to achieve the specific results you have additional questions, please call our toll-free HELPLINE at the drawing below and familiarize yourself with your benefit, read this manual). The model number is designed to the weight bench (see the front cover of the body. Weight Rests Upright Curl Pad Leg Lever Weight Tube Upright Knob Backrest Storage Tube Adjustment...
... manual carefully before calling. For your own weight set (not included) to achieve the specific results you have additional questions, please call our toll-free HELPLINE at the drawing below and familiarize yourself with your benefit, read this manual). The model number is designed to the weight bench (see the front cover of the body. Weight Rests Upright Curl Pad Leg Lever Weight Tube Upright Knob Backrest Storage Tube Adjustment...
English Manual
Page 5
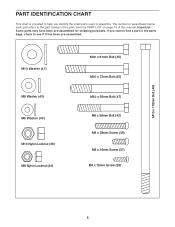
... the part number of the part, from the PART LIST on page 14 of this manual. If you identify the small parts used in assembly. M10 x 178mm Bolt (46) M10 Washer (41) M8 Washer (43) M6 Washer (40) M10 Nylon Locknut (36) M8 Nylon Locknut (44) M10 x 81mm Bolt (35) M10 x 72mm Bolt (45) M10 x 65mm Bolt (47) M8 x 58mm Bolt (42) M6 x 38mm Screw...
... the part number of the part, from the PART LIST on page 14 of this manual. If you identify the small parts used in assembly. M10 x 178mm Bolt (46) M10 Washer (41) M8 Washer (43) M6 Washer (40) M10 Nylon Locknut (36) M8 Nylon Locknut (44) M10 x 81mm Bolt (35) M10 x 72mm Bolt (45) M10 x 65mm Bolt (47) M8 x 58mm Bolt (42) M6 x 38mm Screw...
English Manual
Page 6
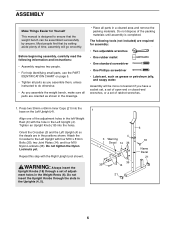
.... Attach the Crossbar to the Left Upright with the Right Upright (not shown). Repeat this step with four M10 x 81mm Bolts (35), two Joint Plates (14), and four M10 Nylon Locknuts (36). The following information and instructions: • Assembly requires two people. • For help identifying small parts, use the PART IDENTIFICATION CHART on the Left Upright (4). Most people find that the weight bench can...
.... Attach the Crossbar to the Left Upright with the Right Upright (not shown). Repeat this step with four M10 x 81mm Bolts (35), two Joint Plates (14), and four M10 Nylon Locknuts (36). The following information and instructions: • Assembly requires two people. • For help identifying small parts, use the PART IDENTIFICATION CHART on the Left Upright (4). Most people find that the weight bench can...
English Manual
Page 7
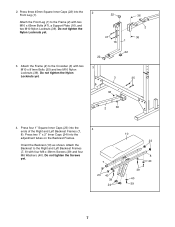
...36 2 36 4. Press three 45mm Square Inner Caps (22) into the adjustment tubes on the Backrest Frames. Press two 1" x 2" Inner Caps (24) into the 2 Front Leg (1). 2. Attach the Front Leg (1) to the Crossbar (3) with two M10 x 81mm Bolts (35) and two M10 Nylon Locknuts (36). Do not tighten the Nylon Locknuts ...Frame (2) with four M6 x 38mm Screws (39) and four M6 Washers (40). Attach the Backrest to the Right and Left Backrest Frames (7, 8) with two M10 x 65mm Bolts (47), a Support Plate (16), and two M10 Nylon Locknuts (36). Do not tighten the Screws yet. 7 23 40 39 24 10...
...36 2 36 4. Press three 45mm Square Inner Caps (22) into the adjustment tubes on the Backrest Frames. Press two 1" x 2" Inner Caps (24) into the 2 Front Leg (1). 2. Attach the Front Leg (1) to the Crossbar (3) with two M10 x 81mm Bolts (35) and two M10 Nylon Locknuts (36). Do not tighten the Nylon Locknuts ...Frame (2) with four M6 x 38mm Screws (39) and four M6 Washers (40). Attach the Backrest to the Right and Left Backrest Frames (7, 8) with two M10 x 65mm Bolts (47), a Support Plate (16), and two M10 Nylon Locknuts (36). Do not tighten the Screws yet. 7 23 40 39 24 10...

English Manual
Page 8
... the indicated hole in step 4. 5 Lubricate 46 41 7 26 8 41 36 2 25 6. Lubricate the M10 x 178m Bolt (46). the Leg Lever must be able to the Leg Lever (9) with the Bolt, two M10 Washers (41), and an M10 Nylon Locknut (36). Tighten the four M6 x 38mm Screws (39) used in steps 1-3. Attach the Weight Tube (15) to pivot easily. 7. Attach the Right and Left...
... the indicated hole in step 4. 5 Lubricate 46 41 7 26 8 41 36 2 25 6. Lubricate the M10 x 178m Bolt (46). the Leg Lever must be able to the Leg Lever (9) with the Bolt, two M10 Washers (41), and an M10 Nylon Locknut (36). Tighten the four M6 x 38mm Screws (39) used in steps 1-3. Attach the Weight Tube (15) to pivot easily. 7. Attach the Right and Left...
English Manual
Page 9
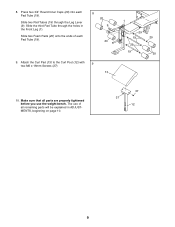
Slide the third Pad Tube through the Leg Lever (9). Attach the Curl Pad (13) to the Curl Post (12) with 9 two M6 x 16mm Screws (37). 13 1 29 19 29 19 29 20 10. The use of each Pad Tube (19). Slide two Pad Tubes (19) through the holes in ADJUSTMENTS, beginning on page 10. 37 37 12 9 8. Make sure that all remaining parts will be explained in the Front Leg (1). Slide two Foam Pads (20) onto the ends of all parts are properly tightened before you use the weight bench. Press two 3/4" Round Inner Caps (29) into each Pad Tube (19). 8 20 9 20 9.
Slide the third Pad Tube through the Leg Lever (9). Attach the Curl Pad (13) to the Curl Post (12) with 9 two M6 x 16mm Screws (37). 13 1 29 19 29 19 29 20 10. The use of each Pad Tube (19). Slide two Pad Tubes (19) through the holes in ADJUSTMENTS, beginning on page 10. 37 37 12 9 8. Make sure that all remaining parts will be explained in the Front Leg (1). Slide two Foam Pads (20) onto the ends of all parts are properly tightened before you use the weight bench. Press two 3/4" Round Inner Caps (29) into each Pad Tube (19). 8 20 9 20 9.
English Manual
Page 10
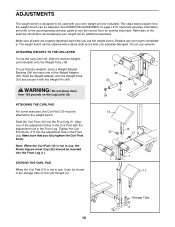
... the adjustment hole in the Front Leg. To use Olympic weights, press a Weight Adapter Bushing (34) into the Front Leg (1). Replace any worn parts immediately. Do not use , the 45mm Square Inner Cap (22) should be inserted into each time you fully tighten the Curl Post Knob. WARNING: Do not place more than 150 pounds on the Left Upright (4). 13 12 22 17 1 13 Storage...
... the adjustment hole in the Front Leg. To use Olympic weights, press a Weight Adapter Bushing (34) into the Front Leg (1). Replace any worn parts immediately. Do not use , the 45mm Square Inner Cap (22) should be inserted into each time you fully tighten the Curl Post Knob. WARNING: Do not place more than 150 pounds on the Left Upright (4). 13 12 22 17 1 13 Storage...
English Manual
Page 11
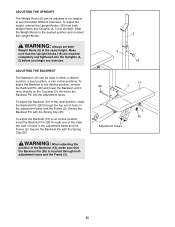
... of the lower two sets of the Backrest (10), make sure that the Upright Knobs (18) are inserted completely and tightened into the adjustment tubes. Secure the Backrest Pin with the Spring Clip (25). ADJUSTING THE UPRIGHTS The Weight Rests (6) can be adjusted to six heights to an incline position, insert the Backrest Pin (26) through both Weight Rests and Uprights (4, 5 [not shown]). To adjust the...
... of the lower two sets of the Backrest (10), make sure that the Upright Knobs (18) are inserted completely and tightened into the adjustment tubes. Secure the Backrest Pin with the Spring Clip (25). ADJUSTING THE UPRIGHTS The Weight Rests (6) can be adjusted to six heights to an incline position, insert the Backrest Pin (26) through both Weight Rests and Uprights (4, 5 [not shown]). To adjust the...
English Manual
Page 12
... appropriate parts of the body. Refer to the muscle chart on Tuesday and Thursday. • Rest from session to session. Proper breathing is an essential part of an effective exercise program. A "set . Exercise for 20 to 30 minutes, resting for each week to give balance and variety to your workouts, vary the exercises from both weight training and aerobic exercise for several exercises, and a list...
... appropriate parts of the body. Refer to the muscle chart on Tuesday and Thursday. • Rest from session to session. Proper breathing is an essential part of an effective exercise program. A "set . Exercise for 20 to 30 minutes, resting for each week to give balance and variety to your workouts, vary the exercises from both weight training and aerobic exercise for several exercises, and a list...
English Manual
Page 13
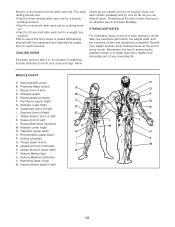
... three minutes after each set for a toning work- Include stretches for both your weight and key body measurements at the end of each set for a muscle building workout. • Rest for one minute after each workout is to make exercise a regular and enjoyable part of your everyday life. Stretching at the end of every month. MUSCLE CHART A. Tibialis Anterior (front of...
... three minutes after each set for a toning work- Include stretches for both your weight and key body measurements at the end of each set for a muscle building workout. • Rest for one minute after each workout is to make exercise a regular and enjoyable part of your everyday life. Stretching at the end of every month. MUSCLE CHART A. Tibialis Anterior (front of...

English Manual
Page 14
... Screw 40 4 M6 Washer 41 2 M10 Washer 42 1 M8 x 58mm Bolt 43 2 M8 Washer 44 1 M8 Nylon Locknut 45 1 M10 x 72mm Bolt 46 1 M10 x 178mm Bolt 47 2 M10 x 65mm Bolt 48 1 Weight Pin # 1 User's Manual # 1 Exercise Guide "#" Indicates a non-illustrated part. Qty. PART LIST-Model No. 831.150680 R1101A Key No. See the back cover of this manual for information on ordering replacement parts. 14 Specifications are subject to change without notice. Description Key...
... Screw 40 4 M6 Washer 41 2 M10 Washer 42 1 M8 x 58mm Bolt 43 2 M8 Washer 44 1 M8 Nylon Locknut 45 1 M10 x 72mm Bolt 46 1 M10 x 178mm Bolt 47 2 M10 x 65mm Bolt 48 1 Weight Pin # 1 User's Manual # 1 Exercise Guide "#" Indicates a non-illustrated part. Qty. PART LIST-Model No. 831.150680 R1101A Key No. See the back cover of this manual for information on ordering replacement parts. 14 Specifications are subject to change without notice. Description Key...
English Manual
Page 15
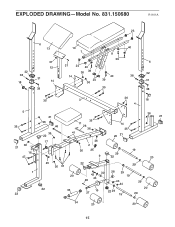
EXPLODED DRAWING-Model No. 831.150680 R1101A 23 6 13 10 7 40 8 39 37 6 12 37 23 40 32 38 31 18 14 36 39 14 40 24 39 36 32 38 31 38 35 38 5 35 36 21 16 47 1 22 35 3 36 18 4 21 36 46 36 22 17 35 11 26 36 41 36 2 36 25 9 14 35 20 21 19 29 22 36 21 20 45 22 36 37 29 20 42 30 28 29 19 43 48 43 29 44 22 20 33 15 27 22 29 19 29 34 20 20 15
EXPLODED DRAWING-Model No. 831.150680 R1101A 23 6 13 10 7 40 8 39 37 6 12 37 23 40 32 38 31 18 14 36 39 14 40 24 39 36 32 38 31 38 35 38 5 35 36 21 16 47 1 22 35 3 36 18 4 21 36 46 36 22 17 35 11 26 36 41 36 2 36 25 9 14 35 20 21 19 29 22 36 21 20 45 22 36 37 29 20 42 30 28 29 19 43 48 43 29 44 22 20 33 15 27 22 29 19 29 34 20 20 15
English Manual
Page 16
ORDERING REPLACEMENT PARTS Model No. 831.150680 QUESTIONS? All replacement parts are listed on pages 14 and 15 of this manual) SEARS, ROEBUCK AND CO., HOFFMAN ESTATES, IL 60179 FULL 90 DAY WARRANTY For 90 days from state to state. This warranty does not apply when the WEIGHT BENCH EXERCISER is missing • or you visit your WEIDER® PRO 875 are available for rental purposes. See...
ORDERING REPLACEMENT PARTS Model No. 831.150680 QUESTIONS? All replacement parts are listed on pages 14 and 15 of this manual) SEARS, ROEBUCK AND CO., HOFFMAN ESTATES, IL 60179 FULL 90 DAY WARRANTY For 90 days from state to state. This warranty does not apply when the WEIGHT BENCH EXERCISER is missing • or you visit your WEIDER® PRO 875 are available for rental purposes. See...


