
English Manual
Page 4
... on the seat when the backrest is the responsibility of the owner to balance the bench (see page 15). It is folded. 3'` 'The Weight bench Is intended for protection. Use the weight bench only as described in this manual. 12. Always place 50 pounds on the leg lever when performing squat exercises... to ensure that all instructions in this manual before • using the weight bench. Always fold the backrest out of the way when performing squat exercises (see page 15). Cover the floor beneath the weight...
... on the seat when the backrest is the responsibility of the owner to balance the bench (see page 15). It is folded. 3'` 'The Weight bench Is intended for protection. Use the weight bench only as described in this manual. 12. Always place 50 pounds on the leg lever when performing squat exercises... to ensure that all instructions in this manual before • using the weight bench. Always fold the backrest out of the way when performing squat exercises (see page 15). Cover the floor beneath the weight...
English Manual
Page 5
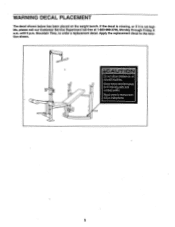
Mountain Time, to the location shown. Read ovvner's manual and follow instructions. 5 Apply the replacement decal to order a replacement decal. until 6 p.m. Keep hands and feet away from moving parts and contact points. If the decal is missing, or if it is not legible, please call our Customer Service Department toll-free at 1-800-999-3756, Monday through Friday, 6 a.m. OPM Otto 1,, Do not allow children on the weight bench. WARNING DECAL PLACEMENT The decal shown below has been placed on or around machine.
Mountain Time, to the location shown. Read ovvner's manual and follow instructions. 5 Apply the replacement decal to order a replacement decal. until 6 p.m. Keep hands and feet away from moving parts and contact points. If the decal is missing, or if it is not legible, please call our Customer Service Department toll-free at 1-800-999-3756, Monday through Friday, 6 a.m. OPM Otto 1,, Do not allow children on the weight bench. WARNING DECAL PLACEMENT The decal shown below has been placed on or around machine.
English Manual
Page 6
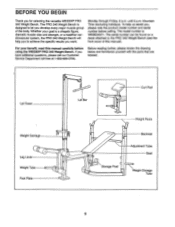
...please review the drawing below and familiarize yourself with the parts that are labeled. If you for selecting the versatile WEIDER® PRO 340 Weight Bench. To help you to achieve the specific results you develop every major muscle group of this manual carefully before calling....strength, or a healthier cardiovascular system, the PRO 340 Weight Bench will help us assist you, please note the product model number and serial number before using the WEIDER• PRO 340 Weight Bench. The model number is designed to the PRO 340 Weight Bench (see the front cover of the body....
...please review the drawing below and familiarize yourself with the parts that are labeled. If you for selecting the versatile WEIDER® PRO 340 Weight Bench. To help you to achieve the specific results you develop every major muscle group of this manual carefully before calling....strength, or a healthier cardiovascular system, the PRO 340 Weight Bench will help us assist you, please note the product model number and serial number before using the WEIDER• PRO 340 Weight Bench. The model number is designed to the PRO 340 Weight Bench (see the front cover of the body....
English Manual
Page 7
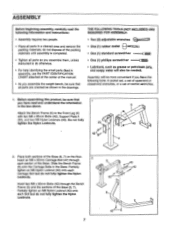
... small parts Crsed in assembly, use the PART IDENTIFICATION CHART attached at the center of the manual. • As you assemble the weight bench, be more convenient if you have the following Information and instructions: • Assembly requires two people. • Place all parts in a...A O (20), and two ME Nylon Locknuts (40). ASSEMBLY Before beginning assembly, carefully read and understand the information in the box above. 5 Attach the Bench Frame (5) to do not fully tighten the Nylon Locknuts. Place both sections of the Base (6, 7) on the floor. 2 Insert an M8 x 60mm Carriage...
... small parts Crsed in assembly, use the PART IDENTIFICATION CHART attached at the center of the manual. • As you assemble the weight bench, be more convenient if you have the following Information and instructions: • Assembly requires two people. • Place all parts in a...A O (20), and two ME Nylon Locknuts (40). ASSEMBLY Before beginning assembly, carefully read and understand the information in the box above. 5 Attach the Bench Frame (5) to do not fully tighten the Nylon Locknuts. Place both sections of the Base (6, 7) on the floor. 2 Insert an M8 x 60mm Carriage...

English Manual
Page 9
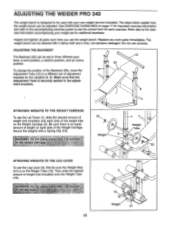
Attach the Seat (22) to the Bench Frame (5) with an M8 x 65mm Bolt (42), two M8 Washers (55), a 13mm Spacer (56), and an M8 Nylon Locknut (40). ented as shown. Lubricate an ... (13) to the Backrest Tubes (13) 7 with the Bolt, two M10 Washers (51), and-an M10 Nylon Locknut (49). Attach the Backrest (23) to the Bench Frame (5) with four M6 x 40mm Bolts (44) and four M6 23 Washers (54). Lower the Backrest (23) onto the Adjustment Tube (12). 9.
Attach the Seat (22) to the Bench Frame (5) with an M8 x 65mm Bolt (42), two M8 Washers (55), a 13mm Spacer (56), and an M8 Nylon Locknut (40). ented as shown. Lubricate an ... (13) to the Backrest Tubes (13) 7 with the Bolt, two M10 Washers (51), and-an M10 Nylon Locknut (49). Attach the Backrest (23) to the Bench Frame (5) with four M6 x 40mm Bolts (44) and four M6 23 Washers (54). Lower the Backrest (23) onto the Adjustment Tube (12). 9.
English Manual
Page 12
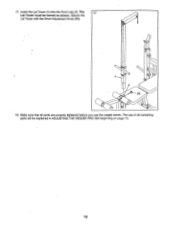
The use of all parts are properly tightened before you use the weight bench. Insert the Lat Tower (1) into the Front Leg (4). The 17 Lat Tower must be explained in ADJUSTING THE WEIDER PRO 340 beginning on page 13. 12 Make sure that all remaining parts will be turned as shown. 17. Secure the Lat Tower with the Short Adjustment Knob (26). 4 A 26 0 18.
The use of all parts are properly tightened before you use the weight bench. Insert the Lat Tower (1) into the Front Leg (4). The 17 Lat Tower must be explained in ADJUSTING THE WEIDER PRO 340 beginning on page 13. 12 Make sure that all remaining parts will be turned as shown. 17. Secure the Lat Tower with the Short Adjustment Knob (26). 4 A 26 0 18.
English Manual
Page 13
... the desired amount of the weight tube on the Weight Carriage (2). Do not use the weight bench. Be sure there is an equal amount of the Weight Carriage. The weight bench can be set of adjustment brackets on page 17 for important exercise information and refer to the ... WARNING: Do not place more than 130 pounds on the Weight Tube (19). ADJUSTING THE WEIDER PRO 340 The weight bench is designed to be used with a Spring Clip (53). The steps below explain how the weight bench can be sure the Weight Stop (21) is securely seated in the adjustment brackets. •...
... the desired amount of the weight tube on the Weight Carriage (2). Do not use the weight bench. Be sure there is an equal amount of the Weight Carriage. The weight bench can be set of adjustment brackets on page 17 for important exercise information and refer to the ... WARNING: Do not place more than 130 pounds on the Weight Tube (19). ADJUSTING THE WEIDER PRO 340 The weight bench is designed to be used with a Spring Clip (53). The steps below explain how the weight bench can be sure the Weight Stop (21) is securely seated in the adjustment brackets. •...
English Manual
Page 14
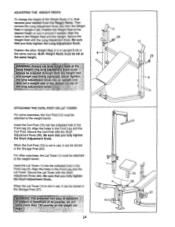
...Curl Post with the Long Adjustment Knob. For other Weight Rest (11) in Upright B (9) in the Front Leg and the Lat Tower. to the weight bench. Secure the Weight Rest with the Short Adjustment Knob (26). Position the other exercises, the Lat Tower (1) must be inserted thrinigkbath the weightrest and upright... Post. Insert the Curl Post (10) into the indicated hole in the Storage Post (27). Both Weight Rests must be attached to the weight bench. ATTACHING THE CURL POST OR LAT TOWER For some exercises, the Curl Post (10) must always be set both weight,rests at the same height...
...Curl Post with the Long Adjustment Knob. For other Weight Rest (11) in Upright B (9) in the Front Leg and the Lat Tower. to the weight bench. Secure the Weight Rest with the Short Adjustment Knob (26). Position the other exercises, the Lat Tower (1) must be inserted thrinigkbath the weightrest and upright... Post. Insert the Curl Post (10) into the indicated hole in the Storage Post (27). Both Weight Rests must be attached to the weight bench. ATTACHING THE CURL POST OR LAT TOWER For some exercises, the Curl Post (10) must always be set both weight,rests at the same height...
English Manual
Page 15
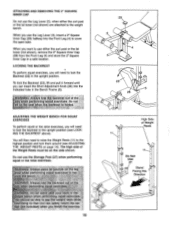
...(see LOCKING THE BACKREST above). Do not use either the curl post or the lat tower (not shown) are attached to a ance the bench. LOCKING THE BACKREST To perform squat exercises, you will then need to ii4gfilkbenCriiiiii01:iiiforriii!jg squat exercises. The high side of the way when ... To perform squat or toe raise exercises, you use the Leg Lever (3), insert a 2" Square Inner Cap (29) halfway into the indicated hole in the Bench Frame (5). ;,WARNING:, AlWays fold thqApckrest out of Weight Rests 11N C 0 0 11 Do Not Use 27 Stand Facing this Direction To lock the Backrest (...
...(see LOCKING THE BACKREST above). Do not use either the curl post or the lat tower (not shown) are attached to a ance the bench. LOCKING THE BACKREST To perform squat exercises, you will then need to ii4gfilkbenCriiiiii01:iiiforriii!jg squat exercises. The high side of the way when ... To perform squat or toe raise exercises, you use the Leg Lever (3), insert a 2" Square Inner Cap (29) halfway into the indicated hole in the Bench Frame (5). ;,WARNING:, AlWays fold thqApckrest out of Weight Rests 11N C 0 0 11 Do Not Use 27 Stand Facing this Direction To lock the Backrest (...
English Manual
Page 20
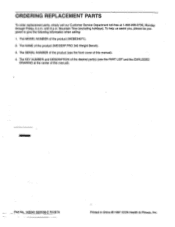
... of this manual). To help us assist you, please be prepared to give the following information when calling: 1. The MODEL NUMBER of the product (WEIDER° PRO 340 Weight Bench). 3. The NAME of the product (WEBE34071). 2. Part No. 142240 G03536-C R1097A Printed in China © 1997 ICON Health & Fitness, Inc. until 6 p.m. The SERIAL NUMBER...
... of this manual). To help us assist you, please be prepared to give the following information when calling: 1. The MODEL NUMBER of the product (WEIDER° PRO 340 Weight Bench). 3. The NAME of the product (WEBE34071). 2. Part No. 142240 G03536-C R1097A Printed in China © 1997 ICON Health & Fitness, Inc. until 6 p.m. The SERIAL NUMBER...
English Manual
Page 27
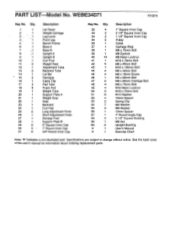
... 2 16 1 17 3 18 6 19 1 20 1 21 1 22 1 23 1 24 1 25 2 26 1 27 1 28 1 29 6 30 5 31 6 Description Lat Tower Weight Carriage Leg Lever Front Leg Bench Frame Base A Base B Upright A Upright B Curl Post Weight Rest Adjustment Tube Backrest Tube Lat Bar Handgrip Cable Clip Pad Tube Foam Pad Weight Tube Support...
... 2 16 1 17 3 18 6 19 1 20 1 21 1 22 1 23 1 24 1 25 2 26 1 27 1 28 1 29 6 30 5 31 6 Description Lat Tower Weight Carriage Leg Lever Front Leg Bench Frame Base A Base B Upright A Upright B Curl Post Weight Rest Adjustment Tube Backrest Tube Lat Bar Handgrip Cable Clip Pad Tube Foam Pad Weight Tube Support...


