

English Manual
Page 1
... refirenCei'' '" a 340 0 OCT 0 9 1997 (4 A C USER'S MANUAL MST CAUTION Read allprecautions and instrucldions in the space above for reference. The trained technicians on our customer hot line will guarantee you . WEBE34071 Serial No. PATENT PENDING Model No. TO AVOID UNNECESSARY DELAYS, PLEASE CALL DIRECT TO OUR TOLL-FREE CUSTOMER HOT LINE. As a manufacturer, we are missing or damaged parts, we will...
... refirenCei'' '" a 340 0 OCT 0 9 1997 (4 A C USER'S MANUAL MST CAUTION Read allprecautions and instrucldions in the space above for reference. The trained technicians on our customer hot line will guarantee you . WEBE34071 Serial No. PATENT PENDING Model No. TO AVOID UNNECESSARY DELAYS, PLEASE CALL DIRECT TO OUR TOLL-FREE CUSTOMER HOT LINE. As a manufacturer, we are missing or damaged parts, we will...
English Manual
Page 2
TABLE OF CONTENTS LIMITED WARRANTY IMPORTANT PRECAUTIONS WARNING DECAL PLACEMENT BEFORE YOU BEGIN ASSEMBLY ADJUSTING THE WEIDER PRO 340 EXERCISE GUIDELINES ORDERING REPLACEMENT PARTS 3 4 5 6 7 13 17 Back Cover Note: A PART IDENTIFICATION CHART and a PART LIST/EXPLODED DRAWING are attached to the center of this manual. Remove the PART IDENTIFICATION CHART and the PART LIST/EXPLODED DRAWING before beginning assembly. 2
TABLE OF CONTENTS LIMITED WARRANTY IMPORTANT PRECAUTIONS WARNING DECAL PLACEMENT BEFORE YOU BEGIN ASSEMBLY ADJUSTING THE WEIDER PRO 340 EXERCISE GUIDELINES ORDERING REPLACEMENT PARTS 3 4 5 6 7 13 17 Back Cover Note: A PART IDENTIFICATION CHART and a PART LIST/EXPLODED DRAWING are attached to the center of this manual. Remove the PART IDENTIFICATION CHART and the PART LIST/EXPLODED DRAWING before beginning assembly. 2

English Manual
Page 3
... or abnormal usage or repairs not provided by ICON. This warranty extends only to you specific legal rights. The warranty extended hereunder is in connection with the use or performance of the product or damages with all other consequential damages of its authorized service centers. WEIDER is a registered trademark of purchase. LIMITED WARRANTY ICON Health & Fitness, Inc. (ICON), warrants this warranty is limited to any and all...
... or abnormal usage or repairs not provided by ICON. This warranty extends only to you specific legal rights. The warranty extended hereunder is in connection with the use or performance of the product or damages with all other consequential damages of its authorized service centers. WEIDER is a registered trademark of purchase. LIMITED WARRANTY ICON Health & Fitness, Inc. (ICON), warrants this warranty is limited to any and all...
English Manual
Page 4
Use the weight bench only as described in this manual. 12. Cover the floor beneath the weight bench for home use the weight bench in any commercial, rental, or institutional setting. 4 Use the weight bench only on the leg lever when performing squat exercises to ensure that all users of the weight bench are adequately informed of all instructions in this manual before • using the weight bench. Always fold the backrest out of the way when performing...
Use the weight bench only as described in this manual. 12. Cover the floor beneath the weight bench for home use the weight bench in any commercial, rental, or institutional setting. 4 Use the weight bench only on the leg lever when performing squat exercises to ensure that all users of the weight bench are adequately informed of all instructions in this manual before • using the weight bench. Always fold the backrest out of the way when performing...
English Manual
Page 6
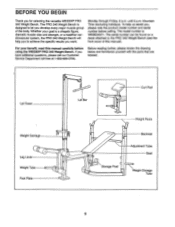
... Customer Service Department toll-free at 1-800-999-3756, Before reading further, please review the drawing below and familiarize yourself with the parts that are labeled. The model number is designed to achieve the specific results you , please note the product model number and serial number before using the WEIDER• PRO 340 Weight Bench. Lat Tower Weight Carriage O Leg Lever Weight Tube Foot Plate Lat Bar 0 0 O O 0 0 0 Curl Pad Weight Rests Backrest C C Storage Post Adjustment Tube Seat Weight Storage...
... Customer Service Department toll-free at 1-800-999-3756, Before reading further, please review the drawing below and familiarize yourself with the parts that are labeled. The model number is designed to achieve the specific results you , please note the product model number and serial number before using the WEIDER• PRO 340 Weight Bench. Lat Tower Weight Carriage O Leg Lever Weight Tube Foot Plate Lat Bar 0 0 O O 0 0 0 Curl Pad Weight Rests Backrest C C Storage Post Adjustment Tube Seat Weight Storage...
English Manual
Page 7
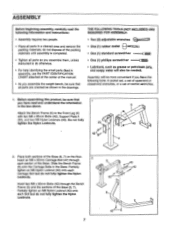
... sure that 1 you assemble the weight bench, be needed. a 20 0 a 40 a • a 2 4 2. Before assembling this product, be sure that all parts are oriented as shown in assembly, use the PART IDENTIFICATION CHART attached at the center of the manual. • As you have the following Information and instructions: • Assembly requires two people. • Place all parts in the Base. Do not fully tighten the Nylon Locknuts...
... sure that 1 you assemble the weight bench, be needed. a 20 0 a 40 a • a 2 4 2. Before assembling this product, be sure that all parts are oriented as shown in assembly, use the PART IDENTIFICATION CHART attached at the center of the manual. • As you have the following Information and instructions: • Assembly requires two people. • Place all parts in the Base. Do not fully tighten the Nylon Locknuts...
English Manual
Page 8
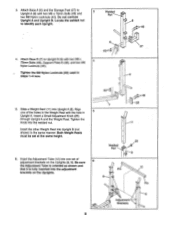
... Nut .. • 8 6 12 • Pin . ...-"' 8 • . . Tighten the Knob into the welded nut. Insert a Small Adjustment Knob (25) through Upright A and the Weight Rest. Attach Base A (6) and the Storage Post (27) to Identify each Upright. • Welded Nut ...1). 8 48 4. Both Weight Rests must be set of the holes in steps 1-4 now. 6 -- .. ,- Locate the welded nut to Upright A (8) with two M8 x 75mm Bolts (48) and 3 two M8...
... Nut .. • 8 6 12 • Pin . ...-"' 8 • . . Tighten the Knob into the welded nut. Insert a Small Adjustment Knob (25) through Upright A and the Weight Rest. Attach Base A (6) and the Storage Post (27) to Identify each Upright. • Welded Nut ...1). 8 48 4. Both Weight Rests must be set of the holes in steps 1-4 now. 6 -- .. ,- Locate the welded nut to Upright A (8) with two M8 x 75mm Bolts (48) and 3 two M8...

English Manual
Page 9
...49). Slide the Weight Stop (21) onto the Weight Tube (19). 54 5 * 45 • 0 0 . ' t 45-A 54 46 10 21 - 0 0 42 55 19 3 57 - 0 'Gt 55 (a , 56 40 9 Lower the Backrest (23) onto the Adjustment Tube (12). 9. Attach the Weight Tube (19) to the Bench Frame (5) with an M8 x 65mm Bolt (42), two ... Locknut; Attach the Seat (22) to the Leg Lever (3) with the M6 x 65mm Bolt (46), two M6 x 16mm Screws (45), and three M6 Washers (54). 54 44 44 8 0 23 Lubricate 43 13 51 . • ► - 49 5 9 22 .. 12 10. Press the 1" Round Angle Cap (57) onto the Weight Tube (...
...49). Slide the Weight Stop (21) onto the Weight Tube (19). 54 5 * 45 • 0 0 . ' t 45-A 54 46 10 21 - 0 0 42 55 19 3 57 - 0 'Gt 55 (a , 56 40 9 Lower the Backrest (23) onto the Adjustment Tube (12). 9. Attach the Weight Tube (19) to the Bench Frame (5) with an M8 x 65mm Bolt (42), two ... Locknut; Attach the Seat (22) to the Leg Lever (3) with the M6 x 65mm Bolt (46), two M6 x 16mm Screws (45), and three M6 Washers (54). 54 44 44 8 0 23 Lubricate 43 13 51 . • ► - 49 5 9 22 .. 12 10. Press the 1" Round Angle Cap (57) onto the Weight Tube (...
English Manual
Page 10
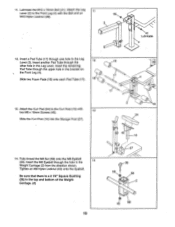
...; . .. . 17 -• - ' .. ,, 13. Attach the Leg 11 Lever (3) to the Curl Post (10) with the Bolt and an M10 Nylon Locknut (49). 3 0 49 • • l s, 0 . 41 Lubricate 4 0 12. Pad Tube through the other hole in the 14 Weight Carriage (2) from the direction shown. Fully thread the M8 Nut (59) onto the... the hole in the Leg Lever. Attach the Curl Pad (24) to the Front Leg (4) with two M6 x 16mm Screws (45). 13 Slide the Curl Post (10) into the Storage Post (27). 3 . 18 24 . , • 45 • 10 ,- --27 14. Tighten an M8 Nylon Locknut ...
...; . .. . 17 -• - ' .. ,, 13. Attach the Leg 11 Lever (3) to the Curl Post (10) with the Bolt and an M10 Nylon Locknut (49). 3 0 49 • • l s, 0 . 41 Lubricate 4 0 12. Pad Tube through the other hole in the 14 Weight Carriage (2) from the direction shown. Fully thread the M8 Nut (59) onto the... the hole in the Leg Lever. Attach the Curl Pad (24) to the Front Leg (4) with two M6 x 16mm Screws (45). 13 Slide the Curl Post (10) into the Storage Post (27). 3 . 18 24 . , • 45 • 10 ,- --27 14. Tighten an M8 Nylon Locknut ...
English Manual
Page 12
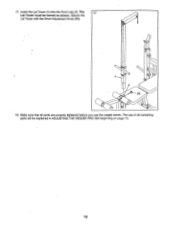
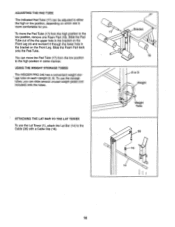
The 17 Lat Tower must be explained in ADJUSTING THE WEIDER PRO 340 beginning on page 13. 12 The use of all parts are properly tightened before you use the weight bench. Insert the Lat Tower (1) into the Front Leg (4). Secure the Lat Tower with the Short Adjustment Knob (26). 4 A 26 0 18. 17. Make sure that all remaining parts will be turned as shown.
The 17 Lat Tower must be explained in ADJUSTING THE WEIDER PRO 340 beginning on page 13. 12 The use of all parts are properly tightened before you use the weight bench. Insert the Lat Tower (1) into the Front Leg (4). Secure the Lat Tower with the Short Adjustment Knob (26). 4 A 26 0 18. 17. Make sure that all remaining parts will be turned as shown.
English Manual
Page 13
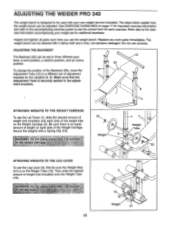
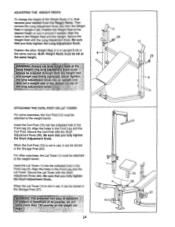
... form for additional exercises. ADJUSTING THE WEIDER PRO 340 The weight bench is designed to be used with a Spring Clip (53). Refer also to three different positions: a level position, a decline position, and an incline position. Inspect and tighten all parts each side of the Weight Carriage. The weight bench can be set of the Backrest (23), move the Adjustment Tube (12) to a different set to the exercise information accompanying your own weight set...
... form for additional exercises. ADJUSTING THE WEIDER PRO 340 The weight bench is designed to be used with a Spring Clip (53). Refer also to three different positions: a level position, a decline position, and an incline position. Inspect and tighten all parts each side of the Weight Carriage. The weight bench can be set of the Backrest (23), move the Adjustment Tube (12) to a different set to the exercise information accompanying your own weight set...
English Manual
Page 14
... in the Storage Post (27). Secure the Curl Post with the Long Adjustment Knob. Secure the Lat Tower with the Short Adjustment Knob (26). When the Lat Tower (1) is not in use , it can be set at the same height; to the weight bench. WARNING: Always set a weight rest In the upright on ca riage. 14 ATTACHING THE CURL POST OR LAT TOWER For some exercises, the...
... in the Storage Post (27). Secure the Curl Post with the Long Adjustment Knob. Secure the Lat Tower with the Short Adjustment Knob (26). When the Lat Tower (1) is not in use , it can be set at the same height; to the weight bench. WARNING: Always set a weight rest In the upright on ca riage. 14 ATTACHING THE CURL POST OR LAT TOWER For some exercises, the...
English Manual
Page 15
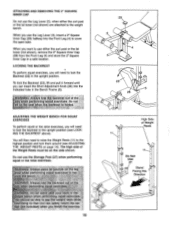
... on the seat When the baCkrest is folded ADJUSTING THE WEIGHT BENCH FOR SQUAT EXERCISES To perform squat or toe raise exercises, you will need to lock the Backrest (23) in the upright position. You will need to ii4gfilkbenCriiiiii01:iiiforriii!jg squat exercises. Do not use either the curl post or the lat tower (not shown) are attached to a ance the bench. WARNINGi Always fold the...
... on the seat When the baCkrest is folded ADJUSTING THE WEIGHT BENCH FOR SQUAT EXERCISES To perform squat or toe raise exercises, you will need to lock the Backrest (23) in the upright position. You will need to ii4gfilkbenCriiiiii01:iiiforriii!jg squat exercises. Do not use either the curl post or the lat tower (not shown) are attached to a ance the bench. WARNINGi Always fold the...
English Manual
Page 16
... Cable (36) with a• Cable Clip (16). 17 0 Bracket 0 0 18 8 or 9 Weight Weight Tube 1 36 16 • O 14 I 16 USING THE WEIGHT STORAGE TUBES The WEIDER PRO 340 has a convenient weight storage tube on the Front Leg. To move the Pad Tube (17) from the high position to the high position in the bracket on each Upright (8, 9). ATTACHING THE LAT BAR TO THE LAT TOWER To use the storage tubes, you . ADJUSTING...
... Cable (36) with a• Cable Clip (16). 17 0 Bracket 0 0 18 8 or 9 Weight Weight Tube 1 36 16 • O 14 I 16 USING THE WEIGHT STORAGE TUBES The WEIDER PRO 340 has a convenient weight storage tube on the Front Leg. To move the Pad Tube (17) from the high position to the high position in the bracket on each Upright (8, 9). ATTACHING THE LAT BAR TO THE LAT TOWER To use the storage tubes, you . ADJUSTING...
English Manual
Page 17
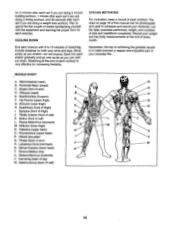
... least one day of light stretching and exercise to your breath. never hold your workouts, vary the exercises from both weight training and aerobic exercise for a maximum of 30 seconds between sets. • Cross Training In the pursuit of a complete and well-balanced fitness program, many sets of aerobic exercise, such as possible without pausing. Each individual exercise can reshape and strengthen your energy level...
... least one day of light stretching and exercise to your breath. never hold your workouts, vary the exercises from both weight training and aerobic exercise for a maximum of 30 seconds between sets. • Cross Training In the pursuit of a complete and well-balanced fitness program, many sets of aerobic exercise, such as possible without pausing. Each individual exercise can reshape and strengthen your energy level...
English Manual
Page 18
Include stretches for both your weight and key body measurements at the end of each workout is to schedule and record your everyday life. Ease into each stretch gradually and go only as far as you stretch-do not bounce. List the date, exercises performed, weight, and numbers of arm) D. Biceps (front of sets and repetitions completed. Obliques (waist) E. Abductor (outer...
Include stretches for both your weight and key body measurements at the end of each workout is to schedule and record your everyday life. Ease into each stretch gradually and go only as far as you stretch-do not bounce. List the date, exercises performed, weight, and numbers of arm) D. Biceps (front of sets and repetitions completed. Obliques (waist) E. Abductor (outer...
English Manual
Page 19
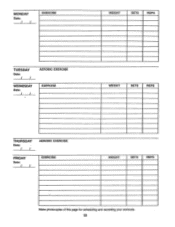
MONDAY Date: / / EXERCISE WEIGHT SETS REPS TUESDAY Date: / / WEDNESDAY Date: / / AEROBIC EXERCISE EXERCISE WEIGHT SETS REPS THURSDAY Date: • / / FRIDAY Date: / / AEROBIC EXERCISE EXERCISE WEIGHT SETS REPS Make photocopies of this page for scheduling and recording your workouts. 19
MONDAY Date: / / EXERCISE WEIGHT SETS REPS TUESDAY Date: / / WEDNESDAY Date: / / AEROBIC EXERCISE EXERCISE WEIGHT SETS REPS THURSDAY Date: • / / FRIDAY Date: / / AEROBIC EXERCISE EXERCISE WEIGHT SETS REPS Make photocopies of this page for scheduling and recording your workouts. 19
English Manual
Page 20
... Time (excluding holidays). The SERIAL NUMBER of the product (see the PART LIST and the EXPLODED DRAWING at 1-800-999-3756, Monday through Friday, 6 a.m. The KEY NUMBER and DESCRIPTION of the desired part(s) (see the front cover of this manual). until 6 p.m. Part No. 142240 G03536-C R1097A Printed in China © 1997 ICON Health & Fitness, Inc. The MODEL NUMBER of the product (WEIDER° PRO 340 Weight Bench). 3. To help us...
... Time (excluding holidays). The SERIAL NUMBER of the product (see the PART LIST and the EXPLODED DRAWING at 1-800-999-3756, Monday through Friday, 6 a.m. The KEY NUMBER and DESCRIPTION of the desired part(s) (see the front cover of this manual). until 6 p.m. Part No. 142240 G03536-C R1097A Printed in China © 1997 ICON Health & Fitness, Inc. The MODEL NUMBER of the product (WEIDER° PRO 340 Weight Bench). 3. To help us...
English Manual
Page 21
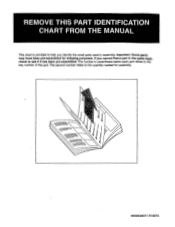
WEBE34071 R1097A The number in the parts bags, check to the quantity needed for shipping purposes. The second number refers to see If it has been pre-assembled. Important: Some parts may have been pre-assembled for assembly. If you cannot find a part in parenthesis below each part refers to help you identify the small parts used in assembly. REMOVE THIS PART IDENTIFICATION CHART FROM THE MANUAL This chart is provided to the key number of the part.
WEBE34071 R1097A The number in the parts bags, check to the quantity needed for shipping purposes. The second number refers to see If it has been pre-assembled. Important: Some parts may have been pre-assembled for assembly. If you cannot find a part in parenthesis below each part refers to help you identify the small parts used in assembly. REMOVE THIS PART IDENTIFICATION CHART FROM THE MANUAL This chart is provided to the key number of the part.
English Manual
Page 27
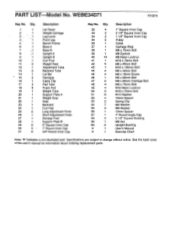
... Lat Tower Weight Carriage Leg Lever Front Leg Bench Frame Base A Base B Upright A Upright B Curl Post Weight Rest Adjustment Tube Backrest Tube Lat Bar Handgrip Cable Clip Pad Tube Foam Pad Weight Tube Support Plate A Weight Stop Seat Backrest Curl Pad Long Adjustment Knob Short Adjustment Knob Storage Post Support Plate B 2" Square Inner Cap 1" Round Inner Cap 3/4" Round Inner Cap Key No. See the back cover of the user's manual for information about ordering replacement parts. PART LIST Model No. WEBE34071 R1097A Key No. Specifications...
... Lat Tower Weight Carriage Leg Lever Front Leg Bench Frame Base A Base B Upright A Upright B Curl Post Weight Rest Adjustment Tube Backrest Tube Lat Bar Handgrip Cable Clip Pad Tube Foam Pad Weight Tube Support Plate A Weight Stop Seat Backrest Curl Pad Long Adjustment Knob Short Adjustment Knob Storage Post Support Plate B 2" Square Inner Cap 1" Round Inner Cap 3/4" Round Inner Cap Key No. See the back cover of the user's manual for information about ordering replacement parts. PART LIST Model No. WEBE34071 R1097A Key No. Specifications...


