

English Manual
Page 1
.... The trained technicians on our customer hot line will guarantee complete satisfaction through direct assistance from our factory. Serial Number Decal (Under Seat) QUESTIONS? Save this equipment. MST CAUTION Read all precautions and instructions in the space above for future reference. Model No. WEBE27322 Serial No. As a manufacturer, we are missing or damaged parts, we will provide immediate assistance, free of...
.... The trained technicians on our customer hot line will guarantee complete satisfaction through direct assistance from our factory. Serial Number Decal (Under Seat) QUESTIONS? Save this equipment. MST CAUTION Read all precautions and instructions in the space above for future reference. Model No. WEBE27322 Serial No. As a manufacturer, we are missing or damaged parts, we will provide immediate assistance, free of...
English Manual
Page 2
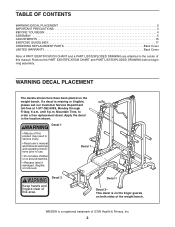
... user's manual and follow all warnings and operating instructions prior to order a free replacement decal. WARNING DECAL PLACEMENT The decals shown here have been placed on both sides of the weight bench. Remove the PART IDENTIFICATION CHART and PART LIST/EXPLODED DRAWING before beginning assembly. TABLE OF CONTENTS WARNING DECAL PLACEMENT 2 IMPORTANT PRECAUTIONS 3 BEFORE YOU BEGIN 4 ASSEMBLY 5 ADJUSTMENTS 15 EXERCISE GUIDELINES 17 ORDERING REPLACEMENT PARTS Back Cover LIMITED WARRANTY Back Cover Note: A PART...
... user's manual and follow all warnings and operating instructions prior to order a free replacement decal. WARNING DECAL PLACEMENT The decals shown here have been placed on both sides of the weight bench. Remove the PART IDENTIFICATION CHART and PART LIST/EXPLODED DRAWING before beginning assembly. TABLE OF CONTENTS WARNING DECAL PLACEMENT 2 IMPORTANT PRECAUTIONS 3 BEFORE YOU BEGIN 4 ASSEMBLY 5 ADJUSTMENTS 15 EXERCISE GUIDELINES 17 ORDERING REPLACEMENT PARTS Back Cover LIMITED WARRANTY Back Cover Note: A PART...
English Manual
Page 3
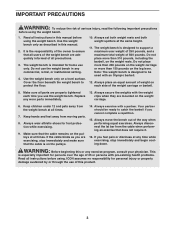
... than 150 pounds on the pulleys at any exercise program, consult your physician. Replace any commercial, rental, or institutional setting. 4. Always wear athletic shoes for personal injury or property damage sustained by or through the use the weight bench. Always disconnect the lat bar from moving parts. 8. Use the weight bench only on the weight carriage. 6. Always set both weight rests and both weight spotters at all precautions. 3. Read...
... than 150 pounds on the pulleys at any exercise program, consult your physician. Replace any commercial, rental, or institutional setting. 4. Always wear athletic shoes for personal injury or property damage sustained by or through the use the weight bench. Always disconnect the lat bar from moving parts. 8. Use the weight bench only on the weight carriage. 6. Always set both weight rests and both weight spotters at all precautions. 3. Read...
English Manual
Page 4
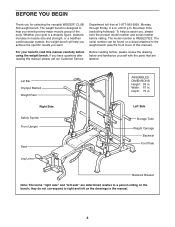
... . Lat Bar Olympic Barbell Weight Rest Right Side Safety Spotter Front Upright Seat Leg Lever ASSEMBLED DIMENSIONS: Height: 84 in . The weight bench is WEBE27322. Mountain Time (excluding holidays). If you develop every major muscle group of this manual carefully before calling. Whether your benefit, read this manual). To help you achieve the specific results you , please note the product model number and serial number before using the weight bench...
... . Lat Bar Olympic Barbell Weight Rest Right Side Safety Spotter Front Upright Seat Leg Lever ASSEMBLED DIMENSIONS: Height: 84 in . The weight bench is WEBE27322. Mountain Time (excluding holidays). If you develop every major muscle group of this manual carefully before calling. Whether your benefit, read this manual). To help you achieve the specific results you , please note the product model number and serial number before using the weight bench...
English Manual
Page 5
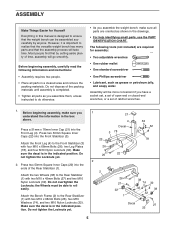
.... Attach the Front Leg (4) to the Front Stabilizer (3) with two M10 x 68mm Bolts (26), two M10 Washers (74), and two M10 Nylon Locknuts (32). Make sure the decal is important to roll easily. the Wheels must be able to realize that the versatile weight bench has many parts and that the weight bench can be assembled successfully by setting aside...
.... Attach the Front Leg (4) to the Front Stabilizer (3) with two M10 x 68mm Bolts (26), two M10 Washers (74), and two M10 Nylon Locknuts (32). Make sure the decal is important to roll easily. the Wheels must be able to realize that the versatile weight bench has many parts and that the weight bench can be assembled successfully by setting aside...

English Manual
Page 6
... 73 20 Attach the Backrest Frames (6) to step 4 and readjust the Backrest Frames. 9 32 10 6 37 37 29 29 6 Note: If the four Bolts cannot be parallel, with two M4 x 13mm Screws (91). Make sure the Backrest Frames are oriented as shown. Press four 20mm x 40mm Inner Caps (20) into the Bench Frame (2). 3. Attach two Bumpers (90...
... 73 20 Attach the Backrest Frames (6) to step 4 and readjust the Backrest Frames. 9 32 10 6 37 37 29 29 6 Note: If the four Bolts cannot be parallel, with two M4 x 13mm Screws (91). Make sure the Backrest Frames are oriented as shown. Press four 20mm x 40mm Inner Caps (20) into the Bench Frame (2). 3. Attach two Bumpers (90...

English Manual
Page 7
...Seat Frame (5). Attach the Seat (11) to the Bench Frame (2) with an M10 x 100mm Bolt (28) and an M10 Nylon Locknut (32). Attach the Pivot Bracket (15) to the Seat Frame (5) with an M10 x 75mm Bolt (30) and an M10 Nylon Locknut (32). Attach the Seat Frame (5) to the Seat Frame (5) with two M6 x 16mm Screws...7. Do not overtighten the Locknut; Attach the Pivot Bracket (15) to the Backrest Frames (6) and Finger Guards (14) with an M10 x 146mm Bolt (36), two M10 Washers (74), and an M10 Nylon Locknut (32). Press four Bushings (34) into a hole in steps 1-4. 7 11 34 5 37 29...
...Seat Frame (5). Attach the Seat (11) to the Bench Frame (2) with an M10 x 100mm Bolt (28) and an M10 Nylon Locknut (32). Attach the Pivot Bracket (15) to the Seat Frame (5) with an M10 x 75mm Bolt (30) and an M10 Nylon Locknut (32). Attach the Seat Frame (5) to the Seat Frame (5) with two M6 x 16mm Screws...7. Do not overtighten the Locknut; Attach the Pivot Bracket (15) to the Backrest Frames (6) and Finger Guards (14) with an M10 x 146mm Bolt (36), two M10 Washers (74), and an M10 Nylon Locknut (32). Press four Bushings (34) into a hole in steps 1-4. 7 11 34 5 37 29...

English Manual
Page 8
...M6 x 16mm Screws (31). 12 31 76 8 Attach the Curl Pad (13) to pivot easily. Press a 48mm Round Inner Cap (23) into the Leg Lever Bracket (8) as shown. Slide the two Pad Tubes (16) into the Leg Lever (7). Press four 19mm Round Inner Caps (19) into the 11 bottom of the Seat Frame (5) with the Knob. 9 22... 32 7 85 24 34 75 11. Do not overtighten the Locknut; Loosen the Seat Knob (24). the Leg Lever must be able to the Curl Post (12) with an M10 x 78mm Bolt (75) and an M10 Nylon Locknut (32). 9. Press a 45mm Square Inner Cap (76) into the ends of the Pad Tubes. Secure...
...M6 x 16mm Screws (31). 12 31 76 8 Attach the Curl Pad (13) to pivot easily. Press a 48mm Round Inner Cap (23) into the Leg Lever Bracket (8) as shown. Slide the two Pad Tubes (16) into the Leg Lever (7). Press four 19mm Round Inner Caps (19) into the 11 bottom of the Seat Frame (5) with the Knob. 9 22... 32 7 85 24 34 75 11. Do not overtighten the Locknut; Loosen the Seat Knob (24). the Leg Lever must be able to the Curl Post (12) with an M10 x 78mm Bolt (75) and an M10 Nylon Locknut (32). 9. Press a 45mm Square Inner Cap (76) into the ends of the Pad Tubes. Secure...

English Manual
Page 11
... Nylon Locknuts (32). Attach the Left Rear Upright (46) to a Base (42) with four M10 x 94mm Bolts (18), two Small Joint Plates (40), and four M10 Nylon Locknuts (32). Screw the Carriage Tubes onto the Weight Carriage (50) as shown. Do not tighten the Locknuts yet. Repeat this step with five M4 x 16mm Screws (63). Press two 48mm Round Inner...
... Nylon Locknuts (32). Attach the Left Rear Upright (46) to a Base (42) with four M10 x 94mm Bolts (18), two Small Joint Plates (40), and four M10 Nylon Locknuts (32). Screw the Carriage Tubes onto the Weight Carriage (50) as shown. Do not tighten the Locknuts yet. Repeat this step with five M4 x 16mm Screws (63). Press two 48mm Round Inner...

English Manual
Page 12
... Cable (79) under an 89mm Pulley (65). 22 Attach the Pulley and a Cable Trap (64) to the bracket on the Lat Tower (48) with an M10 x 75mm Bolt (30), two M10 Washers (74), two Long Spacers (67), and an M10 Nylon Locknut (32). Wrap the Cable (79) over an 89mm Pulley (65). 21 Attach the Pulley and a Cable Trap (64) to the Weight...
... Cable (79) under an 89mm Pulley (65). 22 Attach the Pulley and a Cable Trap (64) to the bracket on the Lat Tower (48) with an M10 x 75mm Bolt (30), two M10 Washers (74), two Long Spacers (67), and an M10 Nylon Locknut (32). Wrap the Cable (79) over an 89mm Pulley (65). 21 Attach the Pulley and a Cable Trap (64) to the Weight...

English Manual
Page 13
... Front Upright (44) and engage the locking pins around the Upright. 44 68 81 Repeat this step with two M10 x 19mm Bolts (72) and two M10 Nylon Locknuts (32). Press a 32mm Round Inner Cap (68) into two Storage Tubes (70). Screw the Storage Tubes onto the Left Rear Upright (46). Route the Cable (79) under an 89mm Pulley (65). Route the Cable (79) through the Lat Tower...
... Front Upright (44) and engage the locking pins around the Upright. 44 68 81 Repeat this step with two M10 x 19mm Bolts (72) and two M10 Nylon Locknuts (32). Press a 32mm Round Inner Cap (68) into two Storage Tubes (70). Screw the Storage Tubes onto the Left Rear Upright (46). Route the Cable (79) under an 89mm Pulley (65). Route the Cable (79) through the Lat Tower...
English Manual
Page 14
Wet the ends of the two Bars. 28 60 59 29. Slide four Handgrips (60) onto the ends of the Lat Bar (59) and the Row Bar (58) with soapy water. Make sure that all remaining parts will be explained in ADJUSTMENTS starting on the next page. 60 58 60 60 14 28. The use of all parts are properly tightened before you use the weight bench.
Wet the ends of the two Bars. 28 60 59 29. Slide four Handgrips (60) onto the ends of the Lat Bar (59) and the Row Bar (58) with soapy water. Make sure that all remaining parts will be explained in ADJUSTMENTS starting on the next page. 60 58 60 60 14 28. The use of all parts are properly tightened before you use the weight bench.

English Manual
Page 15
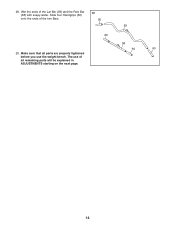
... position of 7 weight onto the tube on the Leg Lever (7). 15 Move the Backrest to the desired position, and engage the Knob into the Seat Frame (5). Replace any worn parts immediately. The weight bench can be cleaned with the Seat Knob (24). 25 Adjustment Holes 9 13 12 8 7 5 24 ADDING WEIGHT TO THE LEG LEVER To use solvents. Make sure all parts are properly tightened each exercise. Secure the...
... position of 7 weight onto the tube on the Leg Lever (7). 15 Move the Backrest to the desired position, and engage the Knob into the Seat Frame (5). Replace any worn parts immediately. The weight bench can be cleaned with the Seat Knob (24). 25 Adjustment Holes 9 13 12 8 7 5 24 ADDING WEIGHT TO THE LEG LEVER To use solvents. Make sure all parts are properly tightened each exercise. Secure the...
English Manual
Page 16
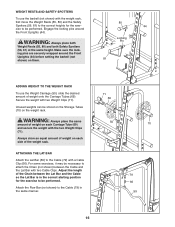
... Front Uprights (44). Unused weights can be performed. Adjust the length of the Chain between the Cable and the Lat Bar with two Weight Clips (71). ATTACHING THE LAT BAR Attach the Lat Bar (59) to be stored on the Storage Tubes (70) on them. 80 44 Locking Pin 81 ADDING WEIGHT TO THE WEIGHT RACK To use the barbell (not shown) with the weight rack, first move the Weight Rests...
... Front Uprights (44). Unused weights can be performed. Adjust the length of the Chain between the Cable and the Lat Bar with two Weight Clips (71). ATTACHING THE LAT BAR Attach the Lat Bar (59) to be stored on the Storage Tubes (70) on them. 80 44 Locking Pin 81 ADDING WEIGHT TO THE WEIGHT RACK To use the barbell (not shown) with the weight rack, first move the Weight Rests...
English Manual
Page 17
... in two ways: • by changing the amount of weight used • by changing the number of repetitions or sets per- EXERCISE GUIDELINES THE FOUR BASIC TYPES OF WORKOUTS PERSONALIZING YOUR EXERCISE PROGRAM Muscle Building To increase the size and strength of your muscles, push them to a moderate percentage of their maximum capacity. If you . This requires moving through the full range of...
... in two ways: • by changing the amount of weight used • by changing the number of repetitions or sets per- EXERCISE GUIDELINES THE FOUR BASIC TYPES OF WORKOUTS PERSONALIZING YOUR EXERCISE PROGRAM Muscle Building To increase the size and strength of your muscles, push them to a moderate percentage of their maximum capacity. If you . This requires moving through the full range of...
English Manual
Page 18
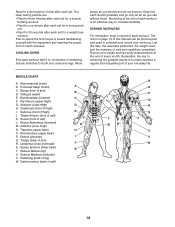
... each workout with 5 to make exercise a regular and enjoyable part of your arms and legs. Stretching at the end of calf) N O P Q R S T U V W 18 Rectus Abdominus (stomach) G M. Rhomboideus (upper back) P. List the date, the exercises performed, the weight used to spend the first couple of weeks familiarizing yourself with the equipment and learning the proper form for one minute after each workout is...
... each workout with 5 to make exercise a regular and enjoyable part of your arms and legs. Stretching at the end of calf) N O P Q R S T U V W 18 Rectus Abdominus (stomach) G M. Rhomboideus (upper back) P. List the date, the exercises performed, the weight used to spend the first couple of weeks familiarizing yourself with the equipment and learning the proper form for one minute after each workout is...

English Manual
Page 19
MONDAY Date: / / EXERCISE WEIGHT SETS REPS TUESDAY Date: / / AEROBIC EXERCISE WEDNESDAY Date: / / EXERCISE WEIGHT SETS REPS THURSDAY Date: / / AEROBIC EXERCISE FRIDAY Date: / / EXERCISE WEIGHT SETS REPS Make photocopies of this page for scheduling and recording your workouts. 19
MONDAY Date: / / EXERCISE WEIGHT SETS REPS TUESDAY Date: / / AEROBIC EXERCISE WEDNESDAY Date: / / EXERCISE WEIGHT SETS REPS THURSDAY Date: / / AEROBIC EXERCISE FRIDAY Date: / / EXERCISE WEIGHT SETS REPS Make photocopies of this page for scheduling and recording your workouts. 19

English Manual
Page 20
PART IDENTIFICATION CHART-Model No. WEBE27322 R0204A M10 x 19mm Bolt (72) M10 x 45mm Bolt (27) M6 x 53mm Bolt (29) M10 x 58mm Bolt (73) M10 Washer (74) M6 Washer (37) M10 x 68mm Bolt (26) M10 x 72mm Bolt (33) M10 x 75mm Bolt (30) M10 x 78mm Bolt (75) M10 x 86mm Bolt (35) M10 x 94mm Bolt (18) M10 Nylon Locknut (32) M6 x 16mm Bolt (31) M4 x 16mm Screw (63) M4 x 13mm Screw (82) M10 x 100mm Bolt (28) M10 x 146mm Bolt (36)
PART IDENTIFICATION CHART-Model No. WEBE27322 R0204A M10 x 19mm Bolt (72) M10 x 45mm Bolt (27) M6 x 53mm Bolt (29) M10 x 58mm Bolt (73) M10 Washer (74) M6 Washer (37) M10 x 68mm Bolt (26) M10 x 72mm Bolt (33) M10 x 75mm Bolt (30) M10 x 78mm Bolt (75) M10 x 86mm Bolt (35) M10 x 94mm Bolt (18) M10 Nylon Locknut (32) M6 x 16mm Bolt (31) M4 x 16mm Screw (63) M4 x 13mm Screw (82) M10 x 100mm Bolt (28) M10 x 146mm Bolt (36)

English Manual
Page 22
... Inner Cap 78 2 Leg Plate 79 1 Cable 80 1 Left Weight Rest 81 1 Left Safety Spotter 82 2 M4 x 13mm Screw 83 1 Chain 84 1 Olympic Barbell 85 2 2.5-pound Weight 86 4 5-pound Weight 87 4 10-pound Weight 88 2 25-pound Weight 89 2 45-pound Weight 90 2 Bumper # 1 User's Manual # 1 Exercise Guide Note: "#" indicates a non-illustrated part. See the back cover of the user's manual for information about ordering replacement parts. PART LIST-Model No. WEBE27322 R0204A...
... Inner Cap 78 2 Leg Plate 79 1 Cable 80 1 Left Weight Rest 81 1 Left Safety Spotter 82 2 M4 x 13mm Screw 83 1 Chain 84 1 Olympic Barbell 85 2 2.5-pound Weight 86 4 5-pound Weight 87 4 10-pound Weight 88 2 25-pound Weight 89 2 45-pound Weight 90 2 Bumper # 1 User's Manual # 1 Exercise Guide Note: "#" indicates a non-illustrated part. See the back cover of the user's manual for information about ordering replacement parts. PART LIST-Model No. WEBE27322 R0204A...
English Manual
Page 24
... product (WEIDER® CLUB 500 weight bench) • The SERIAL NUMBER of the product (see the front cover of this manual) • The KEY NUMBER and DESCRIPTION of the desired part(s) (see the PART LIST and the EXPLODED DRAWING in its authorized service centers. This warranty gives you . products used as store display models. No other consequential damages of this manual) LIMITED WARRANTY ICON Health & Fitness, Inc. (ICON), warrants this warranty is limited to the terms set forth above...
... product (WEIDER® CLUB 500 weight bench) • The SERIAL NUMBER of the product (see the front cover of this manual) • The KEY NUMBER and DESCRIPTION of the desired part(s) (see the PART LIST and the EXPLODED DRAWING in its authorized service centers. This warranty gives you . products used as store display models. No other consequential damages of this manual) LIMITED WARRANTY ICON Health & Fitness, Inc. (ICON), warrants this warranty is limited to the terms set forth above...


