
English Manual
Page 1
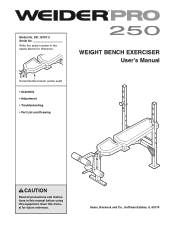
Sears, Roebuck and Co., Hoffman Estates, IL 60179 Save this equipment. Write the serial number in this manual before using this manual for reference. WEIGHT BENCH EXERCISER User's Manual Serial Number Decal (under seat) • Assembly • Adjustment • Troubleshooting • Part List and Drawing CAUTION Read all precautions and instructions in the space above for future reference. Model No. 831.15707.0 Serial No.
Sears, Roebuck and Co., Hoffman Estates, IL 60179 Save this equipment. Write the serial number in this manual before using this manual for reference. WEIGHT BENCH EXERCISER User's Manual Serial Number Decal (under seat) • Assembly • Adjustment • Troubleshooting • Part List and Drawing CAUTION Read all precautions and instructions in the space above for future reference. Model No. 831.15707.0 Serial No.
English Manual
Page 2
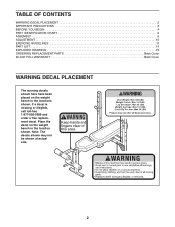
... BEGIN 4 PART IDENTIFICATION CHART 5 ASSEMBLY 6 ADJUSTMENT 10 EXERCISE GUIDELINES 11 PART LIST 14 EXPLODED DRAWING 15 ORDERING REPLACEMENT PARTS Back Cover 90-DAY FULL WARRANTY Back Cover WARNING DECAL PLACEMENT The warning decals shown here have been placed on the weight bench in the locations shown. Place the decal on the weight bench in the location shown. Note: The decals shown may not be shown at actual size. Keep...
... BEGIN 4 PART IDENTIFICATION CHART 5 ASSEMBLY 6 ADJUSTMENT 10 EXERCISE GUIDELINES 11 PART LIST 14 EXPLODED DRAWING 15 ORDERING REPLACEMENT PARTS Back Cover 90-DAY FULL WARRANTY Back Cover WARNING DECAL PLACEMENT The warning decals shown here have been placed on the weight bench in the locations shown. Place the decal on the weight bench in the location shown. Note: The decals shown may not be shown at actual size. Keep...
English Manual
Page 3
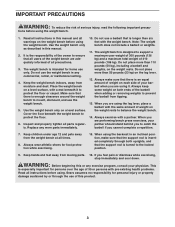
... informed of all users of the weight bench are using the weight bench. Always wear athletic shoes for home use of your partner should stand behind you to ensure that there is turned to protect the floor or carpet. When using the backrest in any exercise program, consult your physician. Sears assumes no responsibility for persons over the age of weight on the weight bench before using the leg...
... informed of all users of the weight bench are using the weight bench. Always wear athletic shoes for home use of your partner should stand behind you to ensure that there is turned to protect the floor or carpet. When using the backrest in any exercise program, consult your physician. Sears assumes no responsibility for persons over the age of weight on the weight bench before using the leg...
English Manual
Page 4
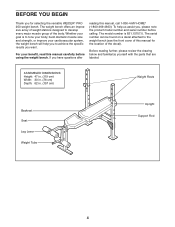
... cm) Weight Rests Backrest Seat Leg Lever Weight Tube Upright Support Rod 4 If you for the location of the body. Before reading further, please review the drawing below and familiarize yourself with the parts that are labeled. The serial number can be found on a decal attached to achieve the specific results you want. Whether your benefit, read this manual for selecting the versatile WEIDER® PRO 250 weight bench. To...
... cm) Weight Rests Backrest Seat Leg Lever Weight Tube Upright Support Rod 4 If you for the location of the body. Before reading further, please review the drawing below and familiarize yourself with the parts that are labeled. The serial number can be found on a decal attached to achieve the specific results you want. Whether your benefit, read this manual for selecting the versatile WEIDER® PRO 250 weight bench. To...
English Manual
Page 5
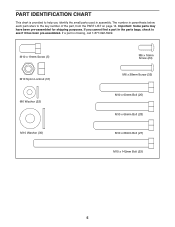
.... PART IDENTIFICATION CHART This chart is missing, call 1-877-992-5999. If you identify the small parts used in assembly. The number in the parts bags, check to the key number of the part, from the PART LIST on page 14. If a part is provided to help you cannot find a part in parenthesis below each part refers to see if it has been pre-assembled. M10 x 19mm Screw...
.... PART IDENTIFICATION CHART This chart is missing, call 1-877-992-5999. If you identify the small parts used in assembly. The number in the parts bags, check to the key number of the part, from the PART LIST on page 14. If a part is provided to help you cannot find a part in parenthesis below each part refers to see if it has been pre-assembled. M10 x 19mm Screw...
English Manual
Page 6
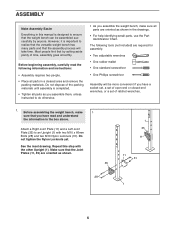
... x 66mm Bolts (28) and two M10 Nylon Locknuts (31). Repeat this manual is important to ensure that the assembly process will be assembled successfully by setting aside plenty of ratchet wrenches. 1. However, it is designed to realize that the versatile weight bench has many parts and that the weight bench can be more convenient if you assemble them, unless instructed to an Upright...
... x 66mm Bolts (28) and two M10 Nylon Locknuts (31). Repeat this manual is important to ensure that the assembly process will be assembled successfully by setting aside plenty of ratchet wrenches. 1. However, it is designed to realize that the versatile weight bench has many parts and that the weight bench can be more convenient if you assemble them, unless instructed to an Upright...
English Manual
Page 7
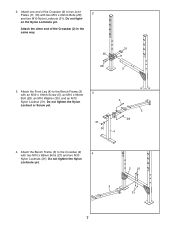
... 7 Attach the Bench Frame (3) to the Crossbar (2) 4 with two M10 x 66mm Bolts (28) and two M10 Nylon Locknuts (31). Do not tight- Do not tighten the Nylon Locknut or Screw yet. 5 3 28 31 30 4 4. 2. Attach one end of the Crossbar (2) in the same way. 35 28 31 11 2 3. en the Nylon Locknuts yet. Attach the Front Leg (4) to...
... 7 Attach the Bench Frame (3) to the Crossbar (2) 4 with two M10 x 66mm Bolts (28) and two M10 Nylon Locknuts (31). Do not tight- Do not tighten the Nylon Locknut or Screw yet. 5 3 28 31 30 4 4. 2. Attach one end of the Crossbar (2) in the same way. 35 28 31 11 2 3. en the Nylon Locknuts yet. Attach the Front Leg (4) to...
English Manual
Page 8
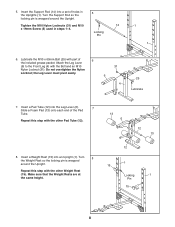
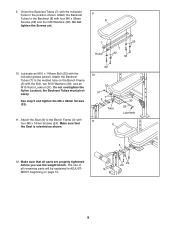
... Lubricate 7. Tighten the M10 Nylon Locknuts (31) and M10 14 x 19mm Screw (5) used in 5 the Uprights (1). Repeat this step with the Bolt and an M10 Nylon Locknut (31). Attach the Leg Lever (6) to the Front Leg (4) with the other Weight Rest (15). Insert a Weight Rest (15) into a set of the Pad Tube. Turn the Support Rod so the locking pin is wrapped around the Upright. Repeat this step...
... Lubricate 7. Tighten the M10 Nylon Locknuts (31) and M10 14 x 19mm Screw (5) used in 5 the Uprights (1). Repeat this step with the Bolt and an M10 Nylon Locknut (31). Attach the Leg Lever (6) to the Front Leg (4) with the other Weight Rest (15). Insert a Weight Rest (15) into a set of the Pad Tube. Turn the Support Rod so the locking pin is wrapped around the Upright. Repeat this step...
English Manual
Page 9
... step 9 and tighten the M6 x 38mm Screws (32). 32 10 30 31 7 3 Tube 11. Make sure that all parts are properly tightened before you use of all remaining parts will be explained in the position shown. Do not overtighten the Nylon Locknut; Attach the Backrest Tubes (7) to the welded tube on page 10. 3 24 24 9 The use the weight bench. Attach the Seat...
... step 9 and tighten the M6 x 38mm Screws (32). 32 10 30 31 7 3 Tube 11. Make sure that all parts are properly tightened before you use of all remaining parts will be explained in the position shown. Do not overtighten the Nylon Locknut; Attach the Backrest Tubes (7) to the welded tube on page 10. 3 24 24 9 The use the weight bench. Attach the Seat...
English Manual
Page 10
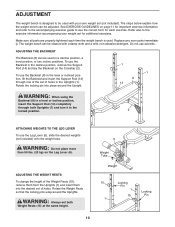
... properly tightened each exercise. Replace any worn parts immediately. ADJUSTING THE BACKREST The Backrest (8) can be adjusted. To use the Backrest (8) in a level or incline position, insert the Support Rod (14) completely through one of holes. See EXERCISE GUIDELINES on page 11 for important exercise information and refer to the accompanying exercise guide to see the correct form for additional exercises. ADJUSTMENT The weight bench is used in the Uprights (1). To use...
... properly tightened each exercise. Replace any worn parts immediately. ADJUSTING THE BACKREST The Backrest (8) can be adjusted. To use the Backrest (8) in a level or incline position, insert the Support Rod (14) completely through one of holes. See EXERCISE GUIDELINES on page 11 for important exercise information and refer to the accompanying exercise guide to see the correct form for additional exercises. ADJUSTMENT The weight bench is used in the Uprights (1). To use...
English Manual
Page 11
...: • by changing the amount of resistance used • by at your own pace and be sensitive to your body time to regenerate. Cross Training Cross training is wrong before continuing. This requires moving only the appropriate parts of the body. On the exercise guide accompanying this manual you . You must gauge your limits and select the amount of resistance that you can adjust the intensity level...
...: • by changing the amount of resistance used • by at your own pace and be sensitive to your body time to regenerate. Cross Training Cross training is wrong before continuing. This requires moving only the appropriate parts of the body. On the exercise guide accompanying this manual you . You must gauge your limits and select the amount of resistance that you can adjust the intensity level...
English Manual
Page 12
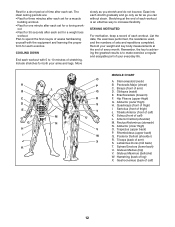
...) T. out. • Rest for 30 seconds after each set. Stretching at the end of every month. List the date, the exercises performed, the resistance used, and the numbers of leg) X. Obliques (waist) E. Abductor (outer thigh) H. Gluteus Maximus (buttocks) W. Rest for a short period of time after each set for a weight loss workout. The ideal resting periods are: • Rest for three...
...) T. out. • Rest for 30 seconds after each set. Stretching at the end of every month. List the date, the exercises performed, the resistance used, and the numbers of leg) X. Obliques (waist) E. Abductor (outer thigh) H. Gluteus Maximus (buttocks) W. Rest for a short period of time after each set for a weight loss workout. The ideal resting periods are: • Rest for three...
English Manual
Page 14
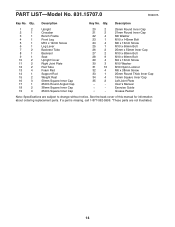
... x 38mm Screw 33 1 25mm Round Thick Inner Cap 34 4 19mm Square Inner Cap 35 2 Left Joint Plate * - User's Manual * - Qty. Description Key No. If a part is missing, call 1-877-992-5999. *These parts are subject to change without notice. PART LIST-Model No. 831.15707.0 R0407A Key No. Exercise Guide * - See the back cover of this manual for information about ordering replacement parts. Qty. Grease Packet Note: Specifications are not...
... x 38mm Screw 33 1 25mm Round Thick Inner Cap 34 4 19mm Square Inner Cap 35 2 Left Joint Plate * - User's Manual * - Qty. Description Key No. If a part is missing, call 1-877-992-5999. *These parts are subject to change without notice. PART LIST-Model No. 831.15707.0 R0407A Key No. Exercise Guide * - See the back cover of this manual for information about ordering replacement parts. Qty. Grease Packet Note: Specifications are not...

English Manual
Page 15
EXPLODED DRAWING-Model No. 831.15707.0 R0407A 16 21 14 29 20 15 10 29 8 21 31 30 7 19 22 19 7 22 30 23 32 1 32 31 16 35 11 31 2 35 9 28 29 27 11 28 20 15 10 3 31 16 31 5 24 34 24 13 6 31 30 28 25 4 17 13 26 26 18 33 18 12 13 29 1 12 13 34 15
EXPLODED DRAWING-Model No. 831.15707.0 R0407A 16 21 14 29 20 15 10 29 8 21 31 30 7 19 22 19 7 22 30 23 32 1 32 31 16 35 11 31 2 35 9 28 29 27 11 28 20 15 10 3 31 16 31 5 24 34 24 13 6 31 30 28 25 4 17 13 26 26 18 33 18 12 13 29 1 12 13 34 15
English Manual
Page 16
... FULL WARRANTY If this Sears WEIGHT BENCH EXERCISER fails due to a defect in items like garage door openers and water heaters. 1-800-4-MY-HOME® (1-800-469-4663) Call anytime, day or night (U.S.A. This warranty does not apply when the WEIGHT BENCH EXERCISER is used commercially or for free repair (or replacement if repair proves impossible). Get it -yourself. Sears, Roebuck and Co., Hoffman Estates, IL 60179 Part...
... FULL WARRANTY If this Sears WEIGHT BENCH EXERCISER fails due to a defect in items like garage door openers and water heaters. 1-800-4-MY-HOME® (1-800-469-4663) Call anytime, day or night (U.S.A. This warranty does not apply when the WEIGHT BENCH EXERCISER is used commercially or for free repair (or replacement if repair proves impossible). Get it -yourself. Sears, Roebuck and Co., Hoffman Estates, IL 60179 Part...


