Weider 265 Support and Manuals
Get Help and Manuals for this Weider item

Weider 265 Videos

265 lbs DL/ILB/TE football player benches 405 lbs 3 reps.
Duration: :43
Total Views: 242
Duration: :43
Total Views: 242
Popular Weider 265 Manual Pages
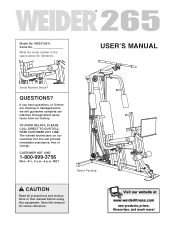
English Manual - Page 1
...:
1-800-999-3756
Mon.-Fri., 6 a.m.-6 p.m.
Write the serial number in this manual before using this manual for reference.
WESY19611 Serial No. Model No.
TO AVOID DELAYS, PLEASE CALL DIRECT TO OUR TOLLFREE CUSTOMER HOT LINE. Save this equipment.
MST
Patent Pending
CAUTION
Read all precautions and instructions in the space above for future reference.
English Manual - Page 2

WEIDER is a registered trademark of this manual. TABLE OF CONTENTS
IMPORTANT PRECAUTIONS 3 BEFORE YOU BEGIN 4 ASSEMBLY 5 ADJUSTMENTS 19 TROUBLE-SHOOTING AND MAINTENANCE 21 WEIGHT RESISTANCE CHART 22 CABLE DIAGRAM 23 ORDERING REPLACEMENT PARTS Back Cover LIMITED WARRANTY Back Cover Note: An EXPLODED DRAWING/PART LIST and a PART IDENTIFICATION CHART are attached in the center of ICON ...
English Manual - Page 3
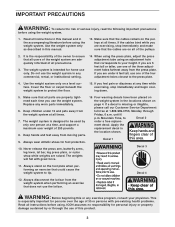
... any commercial, rental, or institutional setting.
14. The weight system is missing or illegible,
please call our Customer Service Department
toll-free at any time while exercising, stop immediately and make sure that all users of the weight system are on the pulleys at all instructions in this or any worn parts immediately.
6. When using the press...
English Manual - Page 4
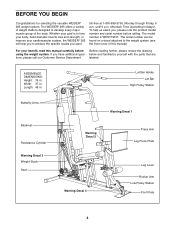
... model number is to achieve the specific results you , please note the product model number and serial number before using the weight system. ASSEMBLED DIMENSIONS: Height: 76 in . The serial number can be found on a decal attached to develop every major muscle group of this manual carefully before calling. For your cardiovascular system, the WEIDER® 265...
English Manual - Page 5

... to open -end or closed-end wrenches, or a set of this page. Place all parts of the weight system in the center of ratchet wrenches. As you assemble them, unless instructed to the weights.
If you have questions after reading the assembly instructions, please call our Customer Service Department at 1-800-999-3756.
ASSEMBLY
Make Assembly Easier...
English Manual - Page 10
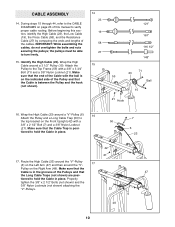
... manual to the CABLE DIAGRAMS on the Front Upright (42) with a
50
3/8" x 2 1/2" Bolt (7) and a 3/8" Nylon Locknut
(21). Wrap the High Cable (23) around a "V"-Pulley (6).
16
Attach the Pulley and a Long Cable Trap (50) to
the top bracket on page 23 of this section, identify the High Cable (23), the Low Cable (19), the Press Cable (58), and the Resistance Cable...
English Manual - Page 18

... 10
46. Insert the 1/4" x 2 1/2" Carriage Bolt (38) into each end of the Long Pad Tube (80). Tighten a 1/4" Nylon Locknut (2) with two 1/4" x 3/4" Screws (18).
Align one set of the Short Pad Tube (28). Make sure that the Press Adjustment Tube is oriented as shown.
48. LEG PRESS" decal to the Press Adjustment...
English Manual - Page 19

...
The instructions below . Use the WEIGHT RESISTANCE CHART
15
on page 22 to find and correct the problem. See TROUBLE-SHOOTING AND MAINTENANCE on page 23 of this manual to see how the weight system should be set up for each part of the holes in the correct starting position for the exercise to the exercise guide accompanying this manual for proper cable routing...
English Manual - Page 20

... the Press Plate (78), remove the "L"-Pin (40) from the Press Plate. Align a different set of the three adjustment holes furthest away from the Press Adjustment Tube (79) and the Rocker Arm (...-insert the "L"-Pin. For some exercises, the Chain (52) should be attached between the Lat Bar and the High Cable so that corresponds to be attached to the High Cable (23) with the holes in...
English Manual - Page 21

... Weight Tube. TIGHTENING THE CABLES
1
Woven cable, the type of cable used .
The weight system can stretch slightly when it . Tighten the bolt on the weight system, can be removed by moving the 3 1/2" Pulley (15) and the Cable Trap (66), or the 4 1/2" Pulley (84) and the Metal Cable Trap (97), to a set of the Cable.
Slack can be replaced, see ORDERING REPLACEMENT PARTS...
English Manual - Page 22

...
3 172 109 367 173 124 168
4 196 125 420 200 144 204
*It is set at position 1 and no weights are being used, the chart shows that this exercise station be used when the resistance handle is not recommended that the approximate weight resistance will be used . The left column lists the five positions of...
English Manual - Page 23

... touch or bind the cables.
8 7
5
2
High Cable (23)
1-High Pulley
6 5-Rear Upright
Bracket
3 4
9-Weight Stack
5 7
1-Weight Stack
4 2
Resistance Cable (27) 3
2 3
8-Long "U"-Bracket Low Cable (19)
8-Wide Bracket Press Cable (58)
5
7
4 6
4
6 3
1-Low Pulley
2 1-Leg Lever
23 If the cables have been assembled correctly. CABLE DIAGRAMS
The cable diagrams below show the correct route...
English Manual - Page 27

...Bolt
94
2 5/16" x 2 3/4" Carriage Bolt
95
2 Weight Bumper
96
1 Bushing 1/2" x 1/2"
97
1 Metal Cable Trap
98
1 3/8" x 3" Grade 5 Bolt
99
2 5/16" Nylon Jamnut
100
2 1/2" x 7/8" Spacer
101
1 1/2" Plane Nut
102
4 Special Washer
103
1 Small Support Plate
#
1 User's Manual
#
1 Exercise Guide
Note: "#" indicates a non-illustrated part. Specifications are subject to change without...
English Manual - Page 28

...
64 15
76
6168 61 21 15 21
15
12 51
66 15 3
66
15
98
3
49
60
46
12 15 21
3
2
12
10
57
58
16 27
1 33
51 4
1
5
15 66 20
76 20
21
94
51
12
97 84
23
3
43 10
63
26 25
41
44 49
7
...
18
28
10 2 21 6
50 7
16 66 77 3
73 65
9 33
3
8 3
78
40
32 9
16
9 21
44
7
33
66 73 65 15
33 58 96
77
93
16
19
30
34
68
29
34
21 30
9
80 44
21
R0102A
EXPLODED DRAWING...
English Manual - Page 29

... by ICON at the center of this manual)
• The KEY NUMBER and DESCRIPTION of the part(s) (see the PART LIST and EXPLODED DRAWING at one of merchantability or fitness for commercial or rental purposes, or products used as store display models. No other warranty beyond that specifically set forth herein.
until 6 p.m. This warranty extends only...
Weider 265 Reviews
We have not received any reviews for Weider yet.