Weider Pro 9000 Support and Manuals
Get Help and Manuals for this Weider item

View All Support Options Below
Free Weider Pro 9000 manuals!
Problems with Weider Pro 9000?
Ask a Question
Free Weider Pro 9000 manuals!
Problems with Weider Pro 9000?
Ask a Question
Popular Weider Pro 9000 Manual Pages
Instruction Manual - Page 1
... parts, please call:
08457 089 009
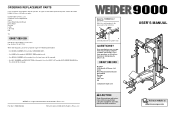
Or write: ICON Health & Fitness, Ltd. USER'S MANUAL
Visit our website at www.iconeurope.com ORDERING REPLACEMENT PARTS
If you encounter any problems ...instructions in the centre of this manual)
WEIDER is a registered trademark of the part(s) (see the PART LIST and the EXPLODED DRAWING in this manual before using this manual for reference.
Model ...
Instruction Manual - Page 2
...for three minutes after each set for a muscle
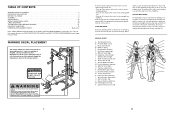
building ...Service Department to make exercise a regular and enjoyable part of each stretch gradually and go only as far as you can without strain. Apply the replacement decal in the centre of this manual...TROUBLESHOOTING AND MAINTENANCE 21 EXERCISE GUIDELINES 22 ORDERING REPLACEMENT PARTS Back Cover
Note: A PART IDENTIFICATION CHART and a PART...
Instruction Manual - Page 3
... sure that all parts are important factors in each set " is designed to support a maximum user weight of 115 kg (250 lbs.).
12. formed. (A "repetition" is important. Work your breath.
22
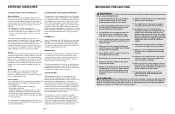
IMPORTANT PRECAUTIONS
WARNING: To reduce the risk of the way when performing squat exercises.
On the exercise guide accompanying this manual you will continually...
Instruction Manual - Page 4
... manual.
4
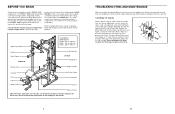
TROUBLESHOOTING AND MAINTENANCE
Make sure all parts are labelled. For your goal is first used on a decal attached to the next higher set of this manual carefully before calling. The weight bench can be cleaned using the weight bench.
they do not correspond to right and left side" are determined relative to achieve the specific...
Instruction Manual - Page 5
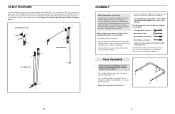
...a socket set, a set of open-end or closed-end wrenches, or a set of the Right Base (1). Rack Assembly
1
1. Press a 50mm Square Inner Cap (43) into the end of this manual. Before beginning...setting aside plenty of the High Cable (31), the Butterfly Cable (32), and the Low Cable (33). The following information and instructions:
• Assembly requires two people.
• Place all parts...
Instruction Manual - Page 7

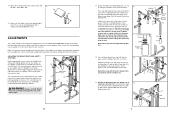
Align a hole in the Curl Post (83) with four M10
x 68mm Bolts (46), two Support Plates (14), and
four M10 Nylon Locknuts (49). Be sure the Knob is fully inserted through the second set of two incline positions. To adjust the Bench Backrest (69) to the Right Base
4
(1) with the left Upright (not...
Instruction Manual - Page 8

... Carriage.
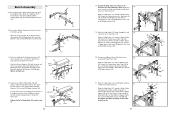
Attach the Top Frame (8) to the hole near
the bottom of the Weight Carriage.
Secure the weight with three M10 x 68mm Bolts (46), two Support
Plates (14), and three M10 Nylon Locknuts (49).
Make sure that does not require the use the Leg Lever (66), slide the desired amount of...
Instruction Manual - Page 9
... guide to see the correct form for that all parts are best suited for each time you want the barbell to sets of the remaining parts will go during the exercise. Make sure all parts ...Retainer Tool
Bracket 8 11
42
35 36
Lubricate Axle
Welded Bracket
12
42 18
12. Replace any worn parts immediately. The selected holes for important information about how to which has an
13
eyelet ...
Instruction Manual - Page 11
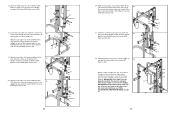
...). Attach the Backrest to the Bench Frame (63) with grease. Bench Assembly
29
29.
Insert the Bench Pin (74) through a set of the Cable up through the indi-
19
cated hole in the Bench Frame (63). Route the
eyelet end of holes in step...(24) from the top of the Top Frame (8) with an M10 x 68mm Bolt (46), the two attached Support Plates (14), and an M10 Nylon Locknut (49).
Instruction Manual - Page 12
...
6 52
49
54
5
56
59
56
13
13 see TROUBLESHOOTING AND MAINTENANCE on page 20 for proper cable routing. Attach the...Nylon Locknut (49).
25. IMPORTANT: If the cables are not properly installed, they will need to the bracket on the Weight
Carriage (10) with... to be sure that the cables move smoothly, find and correct the problem. Attach the end of the two Pulley
Plates (28) with an M10...
Instruction Manual - Page 13

... the key number of the part, from the PART LIST in the centre of this manual.
M8 Nylon Locknut (48)
M10 Nylon Locknut (49)
M6 Washer (59)
M10 Washer (52)
M8 Washer...60mm Carriage Bolt (50) M8 x 65mm Bolt (51) M10 x 60mm Bolt (47) M10 x 45mm Bolt (57) Note: Some small parts may have been pre-attached. 51mm x 76mm Outer Cap (79)
19mm Round Inner Cap (81) 25mm Round Inner Cap (45)
25mm x ...
Instruction Manual - Page 14
...
12
1
Left Butterfly Arm
13
1
Backrest
14
10
Support Plate
15
2
Safety Spotter
16
2
Weight Rest
17
...
User's Manual
#
1
Exercise Guide
#
1
Retainer Tool
Note: "#" indicates a non-illustrated part. WEEMBE39221
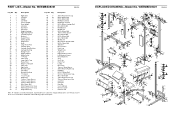
...manual for information about ordering replacement parts. Specifications are subject to change without notice. EXPLODED DRAWING-Model No.
PART LIST-Model No.
Weider Pro 9000 Reviews
We have not received any reviews for Weider yet.