
Instruction Manual
Page 1
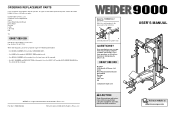
... the following information: • the MODEL NUMBER of the product (WEEMBE39221) • the NAME of the product (WEIDER® 9000 weight bench) • the SERIAL NUMBER of the product (see the front cover of this manual) • the KEY NUMBER and DESCRIPTION of the part(s) (see the PART LIST and the EXPLODED DRAWING in this manual before using this manual) WEIDER is a registered trademark of this equipment. WEEMBE39221 Serial No. USER'S MANUAL Visit...
... the following information: • the MODEL NUMBER of the product (WEEMBE39221) • the NAME of the product (WEIDER® 9000 weight bench) • the SERIAL NUMBER of the product (see the front cover of this manual) • the KEY NUMBER and DESCRIPTION of the part(s) (see the PART LIST and the EXPLODED DRAWING in this manual before using this manual) WEIDER is a registered trademark of this equipment. WEEMBE39221 Serial No. USER'S MANUAL Visit...
Instruction Manual
Page 2
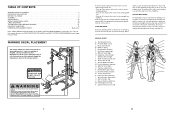
... PLACEMENT 2 IMPORTANT PRECAUTIONS 3 BEFORE YOU BEGIN 4 ASSEMBLY 5 ADJUSTMENTS 16 WEIGHT RESISTANCE CHART 19 CABLE DIAGRAMS 20 TROUBLESHOOTING AND MAINTENANCE 21 EXERCISE GUIDELINES 22 ORDERING REPLACEMENT PARTS Back Cover Note: A PART IDENTIFICATION CHART and a PART LIST/EXPLODED DRAWING is an effective way to increase flexibility. Keep hands and fingers clear of calf) A B C D E F G H I . Rest for one minute after each set for a muscle building workout. • Rest for a short period of each...
... PLACEMENT 2 IMPORTANT PRECAUTIONS 3 BEFORE YOU BEGIN 4 ASSEMBLY 5 ADJUSTMENTS 16 WEIGHT RESISTANCE CHART 19 CABLE DIAGRAMS 20 TROUBLESHOOTING AND MAINTENANCE 21 EXERCISE GUIDELINES 22 ORDERING REPLACEMENT PARTS Back Cover Note: A PART IDENTIFICATION CHART and a PART LIST/EXPLODED DRAWING is an effective way to increase flexibility. Keep hands and fingers clear of calf) A B C D E F G H I . Rest for one minute after each set for a muscle building workout. • Rest for a short period of each...
Instruction Manual
Page 3
... part of an effective exercise program. Note: The weight bench is wrong before using high amounts of weight. If the cables bind as the number of repetitions or sets completed, is the responsibility of the owner to find the schedule that the cables are mounted on the weight carriage or leg lever. ICON assumes no responsibility for each workout, as well as you , stick with the weight pins...
... part of an effective exercise program. Note: The weight bench is wrong before using high amounts of weight. If the cables bind as the number of repetitions or sets completed, is the responsibility of the owner to find the schedule that the cables are mounted on the weight carriage or leg lever. ICON assumes no responsibility for each workout, as well as you , stick with the weight pins...
Instruction Manual
Page 4
... the manual. 4 TROUBLESHOOTING AND MAINTENANCE Make sure all parts are properly tightened each time you use solvents. To help you to tone your body, build dramatic muscle size and strength, or improve your benefit, read this manual for selecting the versatile WEIDER® 9000 weight bench. Replace any worn parts immediately. Do not use the weight bench. Reattach the 90mm Pulley (24) and the Cable Trap (26) to the weight bench (see...
... the manual. 4 TROUBLESHOOTING AND MAINTENANCE Make sure all parts are properly tightened each time you use solvents. To help you to tone your body, build dramatic muscle size and strength, or improve your benefit, read this manual for selecting the versatile WEIDER® 9000 weight bench. Replace any worn parts immediately. Do not use the weight bench. Reattach the 90mm Pulley (24) and the Cable Trap (26) to the weight bench (see...
Instruction Manual
Page 5
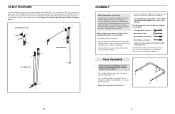
.... • For help identifying small parts, use the PART IDENTIFICATION CHART in the box above. Press a 50mm Square Inner Cap (43) into the end of the Right Base (1). Rack Assembly 1 1. Repeat this manual is important to ensure that by anyone. CABLE DIAGRAMS The cable diagrams below show the correct route for each cable. If the cables have a socket set, a set of open-end or closed-end wrenches...
.... • For help identifying small parts, use the PART IDENTIFICATION CHART in the box above. Press a 50mm Square Inner Cap (43) into the end of the Right Base (1). Rack Assembly 1 1. Repeat this manual is important to ensure that by anyone. CABLE DIAGRAMS The cable diagrams below show the correct route for each cable. If the cables have a socket set, a set of open-end or closed-end wrenches...

Instruction Manual
Page 6
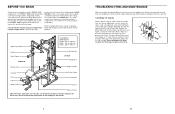
... Right and Left Bases (1, 2). Attach the Foot Plate (9) and the Rear Upright (6) 3 to friction between the cables, pulleys, and weight carriage. Hand tighten two M10 Nylon Locknuts (49) onto the Bolts. Do not tighten the M10 Nylon Locknuts (49) yet. 2 6 5 1 52 49 46 46 49 9 2 6 WEIGHT RESISTANCE CHART This chart shows the approximate weight resistance at each weight station. Slide the Centre Upright (5) onto the M10 x 2 60mm...
... Right and Left Bases (1, 2). Attach the Foot Plate (9) and the Rear Upright (6) 3 to friction between the cables, pulleys, and weight carriage. Hand tighten two M10 Nylon Locknuts (49) onto the Bolts. Do not tighten the M10 Nylon Locknuts (49) yet. 2 6 5 1 52 49 46 46 49 9 2 6 WEIGHT RESISTANCE CHART This chart shows the approximate weight resistance at each weight station. Slide the Centre Upright (5) onto the M10 x 2 60mm...

Instruction Manual
Page 7
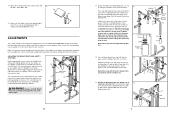
... x 68mm Bolts (46), two Support Plates (14), and four M10 Nylon Locknuts (49). Attach one of the lower two sets of holes in the Backrest Frames (67, 68) and the Bench Frame (63). Do not tighten the Nylon Locknuts yet. Slide a Weight Rest (16) onto the right Upright (3) and engage the Knob (17)...Upright (not shown) in the Backrest Frames (67, 68) and the Bench Frame (63). WARNING: When adjusting the position of the Bench Backrest (69), make sure that the Bench Pin (74) is fully tightened. Press a 50mm Square Inner Cap (43) into an adjustment hole in the Front Leg (64). Turn the Knob...
... x 68mm Bolts (46), two Support Plates (14), and four M10 Nylon Locknuts (49). Attach one of the lower two sets of holes in the Backrest Frames (67, 68) and the Bench Frame (63). Do not tighten the Nylon Locknuts yet. Slide a Weight Rest (16) onto the right Upright (3) and engage the Knob (17)...Upright (not shown) in the Backrest Frames (67, 68) and the Bench Frame (63). WARNING: When adjusting the position of the Bench Backrest (69), make sure that the Bench Pin (74) is fully tightened. Press a 50mm Square Inner Cap (43) into an adjustment hole in the Front Leg (64). Turn the Knob...

Instruction Manual
Page 8
... (49). Do not tighten the M10 Nylon Locknuts (49) yet. 10. ATTACHING WEIGHTS TO THE WEIGHT CARRIAGE To use Olympic weights, press two Adapter Bushings (44) into 8 the indicated ends of the weight tube on the Weight Tube (65). 17 66 37 23 65 To use the high or low pulley station, attach the Lat Bar (73) to the Rear Upright (6) 10 with the Weight Pin (37). WARNING: Do...
... (49). Do not tighten the M10 Nylon Locknuts (49) yet. 10. ATTACHING WEIGHTS TO THE WEIGHT CARRIAGE To use Olympic weights, press two Adapter Bushings (44) into 8 the indicated ends of the weight tube on the Weight Tube (65). 17 66 37 23 65 To use the high or low pulley station, attach the Lat Bar (73) to the Rear Upright (6) 10 with the Weight Pin (37). WARNING: Do...
Instruction Manual
Page 9
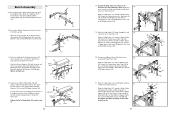
... remaining parts will go during the exercise. Lubricate the axles on each exercise. Have a second person secure the Butterfly Arm with grease. Remove the tool, and tap the Cover Cap onto the axle. Repeat this step with 37 two M6 x 16mm Bolts (80). 84 83 38. Make sure that exercise. Make sure all parts have been properly tight- 80 ened. ADJUSTING THE WEIGHT RESTS...
... remaining parts will go during the exercise. Lubricate the axles on each exercise. Have a second person secure the Butterfly Arm with grease. Remove the tool, and tap the Cover Cap onto the axle. Repeat this step with 37 two M6 x 16mm Bolts (80). 84 83 38. Make sure that exercise. Make sure all parts have been properly tight- 80 ened. ADJUSTING THE WEIGHT RESTS...

Instruction Manual
Page 10
... the holes in the Front Leg (64). Wrap the Butterfly Cable (32) around a "V"-Pulley 16 (25). Attach the Weight Tube (65) to the Double "U"Bracket with an M8 x 58mm Bolt (41), two M8 Washers (53), a 13mm x 10mm Spacer (75), and an M8 Nylon Locknut (48). Remove the 90mm Pulleys (24) from the pre- 15 assembled Double "U"-Bracket (29). Slide...
... the holes in the Front Leg (64). Wrap the Butterfly Cable (32) around a "V"-Pulley 16 (25). Attach the Weight Tube (65) to the Double "U"Bracket with an M8 x 58mm Bolt (41), two M8 Washers (53), a 13mm x 10mm Spacer (75), and an M8 Nylon Locknut (48). Remove the 90mm Pulleys (24) from the pre- 15 assembled Double "U"-Bracket (29). Slide...
Instruction Manual
Page 11
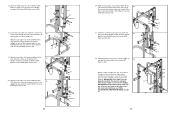
.... Route the eyelet end of the two remaining cables. Remove the 90mm Pulleys (24) from the top of the Top Frame (8) with grease. Attach the Pulley and a Cable Trap (26) to the Bench Frame (63) with an M10 x 45mm Bolt (57) and an M10 Nylon Locknut (49). 21. Attach the Front Leg (64) to the second hole from the pre- 20 assembled Pulley Plates...
.... Route the eyelet end of the two remaining cables. Remove the 90mm Pulleys (24) from the top of the Top Frame (8) with grease. Attach the Pulley and a Cable Trap (26) to the Bench Frame (63) with an M10 x 45mm Bolt (57) and an M10 Nylon Locknut (49). 21. Attach the Front Leg (64) to the second hole from the pre- 20 assembled Pulley Plates...
Instruction Manual
Page 12
... 22 Bolt (not shown) in the cables, they may be sure that the cables move smoothly, find and correct the problem. If there is used. Attach the Pulley to be damaged when heavy weight is any slack in the bracket on the Rear Upright (6) with an M10 x 45mm Bolt (57...cables are not properly installed, they will need to the second hole from the bottom of the Double "U"-Bracket (29) with an M10 Nylon Locknut (49). 31 49 Bracket 10 23. Attach the Pulley and a Cable Trap (26) to be tightened; Attach the Pulley to the Centre Upright (5) 28 with an M10 x 65mm Bolt...
... 22 Bolt (not shown) in the cables, they may be sure that the cables move smoothly, find and correct the problem. If there is used. Attach the Pulley to be damaged when heavy weight is any slack in the bracket on the Rear Upright (6) with an M10 x 45mm Bolt (57...cables are not properly installed, they will need to the second hole from the bottom of the Double "U"-Bracket (29) with an M10 Nylon Locknut (49). 31 49 Bracket 10 23. Attach the Pulley and a Cable Trap (26) to be tightened; Attach the Pulley to the Centre Upright (5) 28 with an M10 x 65mm Bolt...

Instruction Manual
Page 13
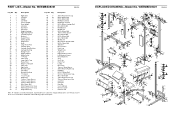
...x 60mm Carriage Bolt (50) M8 x 65mm Bolt (51) M10 x 60mm Bolt (47) M10 x 45mm Bolt (57) If a part is the key number of the part, from the PART LIST in assembly. Note: Some small parts may have been pre-attached. The number in parentheses by each drawing is not in the parts bag, check to identify small parts used in the centre of this manual. 51mm x... Spacer (55) 13mm x 10mm Spacer (75) 15mm x 13mm Spacer (39) 45mm Square Inner Cap (42) 15mm x 10mm Spacer (40) 1" Retainer (35) M10 x 180mm Bolt (78) PART IDENTIFICATION CHART Refer to the drawings below to see if it has been pre...
...x 60mm Carriage Bolt (50) M8 x 65mm Bolt (51) M10 x 60mm Bolt (47) M10 x 45mm Bolt (57) If a part is the key number of the part, from the PART LIST in assembly. Note: Some small parts may have been pre-attached. The number in parentheses by each drawing is not in the parts bag, check to identify small parts used in the centre of this manual. 51mm x... Spacer (55) 13mm x 10mm Spacer (75) 15mm x 13mm Spacer (39) 45mm Square Inner Cap (42) 15mm x 10mm Spacer (40) 1" Retainer (35) M10 x 180mm Bolt (78) PART IDENTIFICATION CHART Refer to the drawings below to see if it has been pre...
Instruction Manual
Page 14
... 3 2 Upright 4 1 Curl Knob 5 1 Centre Upright 6 1 Rear Upright 7 1 Crossbar 8 1 Top Frame 9 1 Foot Plate 10 1 Weight Carriage 11 1 Right Butterfly Arm 12 1 Left Butterfly Arm 13 1 Backrest 14 10 Support Plate 15 2 Safety Spotter 16 2 Weight Rest 17 4 Knob 18 2 Large Foam Pad 19 1 Carriage Stop 20 1 Carriage Stop Bushing 21 10 Carriage Bushing 22 2 Storage Tube 23 3 Weight Adapter 24 9 90mm Pulley 25 2 "V"-Pulley 26 4 Cable Trap 27 2 Large Cable Trap...
... 3 2 Upright 4 1 Curl Knob 5 1 Centre Upright 6 1 Rear Upright 7 1 Crossbar 8 1 Top Frame 9 1 Foot Plate 10 1 Weight Carriage 11 1 Right Butterfly Arm 12 1 Left Butterfly Arm 13 1 Backrest 14 10 Support Plate 15 2 Safety Spotter 16 2 Weight Rest 17 4 Knob 18 2 Large Foam Pad 19 1 Carriage Stop 20 1 Carriage Stop Bushing 21 10 Carriage Bushing 22 2 Storage Tube 23 3 Weight Adapter 24 9 90mm Pulley 25 2 "V"-Pulley 26 4 Cable Trap 27 2 Large Cable Trap...


