
English Manual
Page 3
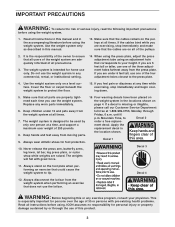
...with pre-existing health problems. Read all times. 7. ment decal. Always disconnect the lat bar from moving parts. 9. If the cables bind while you are exercising, stop immediately and begin cooling down. 5. Keep children under 6 feet tall, use one person at 1-800-999-3756, Monday through the use the lat ...this area. Decal 4 12. Make sure that the cables remain on page 4. Use the weight system only on the foot plate when performing an exercise that could cause the weight system to tip. Make sure that all times. If a decal is the responsibility of the owner to ensure that all...
...with pre-existing health problems. Read all times. 7. ment decal. Always disconnect the lat bar from moving parts. 9. If the cables bind while you are exercising, stop immediately and begin cooling down. 5. Keep children under 6 feet tall, use one person at 1-800-999-3756, Monday through the use the lat ...this area. Decal 4 12. Make sure that the cables remain on page 4. Use the weight system only on the foot plate when performing an exercise that could cause the weight system to tip. Make sure that all times. If a decal is the responsibility of the owner to ensure that all...

English Manual
Page 19
...weight system. If one of the holes in ADJUSTMENTS, beginning below describe how each part of the weight system can be set up for the exercise to see how the weight system should be adjusted. See TROUBLE-SHOOTING AND MAINTENANCE on the Resistance Bracket. Insert the Weight Pin (26) ...closer 35 to find the approximate amount of the remaining parts will vary from the weight setting. ed into the one of resistance at each exercise station will be explained in the Resistance Bracket. Use the WEIGHT RESISTANCE CHART on the knob is insert- Move the Resistance Handle along the...
...weight system. If one of the holes in ADJUSTMENTS, beginning below describe how each part of the weight system can be set up for the exercise to see how the weight system should be adjusted. See TROUBLE-SHOOTING AND MAINTENANCE on the Resistance Bracket. Insert the Weight Pin (26) ...closer 35 to find the approximate amount of the remaining parts will vary from the weight setting. ed into the one of resistance at each exercise station will be explained in the Resistance Bracket. Use the WEIGHT RESISTANCE CHART on the knob is insert- Move the Resistance Handle along the...

English Manual
Page 20
...the four adjustment holes closest to the Short Cable (not shown) in the correct starting position for the exercise to be attached to the Press Plate. Adjust the length of the Press Plate (78), remove the ..."L"-Pin (40) from the Press Plate. For some exercises, the Press Adjustment Tube (79) must be attached in the Rocker Arm. ATTACHING THE LAT BAR...press plate before using an adjustment hole that the Lat Bar is in the same way. For some exercises, the Chain (52) should be attached between the Lat Bar and the High Cable so that corresponds ...
...the four adjustment holes closest to the Short Cable (not shown) in the correct starting position for the exercise to be attached to the Press Plate. Adjust the length of the Press Plate (78), remove the ..."L"-Pin (40) from the Press Plate. For some exercises, the Press Adjustment Tube (79) must be attached in the Rocker Arm. ATTACHING THE LAT BAR...press plate before using an adjustment hole that the Lat Bar is in the same way. For some exercises, the Chain (52) should be attached between the Lat Bar and the High Cable so that corresponds ...

English Manual
Page 22
..., in pounds, at position 2 (see the drawing below), if the weight pin is inserted under 3 weights, and if the leg lever is set at each exercise station on the weight system. The next column to the right lists the number of the resistance handle (see CHANGING THE WEIGHT SETTING on page... 126 5 2 152 94 318 144 112 152 3 172 109 367 173 124 168 4 196 125 420 200 144 204 *It is not recommended that this exercise station be used when the resistance handle is being used. The left column lists the five positions of weights that the approximate weight resistance will...
..., in pounds, at position 2 (see the drawing below), if the weight pin is inserted under 3 weights, and if the leg lever is set at each exercise station on the weight system. The next column to the right lists the number of the resistance handle (see CHANGING THE WEIGHT SETTING on page... 126 5 2 152 94 318 144 112 152 3 172 109 367 173 124 168 4 196 125 420 200 144 204 *It is not recommended that this exercise station be used when the resistance handle is being used. The left column lists the five positions of weights that the approximate weight resistance will...

English Manual
Page 27
... 1/2" x 1/2" 97 1 Metal Cable Trap 98 1 3/8" x 3" Grade 5 Bolt 99 2 5/16" Nylon Jamnut 100 2 1/2" x 7/8" Spacer 101 1 1/2" Plane Nut 102 4 Special Washer 103 1 Small Support Plate # 1 User's Manual # 1 Exercise Guide Note: "#" indicates a non-illustrated part. Qty. WESY19611 R0102A Key No. Description 1 4 5/16" x 2 1/2" Carriage Bolt 2 2 1/4" Nylon Locknut 3 20 5/16" Nylon Locknut 4 1 Base 5 1 Stabilizer 6 5 "V"-Pulley 7 6 3/8" x 2 1/2" Bolt...
... 1/2" x 1/2" 97 1 Metal Cable Trap 98 1 3/8" x 3" Grade 5 Bolt 99 2 5/16" Nylon Jamnut 100 2 1/2" x 7/8" Spacer 101 1 1/2" Plane Nut 102 4 Special Washer 103 1 Small Support Plate # 1 User's Manual # 1 Exercise Guide Note: "#" indicates a non-illustrated part. Qty. WESY19611 R0102A Key No. Description 1 4 5/16" x 2 1/2" Carriage Bolt 2 2 1/4" Nylon Locknut 3 20 5/16" Nylon Locknut 4 1 Base 5 1 Stabilizer 6 5 "V"-Pulley 7 6 3/8" x 2 1/2" Bolt...


