
English Manual
Page 3
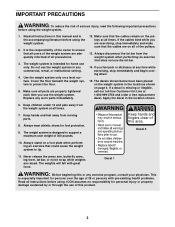
... system to protect the floor. 5. The weights will fall with pre-existing health problems. Read all of the pulleys. 13. IMPORTANT PRECAUTIONS WARNING: To reduce the risk of 300 pounds. Always stand on the pulleys at 1-800-999-3756 and order a free replacement decal. Decal 1 WARNING: Before beginning this product. 3 Do not...
... system to protect the floor. 5. The weights will fall with pre-existing health problems. Read all of the pulleys. 13. IMPORTANT PRECAUTIONS WARNING: To reduce the risk of 300 pounds. Always stand on the pulleys at 1-800-999-3756 and order a free replacement decal. Decal 1 WARNING: Before beginning this product. 3 Do not...
English Manual
Page 4
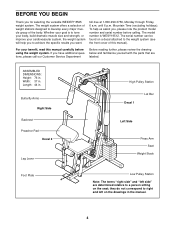
until 6 p.m. Butterfly Arms Right Side Backrest Preacher Pad Decal 2 Leg Lever High Pulley Station Decal 1 Lat Bar Left Side Press Arm Seat Weight Stack Foot Plate Low Pulley Station Note: The terms "right side" and "left on a decal attached to the weight system (see the front cover... Thank you want. The weight system offers a selection of weight stations designed to achieve the specific results you for selecting the versatile WEIDER® 8525 weight system. Whether your goal is WESY19512. The serial number can be found on the drawings in . ASSEMBLED DIMENSIONS: Height: 76...
until 6 p.m. Butterfly Arms Right Side Backrest Preacher Pad Decal 2 Leg Lever High Pulley Station Decal 1 Lat Bar Left Side Press Arm Seat Weight Stack Foot Plate Low Pulley Station Note: The terms "right side" and "left on a decal attached to the weight system (see the front cover... Thank you want. The weight system offers a selection of weight stations designed to achieve the specific results you for selecting the versatile WEIDER® 8525 weight system. Whether your goal is WESY19512. The serial number can be found on the drawings in . ASSEMBLED DIMENSIONS: Height: 76...
English Manual
Page 8
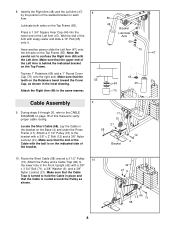
...the Cable with a 3/8" x 2" Bolt (12) and a 3/8" Nylon Locknut (21). Locate the Short Cable (58). Make sure that the Cable Trap is routed around a 3 1/2" Pulley 10 (15). Make sure that the end of the bracket. 9 17 15 21 58 Bracket 12 4 10. 8. Make sure that the Cable is turned to... axle on the Retainers bend toward the Cover 55 Cap, as shown. 42 21 9 15 66 71 58 8 Route the Short Cable (58) around the Pulley as shown in the inset drawing. 44 69 45 Attach the Right Arm (48) in the Front Upright (42) with a 3/8" x 3 3/4" Bolt (71), a 3/8" Washer (9), and ...
...the Cable with a 3/8" x 2" Bolt (12) and a 3/8" Nylon Locknut (21). Locate the Short Cable (58). Make sure that the Cable Trap is routed around a 3 1/2" Pulley 10 (15). Make sure that the end of the bracket. 9 17 15 21 58 Bracket 12 4 10. 8. Make sure that the Cable is turned to... axle on the Retainers bend toward the Cover 55 Cap, as shown. 42 21 9 15 66 71 58 8 Route the Short Cable (58) around the Pulley as shown in the inset drawing. 44 69 45 Attach the Right Arm (48) in the Front Upright (42) with a 3/8" x 3 3/4" Bolt (71), a 3/8" Washer (9), and ...
English Manual
Page 9
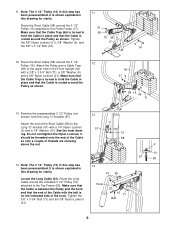
... (71) and the 3/8" Nylon Locknut (21). 14 21 55 Hook 23 15 71 Ball 2 10 57 58 9 Make sure that the Cable is between the Pulley and the hook and that the Cable Trap (66) is shown exploded in the Front Upright (42) with a 3/8" x 3 3/4" Bolt (71), a 3/8" Washer (9), and a 3/8" Nylon Locknut (... overtighten the Nylon Locknut; Locate the Long Cable (23). It is shown exploded in place and that the Cable is routed around the indicated 3 1/2" Pulley (15) attached to the Press Frame (17). Make sure that the Cable Trap is turned to hold the Cable in place and that the Cable...
... (71) and the 3/8" Nylon Locknut (21). 14 21 55 Hook 23 15 71 Ball 2 10 57 58 9 Make sure that the Cable is between the Pulley and the hook and that the Cable Trap (66) is shown exploded in the Front Upright (42) with a 3/8" x 3 3/4" Bolt (71), a 3/8" Washer (9), and a 3/8" Nylon Locknut (... overtighten the Nylon Locknut; Locate the Long Cable (23). It is shown exploded in place and that the Cable is routed around the indicated 3 1/2" Pulley (15) attached to the Press Frame (17). Make sure that the Cable Trap is turned to hold the Cable in place and that the Cable...
English Manual
Page 10
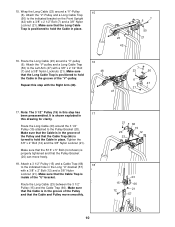
...15 12 15 12 23 66 21 57 10 Repeat this step with a 3/8" x 2" Bolt (12) and a 3/8" Nylon Locknut (21). Attach a 3 1/2" Pulley (15) and a Cable Trap (66) 18 to hold the Cable in the Long "U"-bracket (57) with the Right Arm (48). 16 48 47 7 23 ...to the Left Arm (47) with a 3/8" x 2 1/2" Bolt (7) and a 3/8" Nylon Locknut (21). Wrap the Long Cable (23) around a "V"-Pulley 15 (6). It is positioned to the Pulley Bracket (20). Attach the "V"-pulley and a Long Cable Trap (50) to the indicated bracket on the Front Upright (42) with a 3/8" x 2 1/2" Bolt (7) and a 3/8" Nylon ...
...15 12 15 12 23 66 21 57 10 Repeat this step with a 3/8" x 2" Bolt (12) and a 3/8" Nylon Locknut (21). Attach a 3 1/2" Pulley (15) and a Cable Trap (66) 18 to hold the Cable in the Long "U"-bracket (57) with the Right Arm (48). 16 48 47 7 23 ...to the Left Arm (47) with a 3/8" x 2 1/2" Bolt (7) and a 3/8" Nylon Locknut (21). Wrap the Long Cable (23) around a "V"-Pulley 15 (6). It is positioned to the Pulley Bracket (20). Attach the "V"-pulley and a Long Cable Trap (50) to the indicated bracket on the Front Upright (42) with a 3/8" x 2 1/2" Bolt (7) and a 3/8" Nylon ...

English Manual
Page 11
...) and reattach it should be threaded onto the end of the Cable only a couple of the Pulley and that the Cable is in the groove of turns, as shown. 23 Attach the Small "U"-bracket (67) to the bracket on the Top Frame (... 2 23 2 67 Seat Assembly 21 21. it to the Weight Tube (63) with a 1/4" Nylon Locknut (2) and a 1/4" Washer (10). 19. Make sure that the Cable and Pulley move smoothly. 21 55 Bracket 15 12 23 20.
...) and reattach it should be threaded onto the end of the Cable only a couple of the Pulley and that the Cable is in the groove of turns, as shown. 23 Attach the Small "U"-bracket (67) to the bracket on the Top Frame (... 2 23 2 67 Seat Assembly 21 21. it to the Weight Tube (63) with a 1/4" Nylon Locknut (2) and a 1/4" Washer (10). 19. Make sure that the Cable and Pulley move smoothly. 21 55 Bracket 15 12 23 20.
English Manual
Page 13
... (77) with two 1/4" x 3/4" Screws (18). 56 77 18 27. see TROUBLESHOOTING AND MAINTENANCE on page 18 of the cables does not move smoothly over the pulleys. 26. Attach the Preacher Pad (56) to remove it by tightening the cables; See the CABLE DIAGRAM on page 17. 13 If one of this...
... (77) with two 1/4" x 3/4" Screws (18). 56 77 18 27. see TROUBLESHOOTING AND MAINTENANCE on page 18 of the cables does not move smoothly over the pulleys. 26. Attach the Preacher Pad (56) to remove it by tightening the cables; See the CABLE DIAGRAM on page 17. 13 If one of this...
English Manual
Page 14
... of resistance at each exercise station may vary from 6.5 pounds to 81.5 pounds, in the correct starting position for the exercise to the cables and pulleys, the actual amount of the Chain between the Lat Bar and the Cable with two Cable Clips. Note: Due to be changed from the weight...
... of resistance at each exercise station may vary from 6.5 pounds to 81.5 pounds, in the correct starting position for the exercise to the cables and pulleys, the actual amount of the Chain between the Lat Bar and the Cable with two Cable Clips. Note: Due to be changed from the weight...
English Manual
Page 15
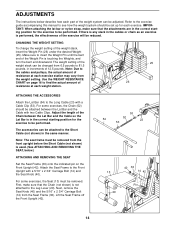
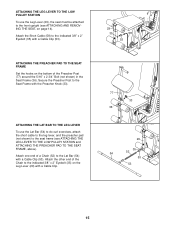
... LEG LEVER To use the Leg Lever (29), the seat must be attached to the front upright (see ATTACHING THE LEG LEVER TO THE LOW PULLEY STATION and ATTACHING THE PREACHER PAD TO THE SEAT FRAME, above). Attach the other end of the Preacher Post (77) around the 5/16" x 2 3/4" Bolt (not... the Preacher Post to the indicated 3/8" x 2" Eyebolt (35) on the Leg Lever (29) with the Preacher Knob (33). ATTACHING THE LEG LEVER TO THE LOW PULLEY STATION To use the Lat Bar (54) to do curl exercises, attach the short cable to the leg lever, and the preacher pad (not shown...
... LEG LEVER To use the Leg Lever (29), the seat must be attached to the front upright (see ATTACHING THE LEG LEVER TO THE LOW PULLEY STATION and ATTACHING THE PREACHER PAD TO THE SEAT FRAME, above). Attach the other end of the Preacher Post (77) around the 5/16" x 2 3/4" Bolt (not... the Preacher Post to the indicated 3/8" x 2" Eyebolt (35) on the Leg Lever (29) with the Preacher Knob (33). ATTACHING THE LEG LEVER TO THE LOW PULLEY STATION To use the Lat Bar (54) to do curl exercises, attach the short cable to the leg lever, and the preacher pad (not shown...
English Manual
Page 16
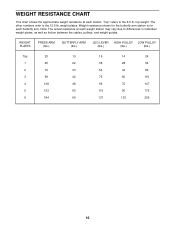
...at each butterfly arm. weight plates. The other numbers refer to differences in individual weight plates, as well as friction between the cables, pulleys, and weight guides. WEIGHT RESISTANCE CHART This chart shows the approximate weight resistance at each weight station may vary due to the 12.5 ...lb. Weight resistance shown for the butterfly arm station is for each station. WEIGHT PLATES PRESS ARM (lbs.) BUTTERFLY ARM (lbs.) LEG LEVER HIGH PULLEY LOW PULLEY (lbs.) (lbs.) (lbs.) Top 20 1 45 2 70 3 99 4 128 5 153 6 184 10 15 14 24 22 36 28 54 33...
...at each butterfly arm. weight plates. The other numbers refer to differences in individual weight plates, as well as friction between the cables, pulleys, and weight guides. WEIGHT RESISTANCE CHART This chart shows the approximate weight resistance at each weight station may vary due to the 12.5 ...lb. Weight resistance shown for the butterfly arm station is for each station. WEIGHT PLATES PRESS ARM (lbs.) BUTTERFLY ARM (lbs.) LEG LEVER HIGH PULLEY LOW PULLEY (lbs.) (lbs.) (lbs.) Top 20 1 45 2 70 3 99 4 128 5 153 6 184 10 15 14 24 22 36 28 54 33...
English Manual
Page 17
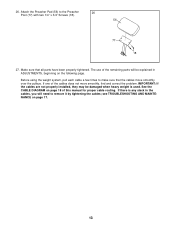
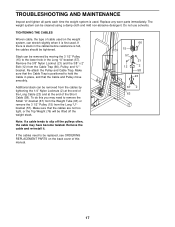
...the cables should be cleaned using a damp cloth and mild non-abrasive detergent. To do this manual. 17 Make sure that the Cable and Pulley move smoothly. Replace any worn parts immediately. TIGHTENING THE CABLES Woven cable, the type of cable used on the back cover of the Short Cable... (58). Remove the cable and re-install it is first used . Re-attach the Pulley and Cable Trap. Do not use solvents. Additional slack can be tightened. TROUBLESHOOTING AND MAINTENANCE Inspect and tighten all parts each time the weight ...
...the cables should be cleaned using a damp cloth and mild non-abrasive detergent. To do this manual. 17 Make sure that the Cable and Pulley move smoothly. Replace any worn parts immediately. TIGHTENING THE CABLES Woven cable, the type of cable used on the back cover of the Short Cable... (58). Remove the cable and re-install it is first used . Re-attach the Pulley and Cable Trap. Do not use solvents. Additional slack can be tightened. TROUBLESHOOTING AND MAINTENANCE Inspect and tighten all parts each time the weight ...
English Manual
Page 18
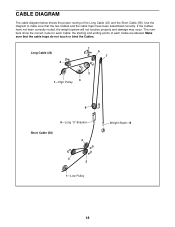
...; If the Cables have been assembled correctly. The numbers show the correct route for each Cable are labeled. Long Cable (23) 4 5 7 2 3 1-High Pulley 6 5-Long "U"-Bracket Short Cable (58) 4 3 2 1-Low Pulley Weight Stack-8 18 Use the diagram to make sure that the cable traps do not touch or bind the Cables. Make sure...
...; If the Cables have been assembled correctly. The numbers show the correct route for each Cable are labeled. Long Cable (23) 4 5 7 2 3 1-High Pulley 6 5-Long "U"-Bracket Short Cable (58) 4 3 2 1-Low Pulley Weight Stack-8 18 Use the diagram to make sure that the cable traps do not touch or bind the Cables. Make sure...
English Manual
Page 21
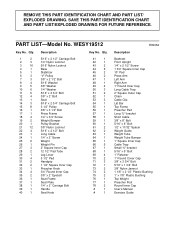
... 2 36 1 37 1 38 1 39 1 40 1 Description 5/16" x 2 1/2" Carriage Bolt 1/4" Nylon Locknut 5/16" Nylon Locknut Base Stabilizer "V"-Pulley 3/8" x 2 1/2" Bolt 5/16" Washer 3/8" Washer 1/4" Washer 5/16" x 2 3/4" Bolt 3/8" x 2" Bolt Seat 5/16" x 2 3/4" Carriage Bolt 3 1/2" Pulley 3/8" x 3 1/2" Bolt Press Frame 1/4" x 3/4" Screw Weight Bumper Pulley Bracket 3/8" Nylon Locknut 5/16" x 2 1/2" Bolt Long Cable 1/4" x 2" Screw Weight Weight Pin 2" Square Inner Cap 12 1/2" Pad...
... 2 36 1 37 1 38 1 39 1 40 1 Description 5/16" x 2 1/2" Carriage Bolt 1/4" Nylon Locknut 5/16" Nylon Locknut Base Stabilizer "V"-Pulley 3/8" x 2 1/2" Bolt 5/16" Washer 3/8" Washer 1/4" Washer 5/16" x 2 3/4" Bolt 3/8" x 2" Bolt Seat 5/16" x 2 3/4" Carriage Bolt 3 1/2" Pulley 3/8" x 3 1/2" Bolt Press Frame 1/4" x 3/4" Screw Weight Bumper Pulley Bracket 3/8" Nylon Locknut 5/16" x 2 1/2" Bolt Long Cable 1/4" x 2" Screw Weight Weight Pin 2" Square Inner Cap 12 1/2" Pad...


