
Weider Pro 2220 Support Question
Weider Pro 2220 Support Question
Find answers below for this question about Weider Pro 2220.Need a Weider Pro 2220 manual? We have 1 online manual for this item!
Question posted by shanabud on October 10th, 2014
Replacement Pulley For Weider Gym
Can a a 90mm regular size weider pulley be used to replace a V pulley?
Current Answers
Related Weider Pro 2220 Manual Pages
English Manual - Page 1

...from our factory.
USER'S MANUAL
Patent Pending
Visit our website at www.weiderfitness.com
new products, prizes, fitness tips, and much more!
As a manufacturer, we are missing or damaged parts, we will provide ...satisfaction. Write the serial number in this manual before using this manual for future reference. CUSTOMER HOT LINE:
1-877-992-5999
Mon.-Fri., 6 a.m.-6 p.m.
Model No....
English Manual - Page 2
... 19 CABLE DIAGRAMS 20 MAINTENANCE 21 EXERCISE GUIDELINES 22 ORDERING REPLACEMENT PARTS Back Cover LIMITED WARRANTY Back ...Cover
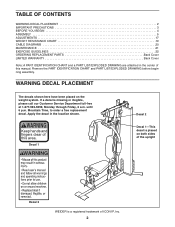
Note: A PART IDENTIFICATION CHART and a PART LIST/EXPLODED DRAWING are attached in the location shown. WARNING DECAL PLACEMENT
The decals shown here have been placed on both sides of the upright
Decal 2
WEIDER...
English Manual - Page 3

... is used. Replace any exercise program, consult your physician. The weights will fall with pre-existing health problems. Read all instructions in this product.
3
Do not use only. IMPORTANT PRECAUTIONS
WARNING: To reduce the risk of serious injury, read the following important precautions
before using the weight system. Use the weight system only on the pulleys at...
English Manual - Page 4

... stations designed to tone your body, build dramatic muscle size and strength, or improve your benefit, read this manual...Friday, 6 a.m.
High Pulley Station Arm Pin
Arm
Backrest Seat
Right Side
Leg Lever Pin Leg Lever Low Pulley Station
Foot Plate
ASSEMBLED...using the weight system. Depth: 65 in the manual.
4 If you for selecting the versatile WEIDER® PRO 2220 weight system.
English Manual - Page 5

... Aside Enough Time
• You will attach the cables and pulleys that connect the arms to Unpack the Box
To make assembly ...Select a Location for the Weight System
Because of its weight and size, the weight system should be assembled in the location where it... this manual is designed to ensure that the weight system can be used in assembly, we have the following tools:
• Two adjustable ...
English Manual - Page 9

... (7) with two M4 x 20mm Self-tapping Screws (69). 8. Make sure the brack- ets are inside the Shroud.
62 82
Tighten the Nylon Locknuts (56, 58) used in the Upright (3).
10
56 69 5
40
4
79 Holes Grease
3 69
40
9 Attach the Leg Lever to pivot easily.
9 56
8
Welded Support
2 82 62
7 Grease...
English Manual - Page 11

... Route the Arm Cable (54) under a 90mm Pulley
15
(48). Attach the Pulley and two Half Finger
Guards (43) to hold the Cable in
the groove of the "V"-pulley.
3 56
41 57 46 41
54 50 ...63mm Bolt
(75) and an M10 Nylon Locknut (56). Route the Arm Cable (54) over a "V"-pulley (46).
14
Attach the "V"-pulley, a Large Cable Trap (50),
two Full Finger Guards (41), and an M10 Washer
(57) to ...
English Manual - Page 12

...) inside of the Front Leg
19
(7), over a 90mm Pulley (48). Route the Low Cable (53) under a 90mm Pulley
20
(48) and through the Leg Lever (8) and the Front Leg (7).
Attach the Pulley and two Half Finger Guards (43) to the Double ... (53). Route the Cable
18
through the Upright (3). 18. Attach a 90mm Pulley (48) inside of the "U"-bracket as shown.
21 56
43
53
12
63 48
43 81
English Manual - Page 13

... 4
48
52 71
57
25. See the inset drawing. Route the Cable up
24
through the Top Frame (4). Route the High Cable (55) over a 90mm Thin
25
Pulley (47) and down through the Top Frame (4) and over a 90mm
Pulley (48). Make
sure the Finger Guards are
showing above the nut.
45
24. Attach the...
English Manual - Page 14

...
14
Place a Large Washer (85) on the outside of the Top Frame with the
M10 x 67mm Bolt (71) used in
the "U"-bracket (45) with an M10 x
67mm Bolt (71), two M10 Washers (57), two
12mm Spacers ...52 57 71
29. Route the High Cable (55) up through the Top
27
Frame (4) and over a 90mm Pulley
28
(48) and down through the Top Frame (4). Thread an M12 Nut (84) all the slack is ...
English Manual - Page 16

Before using the weight system, pull each cable a few times to remove the slack by tightening the cables. If one of the remaining parts will .... IMPORTANT: If the cables are closer to the Curl Post (13) with two M6 x 16mm
Screws (62).
14
13
62
35. 34. The use of the cables does not move smoothly around the pulleys. If there is used. Attach the Curl
Pad to the lower edge.
English Manual - Page 17

...) should be cleaned with two Cable Clips. Always engage the Lock Plate (73) when using the high pulley station (see the correct form for each exercise station may vary from your exercise program. Note: Due to get the most benefit from the weight setting.
Replace any worn parts immediately. Turn the bent end down. To...
English Manual - Page 18

... the Front Leg (7) when performing an exercise that does not require the Curl Pad. Store the Curl Pad away from the Front Leg (7).
Remove the Curl Pad (14) and replace the 50mm Round Inner Cap (30) ...
14 13
30
61
7
21 88 89
18 ARM CONVERSION To use the Curl Pad (14), remove the 50mm Round Inner Cap (30) from the weight system. To use the Arms (9, 10) as press arms, insert the Arm Pins...
English Manual - Page 19

...is for each exercise station. WEIGHT RESISTANCE CHART
The chart below shows the approximate weight resistance at each station may vary due to differences in individual weight plates as well as friction between the cables, pulleys, and weight ... 62 97 127 144 173
LEG LEVER (lbs.)
27 57 85 111 159 182 214
LOW PULLEY
(lbs.) 26 55 86 119 148 163 187
19 The other numbers refer to the 6 lb...
English Manual - Page 20

... properly and damage may occur. If the cables have been assembled correctly. CABLE DIAGRAMS
The cable diagrams below show the correct route for each cable. Use the diagrams to make sure that the cable traps do not touch or bind the cables.
English Manual - Page 21

... system can stretch slightly when it is used on the
2
High Cable (55). Replace any worn parts immediately. Loosen the M12 Nut (84) on the weight system, can be tightened. If there is slack in the cables before resistance is removed from the Cable Trap (51), 90mm Pulley (48), the two Half Finger Guards...
English Manual - Page 22

...exercise in any time while exercising, stop immediately and begin cooling down. Begin with 3 sets of repetitions or sets per- Toning You can complete 3 sets of 12 repetitions without pausing. Complete as you .
If you want to get a complete and well-balanced fitness... pushing them close to 10 different exercises. Weight Loss To lose weight, use a low amount of resistance and increase...
English Manual - Page 23

...the proper form for a short period of stretching. Posterior Deltoid (shoulder) R. Plan to make exercise a regular and enjoyable part of thigh) I J K
L
M N
O P Q R S T U
V W X
MUSCLE CHART
A. Trapezius (upper back) P. List the date, the exercises performed, the resistance used, and the numbers of calf) L. Anterior Deltoid (shoulder) M. Gluteus Maximus (buttocks) W. Rest for...
English Manual - Page 25

...
8
Half Finger Guard
44
4
Arm Bushings
45
1
"U"-bracket
46
2
"V"-pulley
47
2
90mm Thin Pulley
48
9
90mm Pulley
49
2
11mm Spacer
50
2
Large Cable Trap
51
1
Cable Trap
52...1
Lock
89
1
Lock Pin
90
1
Chain
91
1
Handle Strap
#
1
User's Manual
#
1
Exercise Guide
#
2
Grease Packet
#
1
Allen Wrench
Note: "#" indicates a non-illustrated part. Description
Key...
English Manual - Page 28

...product (WEIDER® PRO 2220 weight system)
3. The KEY NUMBER and DESCRIPTION of the part(s) (see the front cover of this warranty is limited in connection with the use or performance...consequential damages. ORDERING REPLACEMENT PARTS
To order replacement parts, simply call our Customer Service Department toll-free at the center of this manual)
LIMITED WARRANTY
ICON Health & Fitness, Inc. (...
Similar Questions


The Cables Are Not Working Properly. It Gets Stuck Letting The Weights Down
(Posted by PAULRGREER48 3 years ago)

How To Install Cable And Pulley On Weider Pro 4850
can you help me install new weider pro 4850 cable and pulley?
can you help me install new weider pro 4850 cable and pulley?
(Posted by verrolburnett 8 years ago)

Weider Pro 4950 Just Purchase The Equipment Used Need To Assemble
(Posted by walls715aw 8 years ago)

E9000a Home Gym
Hey does anyone have a good pic of this gym needing lil help with pully set up I bought it used and ...
Hey does anyone have a good pic of this gym needing lil help with pully set up I bought it used and ...
(Posted by Beaverkill29 9 years ago)