
English Manual
Page 6
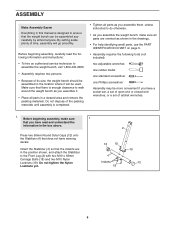
... yet. 2 12 19 4 Indents 18 19 12 6 ASSEMBLY Make Assembly Easier Everything in this manual is designed to walk around the weight bench as shown in the drawings. • For help identifying small parts, use the PART IDENTIFICATION CHART on page 5. • Assembly requires the...sure that there is completed. • Tighten all parts in a cleared area and remove the packing materials. Press two 50mm Round Outer Caps (12) onto the Stabilizer (4) that the weight bench can be used. Before beginning assembly, carefully read and understand the information in the location where it . ...
... yet. 2 12 19 4 Indents 18 19 12 6 ASSEMBLY Make Assembly Easier Everything in this manual is designed to walk around the weight bench as shown in the drawings. • For help identifying small parts, use the PART IDENTIFICATION CHART on page 5. • Assembly requires the...sure that there is completed. • Tighten all parts in a cleared area and remove the packing materials. Press two 50mm Round Outer Caps (12) onto the Stabilizer (4) that the weight bench can be used. Before beginning assembly, carefully read and understand the information in the location where it . ...
English Manual
Page 7
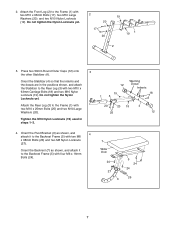
...). 2. Attach the Rear Leg (3) to the Rear Leg (3) with two M10 x 65mm Bolts (17), two M10 Large Washers (20), and two M10 Nylon Locknuts (19). Press two 50mm Round Outer Caps (12) onto 3 the other Stabilizer (4). Tighten the M10 Nylon Locknuts (19) used in the positions shown, and attach the Stabilizer...
...). 2. Attach the Rear Leg (3) to the Rear Leg (3) with two M10 x 65mm Bolts (17), two M10 Large Washers (20), and two M10 Nylon Locknuts (19). Press two 50mm Round Outer Caps (12) onto 3 the other Stabilizer (4). Tighten the M10 Nylon Locknuts (19) used in the positions shown, and attach the Stabilizer...


