
English Manual
Page 1
... questions, or if a part is damaged or missing, PLEASE CONTACT OUR CUSTOMER SERVICE DEPARTMENT DIRECTLY. USER'S MANUAL Visit our website at www.healthrider.com new products, prizes, fitness tips, and much more ! CALL TOLL-FREE: 1-877-992-5999 Mon.-Fri. 6 a.m.-6 p.m. MST ON THE WEB: www.weiderfitness.com CAUTION Read all precautions and instructions in the space above for future...
... questions, or if a part is damaged or missing, PLEASE CONTACT OUR CUSTOMER SERVICE DEPARTMENT DIRECTLY. USER'S MANUAL Visit our website at www.healthrider.com new products, prizes, fitness tips, and much more ! CALL TOLL-FREE: 1-877-992-5999 Mon.-Fri. 6 a.m.-6 p.m. MST ON THE WEB: www.weiderfitness.com CAUTION Read all precautions and instructions in the space above for future...
English Manual
Page 2
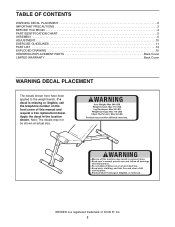
... cover of ICON IP, Inc. 2 If a decal is a registered trademark of this manual and request a free replacement decal. Apply the decal in the location shown. Note: The decals may not be shown at actual size. TABLE OF CONTENTS WARNING DECAL PLACEMENT 2 IMPORTANT PRECAUTIONS 3 BEFORE YOU BEGIN 4 PART IDENTIFICATION CHART 5 ASSEMBLY 6 ADJUSTMENT 10 EXERCISE GUIDELINES 11 PART LIST 14 EXPLODED DRAWING 15 ORDERING REPLACEMENT PARTS Back Cover LIMITED WARRANTY Back Cover...
... cover of ICON IP, Inc. 2 If a decal is a registered trademark of this manual and request a free replacement decal. Apply the decal in the location shown. Note: The decals may not be shown at actual size. TABLE OF CONTENTS WARNING DECAL PLACEMENT 2 IMPORTANT PRECAUTIONS 3 BEFORE YOU BEGIN 4 PART IDENTIFICATION CHART 5 ASSEMBLY 6 ADJUSTMENT 10 EXERCISE GUIDELINES 11 PART LIST 14 EXPLODED DRAWING 15 ORDERING REPLACEMENT PARTS Back Cover LIMITED WARRANTY Back Cover...
English Manual
Page 3
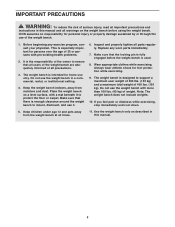
ICON assumes no responsibility for home use only. It is intended for personal injury or property damage sustained by or through the use the weight bench in this manual and all parts regularly. Note: The weight bench does not include weights. 10. Place the weight bench on the weight bench before the weight bench is especially important for foot protection while exercising. 9. Do not use it to support a maximum user weight of 300...
ICON assumes no responsibility for home use only. It is intended for personal injury or property damage sustained by or through the use the weight bench in this manual and all parts regularly. Note: The weight bench does not include weights. 10. Place the weight bench on the weight bench before the weight bench is especially important for foot protection while exercising. 9. Do not use it to support a maximum user weight of 300...
English Manual
Page 4
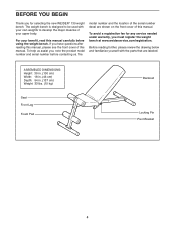
.... (137 cm) Weight: 33 lbs. (15 kg) Seat Front Leg Foam Pad Backrest Locking Pin Pivot Bracket 4 For your upper body. BEFORE YOU BEGIN Thank you have questions after reading this manual, please see the front cover of this manual. If you for any service needed under warranty, you , note the product model number and serial number before using the weight bench. Before reading further, please review the drawing...
.... (137 cm) Weight: 33 lbs. (15 kg) Seat Front Leg Foam Pad Backrest Locking Pin Pivot Bracket 4 For your upper body. BEFORE YOU BEGIN Thank you have questions after reading this manual, please see the front cover of this manual. If you for any service needed under warranty, you , note the product model number and serial number before using the weight bench. Before reading further, please review the drawing...
English Manual
Page 5
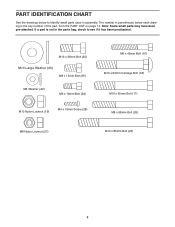
... a part is the key number of the part, from the PART LIST on page 14. Note: Some small parts may have been pre-attached. The number in assembly. M10 x 25mm Bolt (25) M10 Large Washer (20) M8 x 15mm Bolt (29) M6 Washer (22) M6 x 16mm Bolt (24) M10 Nylon Locknut (19) M4 x 16mm Screw (28) M6 x 45mm Bolt (16) M10 x 63mm Carriage Bolt (18) M10 x 65mm Bolt...
... a part is the key number of the part, from the PART LIST on page 14. Note: Some small parts may have been pre-attached. The number in assembly. M10 x 25mm Bolt (25) M10 Large Washer (20) M8 x 15mm Bolt (29) M6 Washer (22) M6 x 16mm Bolt (24) M10 Nylon Locknut (19) M4 x 16mm Screw (28) M6 x 45mm Bolt (16) M10 x 63mm Carriage Bolt (18) M10 x 65mm Bolt...
English Manual
Page 6
Do not dispose of its size, the weight bench should be assembled in the location where it . • Place all parts are in this manual is enough clearance to walk around the weight bench as shown in the box above. Orient the Stabilizer (4) so that you have read the following tools (not included): two adjustable wrenches one rubber mallet one standard screwdriver...
Do not dispose of its size, the weight bench should be assembled in the location where it . • Place all parts are in this manual is enough clearance to walk around the weight bench as shown in the box above. Orient the Stabilizer (4) so that you have read the following tools (not included): two adjustable wrenches one rubber mallet one standard screwdriver...
English Manual
Page 7
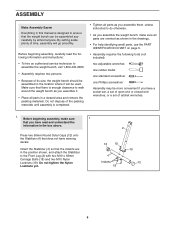
2. Press two 50mm Round Outer Caps (12) onto 3 the other Stabilizer (4). Tighten the M10 Nylon Locknuts (19) used in the positions shown, and attach the Stabilizer to the Rear Leg (3) with two M10 x 65mm Bolts (17), two M10 Large Washers (20), and two M10 Nylon Locknuts (19). Attach the Front Leg (2) to the Frame (1) with two M8 x 68mm Bolts (26) and...
2. Press two 50mm Round Outer Caps (12) onto 3 the other Stabilizer (4). Tighten the M10 Nylon Locknuts (19) used in the positions shown, and attach the Stabilizer to the Rear Leg (3) with two M10 x 65mm Bolts (17), two M10 Large Washers (20), and two M10 Nylon Locknuts (19). Attach the Front Leg (2) to the Frame (1) with two M8 x 68mm Bolts (26) and...

English Manual
Page 8
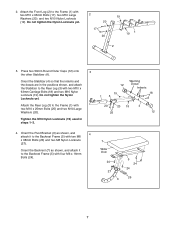
...M4 x 16mm Screw (28). the Backrest Frame must pivot easily. Wide End 8 1 21 Tether 22 28 16 8 Orient the Seat (8) as shown, and attach it to the Frame (1) with the Bolt and an M10 Nylon Locknut (19). Do not overtighten the Nylon Locknut; Insert the Locking Pin (21) ...into the slot in the Pivot Bracket (6). 5 5 19 1 6 Slot 23 21 Adjustment Holes Lubricate 6. 5. Insert the Pivot ...
...M4 x 16mm Screw (28). the Backrest Frame must pivot easily. Wide End 8 1 21 Tether 22 28 16 8 Orient the Seat (8) as shown, and attach it to the Frame (1) with the Bolt and an M10 Nylon Locknut (19). Do not overtighten the Nylon Locknut; Insert the Locking Pin (21) ...into the slot in the Pivot Bracket (6). 5 5 19 1 6 Slot 23 21 Adjustment Holes Lubricate 6. 5. Insert the Pivot ...
English Manual
Page 9
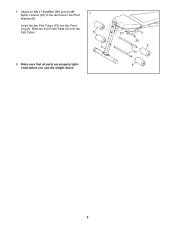
Make sure that all parts are properly tightened before you use the weight bench. 27 6 29 9 10 9 9 Insert the two Pad Tubes (10) into the Front Leg (2). 7. Attach an M8 x 15mmBolt (29) and an M8 Nylon Locknut (27) to the last hole in the Pivot 7 Bracket (6). Slide the four Foam Pads (9) onto the Pad Tubes. 9 2 8.
Make sure that all parts are properly tightened before you use the weight bench. 27 6 29 9 10 9 9 Insert the two Pad Tubes (10) into the Front Leg (2). 7. Attach an M8 x 15mmBolt (29) and an M8 Nylon Locknut (27) to the last hole in the Pivot 7 Bracket (6). Slide the four Foam Pads (9) onto the Pad Tubes. 9 2 8.
English Manual
Page 10
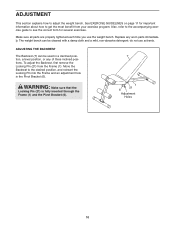
... any worn parts immediately. do not use the weight bench. Also, refer to the accompanying exercise guide to see the correct form for important information about how to adjust the weight bench. WARNING: Make sure that the Locking Pin (21) is fully inserted through the Frame (1) and the Pivot Bracket (6). 1 21 6 Adjustment Holes 10 Make sure all parts are properly tightened each time you use solvents.
... any worn parts immediately. do not use the weight bench. Also, refer to the accompanying exercise guide to see the correct form for important information about how to adjust the weight bench. WARNING: Make sure that the Locking Pin (21) is fully inserted through the Frame (1) and the Pivot Bracket (6). 1 21 6 Adjustment Holes 10 Make sure all parts are properly tightened each time you use solvents.
English Manual
Page 11
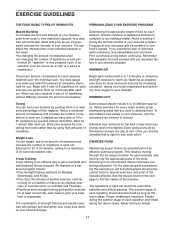
... part of an effective exercise program. Once you find photographs showing the correct form for you feeling exhausted. See the muscle chart on the next page to get a complete and well-balanced fitness program. You can complete 3 sets of 12 repetitions without discomfort. Each workout should last about half as long as the return stage. On the exercise guide accompanying this manual...
... part of an effective exercise program. Once you find photographs showing the correct form for you feeling exhausted. See the muscle chart on the next page to get a complete and well-balanced fitness program. You can complete 3 sets of 12 repetitions without discomfort. Each workout should last about half as long as the return stage. On the exercise guide accompanying this manual...
English Manual
Page 12
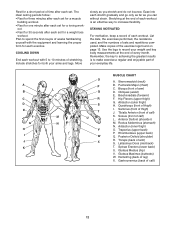
...) I J K L M N O P Q R S T U V W X MUSCLE CHART A. Adductor (inner thigh) O. Plan to spend the first couple of weeks familiarizing yourself with the equipment and learning the proper form for each workout with 5 to increase flexibility. List the date, the exercises performed, the resistance used, and the numbers of every month. Use the logs to make exercise a regular and enjoyable part of each set for a muscle building workout. •...
...) I J K L M N O P Q R S T U V W X MUSCLE CHART A. Adductor (inner thigh) O. Plan to spend the first couple of weeks familiarizing yourself with the equipment and learning the proper form for each workout with 5 to increase flexibility. List the date, the exercises performed, the resistance used, and the numbers of every month. Use the logs to make exercise a regular and enjoyable part of each set for a muscle building workout. •...
English Manual
Page 13
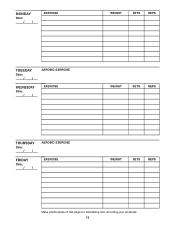
MONDAY Date: // EXERCISE WEIGHT SETS REPS TUESDAY Date: // WEDNESDAY Date: // AEROBIC EXERCISE EXERCISE WEIGHT SETS REPS THURSDAY Date: // FRIDAY Date: // AEROBIC EXERCISE EXERCISE WEIGHT SETS REPS Make photocopies of this page for scheduling and recording your workouts. 13
MONDAY Date: // EXERCISE WEIGHT SETS REPS TUESDAY Date: // WEDNESDAY Date: // AEROBIC EXERCISE EXERCISE WEIGHT SETS REPS THURSDAY Date: // FRIDAY Date: // AEROBIC EXERCISE EXERCISE WEIGHT SETS REPS Make photocopies of this page for scheduling and recording your workouts. 13
English Manual
Page 14
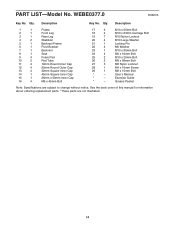
... 4 23 1 24 4 25 2 26 2 27 3 28 1 29 1 * - * - * - Description Key No. M10 x 65mm Bolt M10 x 63mm Carriage Bolt M10 Nylon Locknut M10 Large Washer Locking Pin M6 Washer M10 x 85mm Bolt M6 x 16mm Bolt M10 x 25mm Bolt M8 x 68mm Bolt M8 Nylon Locknut M4 x 16mm Screw M8 x 15mm Bolt User's Manual Exercise Guide Grease Packet Note: Specifications are not illustrated. 14 Qty. PART LIST-Model No. WEBE0377.0 R0607A Key No. Qty.
... 4 23 1 24 4 25 2 26 2 27 3 28 1 29 1 * - * - * - Description Key No. M10 x 65mm Bolt M10 x 63mm Carriage Bolt M10 Nylon Locknut M10 Large Washer Locking Pin M6 Washer M10 x 85mm Bolt M6 x 16mm Bolt M10 x 25mm Bolt M8 x 68mm Bolt M8 Nylon Locknut M4 x 16mm Screw M8 x 15mm Bolt User's Manual Exercise Guide Grease Packet Note: Specifications are not illustrated. 14 Qty. PART LIST-Model No. WEBE0377.0 R0607A Key No. Qty.
English Manual
Page 15
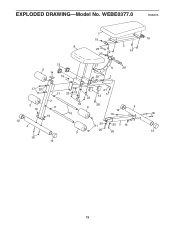
WEBE0377.0 R0607A 8 13 9 14 19 7 19 23 27 24 5 24 27 6 26 29 1 17 20 11 22 19 21 13 22 2 9 11 19 16 28 9 4 12 10 19 19 12 4 20 11 20 3 19 9 25 25 18 12 15 18 12 15 EXPLODED DRAWING-Model No.
WEBE0377.0 R0607A 8 13 9 14 19 7 19 23 27 24 5 24 27 6 26 29 1 17 20 11 22 19 21 13 22 2 9 11 19 16 28 9 4 12 10 19 19 12 4 20 11 20 3 19 9 25 25 18 12 15 18 12 15 EXPLODED DRAWING-Model No.
English Manual
Page 16
... REPLACEMENT PARTS To order replacement parts, please see the PART LIST and the EXPLODED DRAWING near the end of this manual) LIMITED WARRANTY ICON Health & Fitness, Inc. (ICON) warrants this product to be responsible for a minimal trip charge. To help us assist you specific legal rights. ICON's obligation under normal use , costs of incidental or consequential damages. For in-home service, the customer will be free from the service center...
... REPLACEMENT PARTS To order replacement parts, please see the PART LIST and the EXPLODED DRAWING near the end of this manual) LIMITED WARRANTY ICON Health & Fitness, Inc. (ICON) warrants this product to be responsible for a minimal trip charge. To help us assist you specific legal rights. ICON's obligation under normal use , costs of incidental or consequential damages. For in-home service, the customer will be free from the service center...


