Weider 235 Support and Manuals
Get Help and Manuals for this Weider item

Popular Weider 235 Manual Pages
Uk Manual - Page 1

Model No. Serial Number Decal
QUESTIONS?
As a manufacturer, we are missing or damaged parts, please call:
08457 089 009
Or write: ICON Health & Fitness, Ltd. USER'S MANUAL
Visit our website...this manual before using this manual for future reference. Unit 4 Revie Road Industrial Estate Revie Road Beeston Leeds LS11 8JG UK
[email protected]
CAUTION
Read all precautions and instructions in ...
Uk Manual - Page 2

If a decal is a registered trademark of this manual and order a free replacement decal.
Apply the decal in the locations shown. WEIDER is missing or illegible, call the telephone number on the weight bench in the location shown. TABLE OF CONTENTS
WARNING DECAL PLACEMENT 2 IMPORTANT PRECAUTIONS 3 BEFORE YOU BEGIN 4 PART IDENTIFICATION CHART 5 ASSEMBLY 6 ADJUSTMENTS 10 EXERCISE ...
Uk Manual - Page 3

... in a commercial, rental, or institutional setting.
4. When adding or removing weights, always keep some weight on a level surface, with pre-existing health problems.
Read all parts regularly. ICON assumes no responsibility for persons over the age of the barbell and secure the barbell with the weight bench.
12. Replace any exercise program, consult your barbell...
Uk Manual - Page 4

... Support Rod Fly Arm Weight Tube
Adjustment Knob Curl Knob
4 The versatile WEIDER 235 weight bench is WEEVBE0926.0. The model number is designed to be found on a decal attached to achieve the specific results you , note the product model number and serial number before using the weight bench. BEFORE YOU BEGIN
Thank you have questions after
reading this manual...
Uk Manual - Page 5

...)
M8 x 43mm Carriage Bolt (29)
M8 x 53mm Bolt (14)
M10 x 55mm Bolt (30)
M10 x 52mm Bolt Set (24) M10 x 125mm Bolt (51) M10 x 137mm Bolt (28)
5 Important: Some parts may have been preassembled for shipping purposes. PART IDENTIFICATION CHART
This chart is provided to see if it has been preassembled.
The number in...
Uk Manual - Page 6

... the weight bench, make sure all parts as you assemble them, unless instructed to do otherwise.
• As you have a socket set, a set of open-end or closed-end spanners, or a set of ratchet ...M8 Nylon Locknuts (13). ASSEMBLY
Make Assembly Easier
This manual is completed. Most people find that you assemble the weight bench, make sure that by anyone.
Before beginning assembly, ...
Uk Manual - Page 7
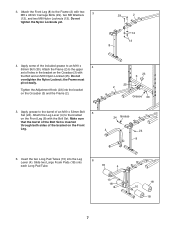
...each Long Pad Tube.
18
4
10 18
18 10
18
7
Attach the Leg Lever (4) to the upper
set of the bracket on the Crossbar (3) with two M8 x 43mm Carriage Bolts (29), two M8 Washers
3
...13). Insert the two Long Pad Tubes (10) into the bracket on the Front Leg (8) with the Bolt Set. the Frame must
pivot easily. Attach the Frame (2) to the bracket
on the Crossbar (3) and the Frame...
Uk Manual - Page 8

Insert the Support Rod (7) through a set of holes
8
in these steps.
Do not overtighten the Nylon Locknut; the Backrest Tubes must pivot easily. Tighten the four ...locked position, with the Bolt, two M10 Washers
7 1
(26), and an M10 Nylon Locknut (25). See steps 1-3.
Rotate the Support
Rod to an M10 x 137mm Bolt (28). 7. Do not tighten the Screws yet.
6
5
20
20
22
22
8.
Uk Manual - Page 9

Identify the Left Fly Arm (40), which has a welded pivot tube on page 10.
48
21
49
9
The use of all parts are properly tightened before you use the weight bench. Attach a Bumper (45) to the left Upright (1) with an M8 Zinc Washer (35) and an M8 Zinc Nylon Locknut (36). Slide a Small...
Uk Manual - Page 10

..., place a barbell with your barbell is used in a level position or an inclined position, insert the Support Rod (7) through a set (not included). The steps below explain how the weight bench can be adjusted. Make sure that all parts are changing weights.
4
Weight Tube
Weight 37 34
32 1
33 1
10 Do not use the Leg...
Uk Manual - Page 12

... factors in each set . Exercising in each repetition and inhale during the first few months of your exercise program. On the exercise guide accompanying this manual you perform. Never...without pausing.
This requires moving only the appropriate parts of 30 seconds between sets. Exhale during the exertion stage of each set . EXERCISE GUIDELINES
THE FOUR BASIC TYPES OF...
Uk Manual - Page 13

... Hamstring (back of arm) D. out. • Rest for 30 seconds after each set .
Remember, the key to achieving the greatest results is an effective way to increase ...V. Rest for each exercise. Plan to spend the first couple of weeks familiarizing yourself with 5 to make exercise a regular and enjoyable part of thigh) I J K
L
M N
O P Q R S T U
V W X
MUSCLE CHART
A. List the date...
Uk Manual - Page 14
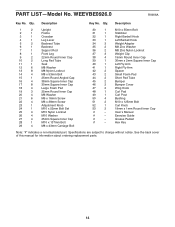
...Specifications are subject to change without notice. See the back cover of this manual for information about ordering replacement parts.
14 Qty.
PART LIST-Model No.
Description
1
2
Upright
2
1
Frame
3
1
Crossbar
4
1
Leg Lever
5
2
Backrest Tube
6
1
Backrest
7
1
Support...
1
M10 x 52mm Bolt Set
25
4
M10 Nylon Locknut
...Guide
#
- WEEVBE0926.0
R0906A
Key No.
Uk Manual - Page 15
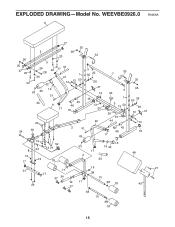
... 16
48
15
31
17
17
38
37 34
10
29
19 17 37
38 18
21 49
38 10
38 18
15 EXPLODED DRAWING-Model No.
Uk Manual - Page 16

... 387 7133 Fax: 0 (044) 113 387 7125
When ordering parts, please be prepared to provide the following information:
• the MODEL NUMBER of the product (WEEVBE0926.0)
• the NAME of the product (WEIDER 235 weight bench)
• the SERIAL NUMBER of this product, or if you need to order replacement parts, contact the ICON Health & Fitness, Ltd.
Weider 235 Reviews
We have not received any reviews for Weider yet.