

Uk Manual
Page 1
..., we are missing or damaged parts, please call: 08457 089 009 Or write: ICON Health & Fitness, Ltd. Unit 4 Revie Road Industrial Estate Revie Road Beeston Leeds LS11 8JG UK [email protected] CAUTION Read all precautions and instructions in the space above for future reference. USER'S MANUAL Visit our website at www.iconeurope.com Serial Number Decal QUESTIONS? If you...
..., we are missing or damaged parts, please call: 08457 089 009 Or write: ICON Health & Fitness, Ltd. Unit 4 Revie Road Industrial Estate Revie Road Beeston Leeds LS11 8JG UK [email protected] CAUTION Read all precautions and instructions in the space above for future reference. USER'S MANUAL Visit our website at www.iconeurope.com Serial Number Decal QUESTIONS? If you...

Uk Manual
Page 2
TABLE OF CONTENTS WARNING DECAL PLACEMENT 2 IMPORTANT PRECAUTIONS 3 BEFORE YOU BEGIN 4 PART IDENTIFICATION CHART 5 ASSEMBLY 6 ADJUSTMENTS 10 EXERCISE GUIDELINES 12 PART LIST 14 EXPLODED DRAWING 15 ORDERING REPLACEMENT PARTS Back Cover WARNING DECAL PLACEMENT The warning decals shown below have been placed on the front cover of ICON IP, Inc. 2 If a decal is a registered trademark of this manual and order a free replacement decal. WEIDER is missing or illegible, call the telephone number on the weight bench in the location shown. Apply the decal in the locations shown.
TABLE OF CONTENTS WARNING DECAL PLACEMENT 2 IMPORTANT PRECAUTIONS 3 BEFORE YOU BEGIN 4 PART IDENTIFICATION CHART 5 ASSEMBLY 6 ADJUSTMENTS 10 EXERCISE GUIDELINES 12 PART LIST 14 EXPLODED DRAWING 15 ORDERING REPLACEMENT PARTS Back Cover WARNING DECAL PLACEMENT The warning decals shown below have been placed on the front cover of ICON IP, Inc. 2 If a decal is a registered trademark of this manual and order a free replacement decal. WEIDER is missing or illegible, call the telephone number on the weight bench in the location shown. Apply the decal in the locations shown.

Uk Manual
Page 3
... exercising, stop immediately and cool down. Use the weight bench only as described in an inclined position or a level position, make sure that all users of the weight bench are adequately informed of all instructions before using the weight bench. Always wear athletic shoes for personal injury or property damage sustained by or through the uprights and turned to support a maximum user weight of 300 lbs. (136 kg) 13. ICON...
... exercising, stop immediately and cool down. Use the weight bench only as described in an inclined position or a level position, make sure that all users of the weight bench are adequately informed of all instructions before using the weight bench. Always wear athletic shoes for personal injury or property damage sustained by or through the uprights and turned to support a maximum user weight of 300 lbs. (136 kg) 13. ICON...

Uk Manual
Page 4
... benefit, read this manual). The serial number can be used with the parts that are labelled. The model number is designed to be found on a decal attached to achieve the specific results you have questions after reading this manual, please see the front cover of this manual. Whether your own weight set (not included) to develop the major muscle groups of the body. ASSEMBLED DIMENSIONS: Height: 45...
... benefit, read this manual). The serial number can be used with the parts that are labelled. The model number is designed to be found on a decal attached to achieve the specific results you have questions after reading this manual, please see the front cover of this manual. Whether your own weight set (not included) to develop the major muscle groups of the body. ASSEMBLED DIMENSIONS: Height: 45...

Uk Manual
Page 5
... Screw (21) M6 x 38mm Screw (22) M8 x 43mm Carriage Bolt (29) M8 x 53mm Bolt (14) M10 x 55mm Bolt (30) M10 x 52mm Bolt Set (24) M10 x 125mm Bolt (51) M10 x 137mm Bolt (28) 5 PART IDENTIFICATION CHART This chart is provided to the key number of the part from the PART LIST on page 14. The number in parenthesis below each part refers to help you cannot find a part in assembly. Important: Some parts...
... Screw (21) M6 x 38mm Screw (22) M8 x 43mm Carriage Bolt (29) M8 x 53mm Bolt (14) M10 x 55mm Bolt (30) M10 x 52mm Bolt Set (24) M10 x 125mm Bolt (51) M10 x 137mm Bolt (28) 5 PART IDENTIFICATION CHART This chart is provided to the key number of the part from the PART LIST on page 14. The number in parenthesis below each part refers to help you cannot find a part in assembly. Important: Some parts...

Uk Manual
Page 6
... the information in a cleared area and remove the packing materials. Before assembling the weight bench, make sure that you assemble the weight bench, make sure all parts in the box above. In addition to the included hex key and grease packets, the following information and instructions: • Assembly requires two persons. • For help identifying small parts, see the PART IDENTIFICATION CHART on page 5. • Tighten all parts as...
... the information in a cleared area and remove the packing materials. Before assembling the weight bench, make sure that you assemble the weight bench, make sure all parts in the box above. In addition to the included hex key and grease packets, the following information and instructions: • Assembly requires two persons. • For help identifying small parts, see the PART IDENTIFICATION CHART on page 5. • Tighten all parts as...
Uk Manual
Page 7
... Locknut; Attach the Leg Lever (4) to an M10 x 4 55mm Bolt (30). Tighten the Adjustment Knob (23) into the Leg 6 Lever (4). Apply grease to the barrel of the included grease to the bracket on the Crossbar (3) and the Frame (2). 23 3 25 2 Grease 30 5. Insert the two Long Pad Tubes (10) into the bracket on the Front Leg (8) with the Bolt Set. Attach the Front Leg (8) to...
... Locknut; Attach the Leg Lever (4) to an M10 x 4 55mm Bolt (30). Tighten the Adjustment Knob (23) into the Leg 6 Lever (4). Apply grease to the barrel of the included grease to the bracket on the Crossbar (3) and the Frame (2). 23 3 25 2 Grease 30 5. Insert the two Long Pad Tubes (10) into the bracket on the Front Leg (8) with the Bolt Set. Attach the Front Leg (8) to...

Uk Manual
Page 8
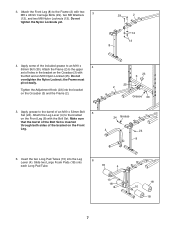
See steps 1-3. Insert the Support Rod (7) through a set of holes 8 in these steps. Tighten the M8 Nylon Locknuts Locking Pin 25 26 5 (13) used in the Uprights (1). Attach the Seat (11) to the brackets on the Frame (2) with four M6 x 38mm Screws (22) and four M6 7 Washers (20). 7. Attach the ...pin wrapped around the right Upright. 1 Apply grease to the locked position, with the Bolt, two M10 Washers 7 1 (26), and an M10 Nylon Locknut (25). Rotate the Support Rod to an M10 x 137mm Bolt (28). Do not tighten the Screws yet. 6 5 20 20 22 22 8. See step...
See steps 1-3. Insert the Support Rod (7) through a set of holes 8 in these steps. Tighten the M8 Nylon Locknuts Locking Pin 25 26 5 (13) used in the Uprights (1). Attach the Seat (11) to the brackets on the Frame (2) with four M6 x 38mm Screws (22) and four M6 7 Washers (20). 7. Attach the ...pin wrapped around the right Upright. 1 Apply grease to the locked position, with the Bolt, two M10 Washers 7 1 (26), and an M10 Nylon Locknut (25). Rotate the Support Rod to an M10 x 137mm Bolt (28). Do not tighten the Screws yet. 6 5 20 20 22 22 8. See step...

Uk Manual
Page 9
...parts are properly tightened before you use of all remaining parts will be explained in ADJUSTMENTS, starting on the indicated side. Slide a Small Foam Pad (43) onto the Short Pad Tube, and press a 19mm x 1mm Round Inner Cap (53) into the Left Fly Arm (40). The use the weight bench. the Barbell Hook must pivot freely. 33 35 36 11. Press a Bumper Cover... Fly Arm. Attach a Bumper (45) to the right Upright (1) with two M6 x 16mm Screws (21). 12 51 43 53 40 13 26 25 44 1 Pivot Tube 42 14. Attach the Right Barbell Hook (32) to the left Upright (1) with a 11 Wing Knob (47...
...parts are properly tightened before you use of all remaining parts will be explained in ADJUSTMENTS, starting on the indicated side. Slide a Small Foam Pad (43) onto the Short Pad Tube, and press a 19mm x 1mm Round Inner Cap (53) into the Left Fly Arm (40). The use the weight bench. the Barbell Hook must pivot freely. 33 35 36 11. Press a Bumper Cover... Fly Arm. Attach a Bumper (45) to the right Upright (1) with two M6 x 16mm Screws (21). 12 51 43 53 40 13 26 25 44 1 Pivot Tube 42 14. Attach the Right Barbell Hook (32) to the left Upright (1) with a 11 Wing Knob (47...

Uk Manual
Page 10
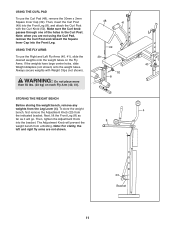
... balance the weight bench. Then, rest the Backrest on the Leg Lever. USING THE BARBELL HOOKS To change weights while your own weight set of the barbell tipping while you are properly tightened each time the weight bench is wrapped around the Upright. The weight bench can be cleaned with the Weight Clip (37). Rotate the Support Locking Pin Rod to see the correct form for several exercises. ADJUSTING THE...
... balance the weight bench. Then, rest the Backrest on the Leg Lever. USING THE BARBELL HOOKS To change weights while your own weight set of the barbell tipping while you are properly tightened each time the weight bench is wrapped around the Upright. The weight bench can be cleaned with the Weight Clip (37). Rotate the Support Locking Pin Rod to see the correct form for several exercises. ADJUSTING THE...
Uk Manual
Page 11
... far as it will prevent the weight bench from unfolding. USING THE CURL PAD To use the Right and Left Fly Arms (40, 41), slide the 39 desired weights onto the weight tubes on each Fly Arm (40, 41). Always secure weights with the Curl Knob (52). To store the weight 4 bench, first remove the Adjustment Knob (23) from the Leg Lever (4). Then, tighten the Adjustment Knob 8 into the Front...
... far as it will prevent the weight bench from unfolding. USING THE CURL PAD To use the Right and Left Fly Arms (40, 41), slide the 39 desired weights onto the weight tubes on each Fly Arm (40, 41). Always secure weights with the Curl Knob (52). To store the weight 4 bench, first remove the Adjustment Knob (23) from the Leg Lever (4). Then, tighten the Adjustment Knob 8 into the Front...

Uk Manual
Page 12
... at any exercise program. Complete as many sets of 15 to their capacity. Weight Loss To lose weight, use a low amount of weight and increase the number of repetitions in each set . Remember that you want to get a complete and well-balanced fitness program. On the exercise guide accompanying this manual you will leave you . EXERCISE GUIDELINES THE FOUR BASIC TYPES OF WORKOUTS PERSONALISING YOUR EXERCISE PROGRAM Muscle Building...
... at any exercise program. Complete as many sets of 15 to their capacity. Weight Loss To lose weight, use a low amount of weight and increase the number of repetitions in each set . Remember that you want to get a complete and well-balanced fitness program. On the exercise guide accompanying this manual you will leave you . EXERCISE GUIDELINES THE FOUR BASIC TYPES OF WORKOUTS PERSONALISING YOUR EXERCISE PROGRAM Muscle Building...

Uk Manual
Page 13
... three minutes after each set for a muscle building workout. • Rest for one minute after each set for a toning work- Move slowly as you stretch and do not bounce. Record your arms and legs. out. • Rest for 30 seconds after each set for a weight loss workout. List the date, the exercises performed, the weight used, and the numbers of thigh) I J K L M N O P Q R S T U V W X MUSCLE CHART A. Anterior Deltoid (shoulder...
... three minutes after each set for a muscle building workout. • Rest for one minute after each set for a toning work- Move slowly as you stretch and do not bounce. Record your arms and legs. out. • Rest for 30 seconds after each set for a weight loss workout. List the date, the exercises performed, the weight used, and the numbers of thigh) I J K L M N O P Q R S T U V W X MUSCLE CHART A. Anterior Deltoid (shoulder...
Uk Manual
Page 14
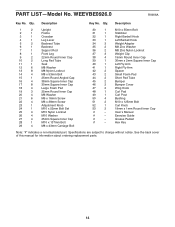
... back cover of this manual for information about ordering replacement parts. 14 Specifications are subject to change without notice. Exercise Guide # - Grease Packet # - Qty. WEEVBE0926.0 R0906A Key No. Hex Key Note: "#" indicates a non-illustrated part. Description 1 2 Upright 2 1 Frame 3 1 Crossbar 4 1 Leg Lever 5 2 Backrest Tube 6 1 Backrest 7 1 Support Rod 8 1 Front Leg 9 2 22mm Round Inner Cap 10 2 Long Pad Tube 11 1 Seat 12 6 M8 Washer 13 8 M8 Nylon Locknut 14 4 M8 x 53mm Bolt...
... back cover of this manual for information about ordering replacement parts. 14 Specifications are subject to change without notice. Exercise Guide # - Grease Packet # - Qty. WEEVBE0926.0 R0906A Key No. Hex Key Note: "#" indicates a non-illustrated part. Description 1 2 Upright 2 1 Frame 3 1 Crossbar 4 1 Leg Lever 5 2 Backrest Tube 6 1 Backrest 7 1 Support Rod 8 1 Front Leg 9 2 22mm Round Inner Cap 10 2 Long Pad Tube 11 1 Seat 12 6 M8 Washer 13 8 M8 Nylon Locknut 14 4 M8 x 53mm Bolt...
Uk Manual
Page 15
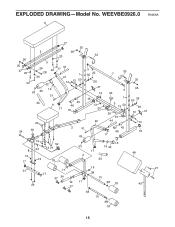
WEEVBE0926.0 R0906A 6 27 5 26 25 27 20 5 26 22 28 20 22 53 42 43 19 51 35 36 20 44 17 41 14 1 12 50 34 11 45 46 17 16 32 9 25 50 26 47 13 16 13 25 40 29 33 7 9 23 1 3 13 50 30 13 44 24 39 2 51 43 45 46 17 12 52 8 24 13 21 53 17 16 19 42 13 17 13 18 4 34 35 36 25 50 26 12 47 14 16 48 15 31 17 17 38 37 34 10 29 19 17 37 38 18 21 49 38 10 38 18 15 EXPLODED DRAWING-Model No.
WEEVBE0926.0 R0906A 6 27 5 26 25 27 20 5 26 22 28 20 22 53 42 43 19 51 35 36 20 44 17 41 14 1 12 50 34 11 45 46 17 16 32 9 25 50 26 47 13 16 13 25 40 29 33 7 9 23 1 3 13 50 30 13 44 24 39 2 51 43 45 46 17 12 52 8 24 13 21 53 17 16 19 42 13 17 13 18 4 34 35 36 25 50 26 12 47 14 16 48 15 31 17 17 38 37 34 10 29 19 17 37 38 18 21 49 38 10 38 18 15 EXPLODED DRAWING-Model No.

Uk Manual
Page 16
... to order replacement parts, contact the ICON Health & Fitness, Ltd. office, or write: ICON Health & Fitness, Ltd. ORDERING REPLACEMENT PARTS If you encounter any problems with this manual) • the KEY NUMBER and DESCRIPTION of the part(s) (see the front cover of this product, or if you need to provide the following information: • the MODEL NUMBER of the product (WEEVBE0926.0) • the NAME of the product (WEIDER 235 weight bench) • the SERIAL NUMBER of...
... to order replacement parts, contact the ICON Health & Fitness, Ltd. office, or write: ICON Health & Fitness, Ltd. ORDERING REPLACEMENT PARTS If you encounter any problems with this manual) • the KEY NUMBER and DESCRIPTION of the part(s) (see the front cover of this product, or if you need to provide the following information: • the MODEL NUMBER of the product (WEEVBE0926.0) • the NAME of the product (WEIDER 235 weight bench) • the SERIAL NUMBER of...


