
AL-2030 | AL-2040CS Operation Manual
Page 21
...to use the scanner menus on the AL-2040CS. • The screen images in this manual are connected to the machine by a USB cable. Please note that accompanied the machine simply as a network printer. The printer driver includes the Print Status Window. If you to use the printer... a LAN connection, only the printer function can only be used with TWAIN-compliant and WIA-compliant applications. The procedure for Windows XP. Button Manager* (AL-2040CS) Button Manager allows you are mainly for viewing the Online Manual is also explained. • The scanner function is only ...
...to use the scanner menus on the AL-2040CS. • The screen images in this manual are connected to the machine by a USB cable. Please note that accompanied the machine simply as a network printer. The printer driver includes the Print Status Window. If you to use the printer... a LAN connection, only the printer function can only be used with TWAIN-compliant and WIA-compliant applications. The procedure for Windows XP. Button Manager* (AL-2040CS) Button Manager allows you are mainly for viewing the Online Manual is also explained. • The scanner function is only ...

AL-2030 | AL-2040CS Operation Manual
Page 23
... then double-click the CD-ROM icon. 4 Double-click the "setup" icon ( ). 5 The "SOFTWARE LICENSE" window will appear. You can show the "SOFTWARE LICENSE" in the "Welcome" window and then click the "Next" button. 21 Using the machine with that language selected. 6 Read the "Readme First"... in a different language by selecting the desired language from the beginning after installing the software using a USB or network connection, you must not ...
... then double-click the CD-ROM icon. 4 Double-click the "setup" icon ( ). 5 The "SOFTWARE LICENSE" window will appear. You can show the "SOFTWARE LICENSE" in the "Welcome" window and then click the "Next" button. 21 Using the machine with that language selected. 6 Read the "Readme First"... in a different language by selecting the desired language from the beginning after installing the software using a USB or network connection, you must not ...

AL-2030 | AL-2040CS Operation Manual
Page 27
... that was originally equipped with the machine. A USB cable for your computer. • If you intend to use the machine as a network printer (AL-2040CS only) • Interface cables for your computer's CD-ROM drive. 4 Click the "start" button, click "My Computer" ( ), and then double-click... a LAN cable. 1 Insert the LAN cable into your computer. • USB is not included with USB and had Windows 98, Windows Me, Windows 2000 Professional, Windows XP Professional or Windows XP Home Edition preinstalled. • Do not connect the USB cable before installing the printer driver. In...
... that was originally equipped with the machine. A USB cable for your computer. • If you intend to use the machine as a network printer (AL-2040CS only) • Interface cables for your computer's CD-ROM drive. 4 Click the "start" button, click "My Computer" ( ), and then double-click... a LAN cable. 1 Insert the LAN cable into your computer. • USB is not included with USB and had Windows 98, Windows Me, Windows 2000 Professional, Windows XP Professional or Windows XP Home Edition preinstalled. • Do not connect the USB cable before installing the printer driver. In...

AL-2030 | AL-2040CS Operation Manual
Page 28
... This setting is already connected to be detected. You can show the "SOFTWARE LICENSE" in the "Welcome" window and then click the "Next" button. To set , go to the network will appear. To install the software in the selected language, continue the installation with that you understand the contents... of the machine, follow the steps below. If the machine is only required once when using the machine on a network. 8 Click the "Set the IP Address" button. 9 The printer or printers connected to "LPR (TCP/IP) direct printing" (p.27). Click the...
... This setting is already connected to be detected. You can show the "SOFTWARE LICENSE" in the "Welcome" window and then click the "Next" button. To set , go to the network will appear. To install the software in the selected language, continue the installation with that you understand the contents... of the machine, follow the steps below. If the machine is only required once when using the machine on a network. 8 Click the "Set the IP Address" button. 9 The printer or printers connected to "LPR (TCP/IP) direct printing" (p.27). Click the...

AL-2030 | AL-2040CS Operation Manual
Page 29
...Follow the on-screen instructions to be recognized. Be sure to ask your network administrator for the correct IP address, subnet mask, and default gateway to click... "Initialize" button to step 8 on page 28. LPR (TCP/IP) direct printing After step 1-7 on a different network after the IP address is set the IP Address, click the "Set the IP Address" button first and go to..."Printer Driver" button. Go to step 11 on page 26. 27 The settings in the above window are examples. This will not be entered. 4 When "Get IP Address Automatically" is selected, the IP address may ...
...Follow the on-screen instructions to be recognized. Be sure to ask your network administrator for the correct IP address, subnet mask, and default gateway to click... "Initialize" button to step 8 on page 28. LPR (TCP/IP) direct printing After step 1-7 on a different network after the IP address is set the IP Address, click the "Set the IP Address" button first and go to..."Printer Driver" button. Go to step 11 on page 26. 27 The settings in the above window are examples. This will not be entered. 4 When "Get IP Address Automatically" is selected, the IP address may ...

AL-2030 | AL-2040CS Operation Manual
Page 30
..."LPR Direct Print" and click the "Next" button. 11 The printer or printers connected to the network will be entered in "Printer Port Name" (maximum of 38 characters). 13 A window appears to the appropriate window and correct the entry. 28 Click the printer to be found, make sure the machine is powered... on, make sure the network cable is connected correctly, and then click the "Search" button. 12 In the window for setting the destination print port name, make sure that the entries are incorrect, click the "Back" ...
..."LPR Direct Print" and click the "Next" button. 11 The printer or printers connected to the network will be entered in "Printer Port Name" (maximum of 38 characters). 13 A window appears to the appropriate window and correct the entry. 28 Click the printer to be found, make sure the machine is powered... on, make sure the network cable is connected correctly, and then click the "Search" button. 12 In the window for setting the destination print port name, make sure that the entries are incorrect, click the "Back" ...

AL-2030 | AL-2040CS Operation Manual
Page 31
... a network, follow these steps to install the printer driver in "Using the machine with the machine, and click the "Next" button. 15 Select whether or not you wish the printer to be your computer. 4 This completes the installation of the SHARP software is complete." If you are running Windows 2000/XP.... In this case, click the "Yes" button to restart your default printer and click the "Next" button. Using the machine as a shared printer (AL-2030) If the machine will be sure to click "Continue Anyway" or "Yes". 16 When "The installation of the software. 14 Select the port you...
... a network, follow these steps to install the printer driver in "Using the machine with the machine, and click the "Next" button. 15 Select whether or not you wish the printer to be your computer. 4 This completes the installation of the SHARP software is complete." If you are running Windows 2000/XP.... In this case, click the "Yes" button to restart your default printer and click the "Next" button. Using the machine as a shared printer (AL-2030) If the machine will be sure to click "Continue Anyway" or "Yes". 16 When "The installation of the software. 14 Select the port you...
AL-2030 | AL-2040CS Operation Manual
Page 33
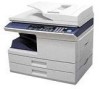
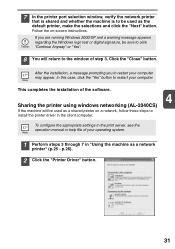
... installation of the software. 4 Sharing the printer using windows networking (AL-2040CS) If the machine will return to the window of step 3. After the installation, a message prompting you are running Windows 2000/XP and a warning message appears regarding the Windows logo test or digital signature, be used as a ...client computer. If you to restart your computer. p.26). 2 Click the "Printer Driver" button. 31 7 In the printer port selection window, verify the network printer that is shared and whether the machine is to be sure to click "Continue Anyway" or "Yes". 8 You will be used...
... installation of the software. 4 Sharing the printer using windows networking (AL-2040CS) If the machine will return to the window of step 3. After the installation, a message prompting you are running Windows 2000/XP and a warning message appears regarding the Windows logo test or digital signature, be used as a ...client computer. If you to restart your computer. p.26). 2 Click the "Printer Driver" button. 31 7 In the printer port selection window, verify the network printer that is shared and whether the machine is to be sure to click "Continue Anyway" or "Yes". 8 You will be used...

AL-2030 | AL-2040CS Operation Manual
Page 34
...not appear in the list, check the settings in the window that appears. This completes the installation of the software. 32 In this case, click the "Yes" button to restart your computer. You can also click the "Add Network Port" button and select the printer to be used, ...and click the "Next" button. 3 Select "Shared Printer" and click the "Next" button. 4 For the port to be shared (the machine) by browsing the network in the printer server. 5 Follow the on-screen instructions. 6 When the "Finish" screen appears, click the "Close" button. After the installation, a message prompting...
...not appear in the list, check the settings in the window that appears. This completes the installation of the software. 32 In this case, click the "Yes" button to restart your computer. You can also click the "Add Network Port" button and select the printer to be used, ...and click the "Next" button. 3 Select "Shared Printer" and click the "Next" button. 4 For the port to be shared (the machine) by browsing the network in the printer server. 5 Follow the on-screen instructions. 6 When the "Finish" screen appears, click the "Close" button. After the installation, a message prompting...


