Safety Guide (ENGLISH)
Page 7
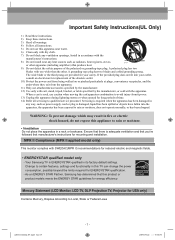
..., tripod, bracket, or table specified by the manufacturer, or sold with the apparatus. Mercury Statement (LCD Monitor, LCD TV, DLP Projection TV, Projector for mounting and installation. Ensure that there is used, use caution when moving the cart/apparatus combination to rain or moisture. • Ventilation Do not place the... Laws AA68-03242L-07.indd Sec1:7 - 7 - 2009-09-22 5:06:50 WARNING: To prevent damage which may result in a rack or bookcase. Your Samsung TV is required when the apparatus has been damaged in its factory default settings. As an ENERGY STAR Partner...
..., tripod, bracket, or table specified by the manufacturer, or sold with the apparatus. Mercury Statement (LCD Monitor, LCD TV, DLP Projection TV, Projector for mounting and installation. Ensure that there is used, use caution when moving the cart/apparatus combination to rain or moisture. • Ventilation Do not place the... Laws AA68-03242L-07.indd Sec1:7 - 7 - 2009-09-22 5:06:50 WARNING: To prevent damage which may result in a rack or bookcase. Your Samsung TV is required when the apparatus has been damaged in its factory default settings. As an ENERGY STAR Partner...
User Manual (ENGLISH)
Page 3
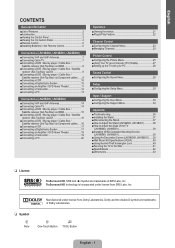
..., LN19B361 38 ■ How to Adjust the Angle of the TV (LN19B360, LN19B361 38 ■ Installing VESA Compliant Mounting Devices (LN19B360, LN19B361 39 ■ Using the Decoration Covers (LN19B360, LN19B361).......39 ■ Wall Mount Kit Specifications (VESA 40 ■ Using the Anti-Theft Kensington Lock 40 ■ Securing the TV to the...
..., LN19B361 38 ■ How to Adjust the Angle of the TV (LN19B360, LN19B361 38 ■ Installing VESA Compliant Mounting Devices (LN19B360, LN19B361 39 ■ Using the Decoration Covers (LN19B360, LN19B361).......39 ■ Wall Mount Kit Specifications (VESA 40 ■ Using the Anti-Theft Kensington Lock 40 ■ Securing the TV to the...
User Manual (ENGLISH)
Page 4
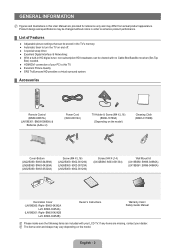
...) (LN26B360: BN63-04269A) (LN32B360: BN63-05326A) Screw (M4 X L16) (LN22B360: 6002-001294) (LN26B360: 6002-001294) (LN32B360: 6002-001294) Screw (M4 X L14) (LN32B360: 6003-001334) Wall Mount kit (LN19B360: BN96-04960A) (LN19B361: BN96-04960A) Decoration Cover (LN19B360: Right- Product design and specifications may vary depending on and off. ● A special sleep timer...
...) (LN26B360: BN63-04269A) (LN32B360: BN63-05326A) Screw (M4 X L16) (LN22B360: 6002-001294) (LN26B360: 6002-001294) (LN32B360: 6002-001294) Screw (M4 X L14) (LN32B360: 6003-001334) Wall Mount kit (LN19B360: BN96-04960A) (LN19B361: BN96-04960A) Decoration Cover (LN19B360: Right- Product design and specifications may vary depending on and off. ● A special sleep timer...
User Manual (ENGLISH)
Page 40
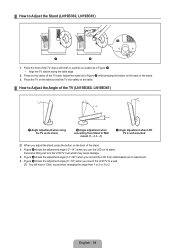
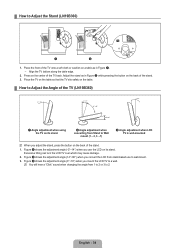
... Figure 1. - Adjust the stand as in Figure 2 while pressing the button on its stand. 2 Angle adjustment when converting from stand-based use to wall-mount. 3. Place the TV on the table so that the TV sits safely on the table. ¦ How to a wall. Excessive tilting can turn the .... 2. Figure 2 shows the adjustment angle (14°~80°) when you convert the LCD from Stand to Wall mount (1→3, 3→1) 3 Angle adjustment when LCD TV is wall-mounted N When you mount the LCD TV to Adjust the Angle of the TV (LN19B360, LN19B361) 1 Angle adjustment when using the TV on...
... Figure 1. - Adjust the stand as in Figure 2 while pressing the button on its stand. 2 Angle adjustment when converting from stand-based use to wall-mount. 3. Place the TV on the table so that the TV sits safely on the table. ¦ How to a wall. Excessive tilting can turn the .... 2. Figure 2 shows the adjustment angle (14°~80°) when you convert the LCD from Stand to Wall mount (1→3, 3→1) 3 Angle adjustment when LCD TV is wall-mounted N When you mount the LCD TV to Adjust the Angle of the TV (LN19B360, LN19B361) 1 Angle adjustment when using the TV on...
User Manual (ENGLISH)
Page 41
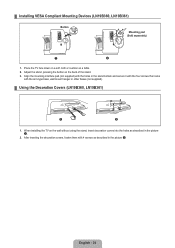
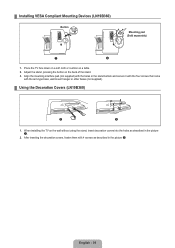
... After inserting the decoration covers, fasten them with 4 screws as described in the picture 1. 2. Align the mounting interface pad (not supplied) with the arm-type base, wall mount hanger or other bases (not supplied). ¦ Using the Decoration Covers (LN19B360, LN19B361) 1 2 1.... ¦ Installing VESA Compliant Mounting Devices (LN19B360, LN19B361) Button Mounting pad (Sold separately) 1 2 1. When installing the TV on ...
... After inserting the decoration covers, fasten them with 4 screws as described in the picture 1. 2. Align the mounting interface pad (not supplied) with the arm-type base, wall mount hanger or other bases (not supplied). ¦ Using the Decoration Covers (LN19B360, LN19B361) 1 2 1.... ¦ Installing VESA Compliant Mounting Devices (LN19B360, LN19B361) Button Mounting pad (Sold separately) 1 2 1. When installing the TV on ...
User Manual (ENGLISH)
Page 42
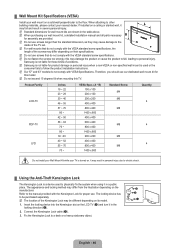
...locking device has 2 to fall and result in the table above. N For wall mounts that do not comply with VESA Specifications. N Do not use our dedicated wall mount kit for these kinds of accidents. Samsung is turned on its model. 1 1. N Our 57" and 63" models ... when using it in a public place. N Samsung is not liable for wall mount kits are provided. Connect the Kensington Lock cable (3). 3. ¦ Wall Mount Kit Specifications (VESA) Install your wall mount on their specifications. N When purchasing our wall mount kit, a detailed installation manual and all parts ...
...locking device has 2 to fall and result in the table above. N For wall mounts that do not comply with VESA Specifications. N Do not use our dedicated wall mount kit for these kinds of accidents. Samsung is turned on its model. 1 1. N Our 57" and 63" models ... when using it in a public place. N Samsung is not liable for wall mount kits are provided. Connect the Kensington Lock cable (3). 3. ¦ Wall Mount Kit Specifications (VESA) Install your wall mount on their specifications. N When purchasing our wall mount kit, a detailed installation manual and all parts ...
User Manual (ENGLISH)
Page 3
... the Stand (LN19B360 38 ■ How to Adjust the Angle of the TV (LN19B360 38 ■ Installing VESA Compliant Mounting Devices (LN19B360)39 ■ Using the Decoration Covers (LN19B360 39 ■ Wall Mount Kit Specifications (VESA 40 ■ Using the Anti-Theft Kensington Lock 40 ■ Securing the TV to the Wall...
... the Stand (LN19B360 38 ■ How to Adjust the Angle of the TV (LN19B360 38 ■ Installing VESA Compliant Mounting Devices (LN19B360)39 ■ Using the Decoration Covers (LN19B360 39 ■ Wall Mount Kit Specifications (VESA 40 ■ Using the Anti-Theft Kensington Lock 40 ■ Securing the TV to the Wall...

User Manual (ENGLISH)
Page 4
...) (LN26B360: BN63-04269A) (LN32B360: BN63-05326A) Screw (M4 X L16) (LN22B360: 6002-001294) (LN26B360: 6002-001294) (LN32B360: 6002-001294) Screw (M4 X L14) (LN32B530: 6003-001334) Wall Mount kit (LN19B360: BN96-04960A) Decoration Cover (LN19B360: Right-
...) (LN26B360: BN63-04269A) (LN32B360: BN63-05326A) Screw (M4 X L16) (LN22B360: 6002-001294) (LN26B360: 6002-001294) (LN32B360: 6002-001294) Screw (M4 X L14) (LN32B530: 6003-001334) Wall Mount kit (LN19B360: BN96-04960A) Decoration Cover (LN19B360: Right-
User Manual (ENGLISH)
Page 40
...to Adjust the Angle of the stand. 1. Figure 1 shows the adjustment angle (-2°~14°) when you use to Wall mount (1→3, 3→1) 3 Angle adjustment when LCD TV is wall-mounted N When you mount the LCD TV to Adjust the Stand (LN19B360) 1 2 1. N You will hear a "Click" sound when changing the ...angle from Stand to wall-mount. 3. Adjust the stand as in Figure 2 while pressing the button on a table as in Figure 1. - Figure 3 shows the adjustment angle (0°~10...
...to Adjust the Angle of the stand. 1. Figure 1 shows the adjustment angle (-2°~14°) when you use to Wall mount (1→3, 3→1) 3 Angle adjustment when LCD TV is wall-mounted N When you mount the LCD TV to Adjust the Stand (LN19B360) 1 2 1. N You will hear a "Click" sound when changing the ...angle from Stand to wall-mount. 3. Adjust the stand as in Figure 2 while pressing the button on a table as in Figure 1. - Figure 3 shows the adjustment angle (0°~10...
User Manual (ENGLISH)
Page 41
... installing the TV on the back of the stand. 3. English - 39 After inserting the decoration covers, fasten them with the arm-type base, wall mount hanger or other bases (not supplied). ¦ Using the Decoration Covers (LN19B360) 1 2 1. Place the TV face down on a soft cloth or... cushion on a table. 2. ¦ Installing VESA Compliant Mounting Devices (LN19B360) Button Mounting pad (Sold separately) 1 2 1. Align the mounting interface pad (not supplied) with the holes in the stand bottom and secure it with the four screws that come ...
... installing the TV on the back of the stand. 3. English - 39 After inserting the decoration covers, fasten them with the arm-type base, wall mount hanger or other bases (not supplied). ¦ Using the Decoration Covers (LN19B360) 1 2 1. Place the TV face down on a soft cloth or... cushion on a table. 2. ¦ Installing VESA Compliant Mounting Devices (LN19B360) Button Mounting pad (Sold separately) 1 2 1. Align the mounting interface pad (not supplied) with the holes in the stand bottom and secure it with the four screws that come ...

User Manual (ENGLISH)
Page 42
... wall perpendicular to physically fix the system when using it in the locking direction (2). 2. N The location of accidents. ¦ Wall Mount Kit Specifications (VESA) Install your wall mount on the 3 manufacturer. N Samsung is not liable for assembly are shown in personal injury due to electric shock. ¦ Using the Anti-Theft Kensington Lock...
... wall perpendicular to physically fix the system when using it in the locking direction (2). 2. N The location of accidents. ¦ Wall Mount Kit Specifications (VESA) Install your wall mount on the 3 manufacturer. N Samsung is not liable for assembly are shown in personal injury due to electric shock. ¦ Using the Anti-Theft Kensington Lock...


