
Owner's Manual
Page 2
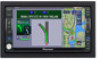
The screen shown in the example may be changed without notice for performance and function improvements. The actual screen may differ from the actual screen.
The screen shown in the example may be changed without notice for performance and function improvements. The actual screen may differ from the actual screen.
Owner's Manual
Page 10
...24 Buttons you can use 25 Chapter 2 Menu and Map Display How to Use Menu Screens 27 Main menu 27 Shortcut menu 28 How to Use the Map 29 Switching the current position screen display mode 29 How to view the map of the current location 29 Changing the scale... 42 Displaying Certain POI on route ahead 52 When checking traffic congestion information manually 52 for Navigation System 18 Configuration of Contents Introduction License Agreement 1 PIONEER AVIC-D1 - for Canada 3 Terms and Conditions for the Tele Atlas Data 5 About the Data for the Map Database 7 Copyright 7 Table of Contents 8 ...
...24 Buttons you can use 25 Chapter 2 Menu and Map Display How to Use Menu Screens 27 Main menu 27 Shortcut menu 28 How to Use the Map 29 Switching the current position screen display mode 29 How to view the map of the current location 29 Changing the scale... 42 Displaying Certain POI on route ahead 52 When checking traffic congestion information manually 52 for Navigation System 18 Configuration of Contents Introduction License Agreement 1 PIONEER AVIC-D1 - for Canada 3 Terms and Conditions for the Tele Atlas Data 5 About the Data for the Map Database 7 Copyright 7 Table of Contents 8 ...

Owner's Manual
Page 11
... a channel in the channel category 89 TV Tuner 90 Watching the TV tuner 90 Storing and recalling broadcast stations 90 Changing the wide screen mode 91 Advanced TV tuner operation 91 Storing the strongest broadcast stations sequentially 91 9 mediately before 85 Display the Radio ID 85 Advanced ... 76 Storing and recalling broadcast frequencies 77 Storing the strongest broadcast frequencies 77 Tuning in strong signals 77 Chapter 7 Using the AV Source (Pioneer AV Equipment) Multi-CD Player 79 Listening a CD 79 Pausing CD playback 80 Advanced multi-CD player operation 80 Repeating play and the ...
... a channel in the channel category 89 TV Tuner 90 Watching the TV tuner 90 Storing and recalling broadcast stations 90 Changing the wide screen mode 91 Advanced TV tuner operation 91 Storing the strongest broadcast stations sequentially 91 9 mediately before 85 Display the Radio ID 85 Advanced ... 76 Storing and recalling broadcast frequencies 77 Storing the strongest broadcast frequencies 77 Tuning in strong signals 77 Chapter 7 Using the AV Source (Pioneer AV Equipment) Multi-CD Player 79 Listening a CD 79 Pausing CD playback 80 Advanced multi-CD player operation 80 Repeating play and the ...
Owner's Manual
Page 12
...Setting the video input 102 Setting for Areas not Stored on the Disc 113 Other function limitations 114 Troubleshooting 115 Problems in the screen 115 117 Messages and how to react to Cause Noticeable Positioning Errors 111 About the Data being Deleted 113 Limitation of Functions for...specifications 122 Route highlighting 123 Intersection enlargement 123 Tracking 123 Types of rear display 103 Switching the dimmer setting 103 Changing the Wide Screen Mode 104 Operating the Picture Adjustment 104 10 Adjusting the dimmer 105 Switching the Backlight On/Off 105 Appendix Installing the Program 107...
...Setting the video input 102 Setting for Areas not Stored on the Disc 113 Other function limitations 114 Troubleshooting 115 Problems in the screen 115 117 Messages and how to react to Cause Noticeable Positioning Errors 111 About the Data being Deleted 113 Limitation of Functions for...specifications 122 Route highlighting 123 Intersection enlargement 123 Tracking 123 Types of rear display 103 Switching the dimmer setting 103 Changing the Wide Screen Mode 104 Operating the Picture Adjustment 104 10 Adjusting the dimmer 105 Switching the Backlight On/Off 105 Appendix Installing the Program 107...

Owner's Manual
Page 15
... images on this disc Only use the Pioneer DVD Map Disc with AVBUS or RCA cable, such as an aid to the driver. • In some countries or states the viewing of the map display between day and night Night display 13 will appear on AVIC-D1. Please keep the brake pedal pushed... of the Navigation System must be illegal. You cannot use with a visual image that is parked on trailers, or backing into a tight parking spot. • SCREEN IMAGE MAY APPEAR REVERSED • USE INPUT ONLY FOR REVERSE OR MIRROR IMAGE REAR VIEW CAMERA.
... images on this disc Only use the Pioneer DVD Map Disc with AVBUS or RCA cable, such as an aid to the driver. • In some countries or states the viewing of the map display between day and night Night display 13 will appear on AVIC-D1. Please keep the brake pedal pushed... of the Navigation System must be illegal. You cannot use with a visual image that is parked on trailers, or backing into a tight parking spot. • SCREEN IMAGE MAY APPEAR REVERSED • USE INPUT ONLY FOR REVERSE OR MIRROR IMAGE REAR VIEW CAMERA.
Owner's Manual
Page 16
...data. ❒ The information content depends on the information provided by XM NavTraffic Service, including data refresh and availability timing. ❒ Pioneer does not bear responsibility for navigation guidance. - This system provides easy-to collect all areas. - XM NavTraffic data also may be...the original data source is played. About XM NavTraffic Service and Pioneer Navigation ❒ XM NavTraffic subscription is required and is also available. - Map View, Route View, Guide View The split screen mode is available only in select markets. Auto Reroute Function If...
...data. ❒ The information content depends on the information provided by XM NavTraffic Service, including data refresh and availability timing. ❒ Pioneer does not bear responsibility for navigation guidance. - This system provides easy-to collect all areas. - XM NavTraffic data also may be...the original data source is played. About XM NavTraffic Service and Pioneer Navigation ❒ XM NavTraffic subscription is required and is also available. - Map View, Route View, Guide View The split screen mode is available only in select markets. Auto Reroute Function If...

Owner's Manual
Page 18
...provides the important information you use a disc in the built-in CD drive or operate the Pioneer audio equipment connected to the navigation unit. Chapters 6, 7 and 8 describe how to organize information on the screen, you need to make full use a CD, MP3/WMA/WAV disc and the radio. 7... Using the AV Source (Pioneer AV Equipment) When Pioneer audio equipment is connected to the navigation unit, that equipment can find the ...
...provides the important information you use a disc in the built-in CD drive or operate the Pioneer audio equipment connected to the navigation unit. Chapters 6, 7 and 8 describe how to organize information on the screen, you need to make full use a CD, MP3/WMA/WAV disc and the radio. 7... Using the AV Source (Pioneer AV Equipment) When Pioneer audio equipment is connected to the navigation unit, that equipment can find the ...
Owner's Manual
Page 19
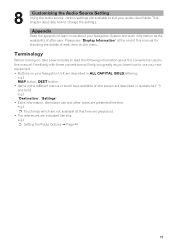
... Navigation Unit are described in ALL CAPITAL, BOLD lettering: e.g.) MAP button, DEST button. • Items in the different menus or touch keys available on the screen are described in this : e.g.) ➲ Setting the Route Options ➞ Page 44 17 Please see "Display Information" at the end of this manual for checking...
... Navigation Unit are described in ALL CAPITAL, BOLD lettering: e.g.) MAP button, DEST button. • Items in the different menus or touch keys available on the screen are described in this : e.g.) ➲ Setting the Route Options ➞ Page 44 17 Please see "Display Information" at the end of this manual for checking...
Owner's Manual
Page 21
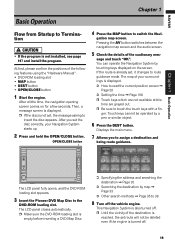
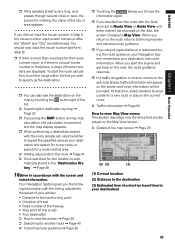
... • If the program is not set, the message asking to insert the disc appears. After a little time, the navigation opening screen comes on the screen. Then, a message screen is displayed. ❒ If the disc is not installed, see page 107 and install the program. Pressing the AV button switches between... out. ❒ Be sure to touch the touch keys with a fin- gation map screen. ger. After you to route guidance mode. The LCD panel fully opens, and the DVD-ROM loading slot appears. 3 Insert the Pioneer DVD Map Disc to switch the Navi- Displays the main menu. 7 Allows you set ...
... • If the program is not set, the message asking to insert the disc appears. After a little time, the navigation opening screen comes on the screen. Then, a message screen is displayed. ❒ If the disc is not installed, see page 107 and install the program. Pressing the AV button switches between... out. ❒ Be sure to touch the touch keys with a fin- gation map screen. ger. After you to route guidance mode. The LCD panel fully opens, and the DVD-ROM loading slot appears. 3 Insert the Pioneer DVD Map Disc to switch the Navi- Displays the main menu. 7 Allows you set ...
Owner's Manual
Page 23
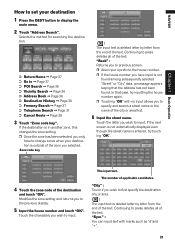
... Input the house number and touch "OK". Continuing to specify and search a street name or the name of applicable candidates. If the next screen is not automatically displayed even though the street name is entered, try inputting the house number again. ❒ Touching "OK" with marks such ...when your destination 1 Press the DEST button to the house number. ❒ If the house number you selected. "Back" : Returns you to previous screen. ❒ Also input a prefix to display the main menu. 2 Touch "Address Search". Continuing to input. Zone code key : The input text is...
... Input the house number and touch "OK". Continuing to specify and search a street name or the name of applicable candidates. If the next screen is not automatically displayed even though the street name is entered, try inputting the house number again. ❒ Touching "OK" with marks such ...when your destination 1 Press the DEST button to the house number. ❒ If the house number you selected. "Back" : Returns you to previous screen. ❒ Also input a prefix to display the main menu. 2 Touch "Address Search". Continuing to input. Zone code key : The input text is...
Owner's Manual
Page 24
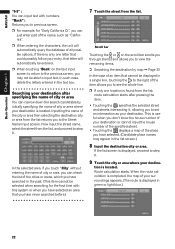
...completed, the map of the city or area then selecting the destination city or area from the list, and proceed to the Street Name input screen. tion is useful when you have never searched before.) 7 Touch the street from the list, route calculation starts after pressing the item. ...items. ➲ Searching the destination by initially specifying the name of city or area where your entry, that letter will automatically be able to previous screen. ❒ For example, for the first time with numbers. In such case, delete the letters entered in a single line, touching the to...
...completed, the map of the city or area then selecting the destination city or area from the list, and proceed to the Street Name input screen. tion is useful when you have never searched before.) 7 Touch the street from the list, route calculation starts after pressing the item. ...items. ➲ Searching the destination by initially specifying the name of city or area where your entry, that letter will automatically be able to previous screen. ❒ For example, for the first time with numbers. In such case, delete the letters entered in a single line, touching the to...
Owner's Manual
Page 25
...to recalculate for , the location is auto- matically stored in the "Destination History". ➞ Page 48 10Drive in Step 5, the house number input screen comes up after the "Street" and "City" are determined. When you stop at a gas station or a restaurant during route calculation, the calculation ...is set route ahead, traffic information will appear on the screen and voice information will be provided. When you return to the route, returns to the original view and resumes route guidance. ❒ If...
...to recalculate for , the location is auto- matically stored in the "Destination History". ➞ Page 48 10Drive in Step 5, the house number input screen comes up after the "Street" and "City" are determined. When you stop at a gas station or a restaurant during route calculation, the calculation ...is set route ahead, traffic information will appear on the screen and voice information will be provided. When you return to the route, returns to the original view and resumes route guidance. ❒ If...
Owner's Manual
Page 26
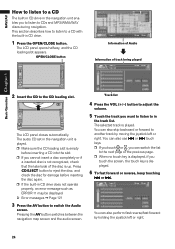
... selected track is displayed. 6 To fast forward or reverse, keep touching or . Pressing the AV button switches between the navigation map screen and the audio screen. This section describes how to listen to CDs and MP3/WMA/WAV discs during navigation. Press CD EJECT button to the CD loading slot.... You can also skip backward or forward to switch the Audio screen. You can also perform fast reverse/fast forward by moving the joystick left or right. 24 OPEN/CLOSE button Information of Audio Information ...
... selected track is displayed. 6 To fast forward or reverse, keep touching or . Pressing the AV button switches between the navigation map screen and the audio screen. This section describes how to listen to CDs and MP3/WMA/WAV discs during navigation. Press CD EJECT button to the CD loading slot.... You can also skip backward or forward to switch the Audio screen. You can also perform fast reverse/fast forward by moving the joystick left or right. 24 OPEN/CLOSE button Information of Audio Information ...
Owner's Manual
Page 27
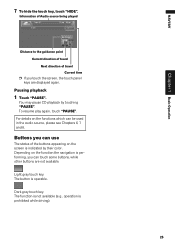
... be used in the audio source, please see Chapters 6, 7 and 8. Light gray touch key: The button is prohibited while driving). 25 Buttons you touch the screen, the touch panel keys are not available. Depending on the function the navigation is indicated by touching "PAUSE". Dark gray touch key: The function is...
... be used in the audio source, please see Chapters 6, 7 and 8. Light gray touch key: The button is prohibited while driving). 25 Buttons you touch the screen, the touch panel keys are not available. Depending on the function the navigation is indicated by touching "PAUSE". Dark gray touch key: The function is...
Owner's Manual
Page 29
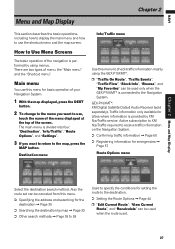
...MAP button. The main menu is set. 27 GEX-P10XMT*: XM Digital Satellite Data & Audio Receiver (sold separately). Info/Traffic menu How to Use Menu Screens The basic operation of menu: the "Main menu" and the "Shortcut menu". Also the route set can be used only when the GEX-P10XMT* is... menu You use this menu for cities where information is connected to use , touch the name of the menu displayed at the top of the screen. Traffic information only available for basic operation of your Navigation System. 1 With the map displayed, press the DEST button. 2 To change to the menu...
...MAP button. The main menu is set. 27 GEX-P10XMT*: XM Digital Satellite Data & Audio Receiver (sold separately). Info/Traffic menu How to Use Menu Screens The basic operation of menu: the "Main menu" and the "Shortcut menu". Also the route set can be used only when the GEX-P10XMT* is... menu You use this menu for cities where information is connected to use , touch the name of the menu displayed at the top of the screen. Traffic information only available for basic operation of your Navigation System. 1 With the map displayed, press the DEST button. 2 To change to the menu...

Owner's Manual
Page 31
Switching the current position screen display mode This section describes how to know how the information appears on the map. laid with the... travel. NAVI How to Use the Map Most of the information provided by pressing the MAP button, the screen automatically switches to the selected map display mode after 4 seconds. You need to get to display the current position... screen and change the map display mode. cating the direction of map display and two additional view modes. • Map ...
Switching the current position screen display mode This section describes how to know how the information appears on the map. laid with the... travel. NAVI How to Use the Map Most of the information provided by pressing the MAP button, the screen automatically switches to the selected map display mode after 4 seconds. You need to get to display the current position... screen and change the map display mode. cating the direction of map display and two additional view modes. • Map ...
Owner's Manual
Page 32
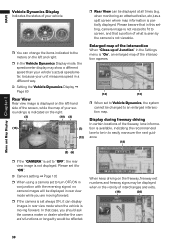
...; If the "CAMERA" is available, indicating the recommended lane to be displayed at all times (e.g. when monitoring an attached trailer, etc.) as a split screen where map information is not displayed. Please beware that in a different way. ➲ Setting the Vehicle Dynamics Display ➞ Page 60 Rear View Rear ...ON". ➲ Camera setting ➞ Page 102 ❒ When using a camera set to the meters on the left -hand side of the screen, while the map of your vehicle. ❒ Rear View can change the items indicated to "OFF", the rear view image is partially displayed....
...; If the "CAMERA" is available, indicating the recommended lane to be displayed at all times (e.g. when monitoring an attached trailer, etc.) as a split screen where map information is not displayed. Please beware that in a different way. ➲ Setting the Vehicle Dynamics Display ➞ Page 60 Rear View Rear ...ON". ➲ Camera setting ➞ Page 102 ❒ When using a camera set to the meters on the left -hand side of the screen, while the map of your vehicle. ❒ Rear View can change the items indicated to "OFF", the rear view image is partially displayed....
Owner's Manual
Page 33
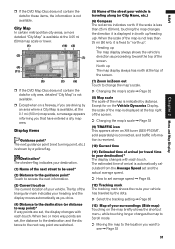
... destination. (1) Name of the next street to be used* (2) Distance to the guidance point* Touch to the location you are switched. (5) Name of the screen. Except for on the map briefly shows the shortcut menu, while touching longer changes the map to Scroll mode. ➲ Moving the map to access... top of the street your vehicle is shown by distance. When two or more detailed "City Map" is available at the top right of the screen. ➲ Changing the map's scale ➞ Page 32 (9) TRAFFIC icon This appears when an XM tuner (GEX-P10XMT, sold separately) is connected, and traffic...
... destination. (1) Name of the next street to be used* (2) Distance to the guidance point* Touch to the location you are switched. (5) Name of the screen. Except for on the map briefly shows the shortcut menu, while touching longer changes the map to Scroll mode. ➲ Moving the map to access... top of the street your vehicle is shown by distance. When two or more detailed "City Map" is available at the top right of the screen. ➲ Changing the map's scale ➞ Page 32 (9) TRAFFIC icon This appears when an XM tuner (GEX-P10XMT, sold separately) is connected, and traffic...
Owner's Manual
Page 34
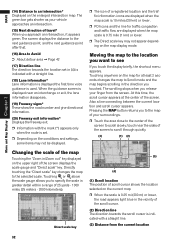
.... Moving the map to the location you want to see If you to specify the scale in greater detail within a range of the screen displays the scale gauge and "Direct scale" key. Also a line connecting between the current location and scroll cursor appears. Touching or above...Freeway exit information* Displays the freeway exit. ❒ Information with the mark (*) appears only when the route is set in the vicinity of the screen to an intersection* Displayed on the enlarged intersection map. Direct scale key (5) (4) (1) Scroll location The position of your finger from the current location...
.... Moving the map to the location you want to see If you to specify the scale in greater detail within a range of the screen displays the scale gauge and "Direct scale" key. Also a line connecting between the current location and scroll cursor appears. Touching or above...Freeway exit information* Displays the freeway exit. ❒ Information with the mark (*) appears only when the route is set in the vicinity of the screen to an intersection* Displayed on the enlarged intersection map. Direct scale key (5) (4) (1) Scroll location The position of your finger from the current location...
Owner's Manual
Page 35
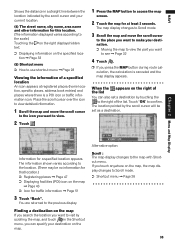
... the map, and touch in the Shortcut menu, you can also set as a destination. Alternative option: Scroll : The map display changes to access the map screen. 2 Touch the map for a specified location appears. Place the scroll cursor over the icon to view detailed information. 1 Scroll the map and move the scroll...
... the map, and touch in the Shortcut menu, you can also set as a destination. Alternative option: Scroll : The map display changes to access the map screen. 2 Touch the map for a specified location appears. Place the scroll cursor over the icon to view detailed information. 1 Scroll the map and move the scroll...


