Owner's Manual
Page 61
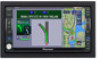
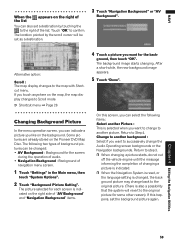
..."Navigation Background" items. On this happens, set as a destination. 3 Touch "Navigation Background" or "AV Background". If you like on the Pioneer DVD Map Disc. The picture selected for the screen during the operation of audio. • Navigation Background : Background of changing a picture is ...indicated. ❒ When the Navigation System is reset, or the language setting is changed : • AV Background : Background for each screen is also a possibility that the system will ...
..."Navigation Background" items. On this happens, set as a destination. 3 Touch "Navigation Background" or "AV Background". If you like on the Pioneer DVD Map Disc. The picture selected for the screen during the operation of audio. • Navigation Background : Background of changing a picture is ...indicated. ❒ When the Navigation System is reset, or the language setting is changed : • AV Background : Background for each screen is also a possibility that the system will ...
Owner's Manual
Page 62
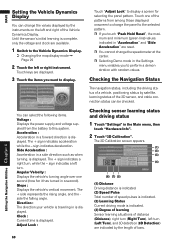
...Displays the vehicle's turning angle over one of bars. The + side represents the rising angle, and the side the falling angle. Touch keys are reset. ❒ You cannot change the values displayed by the instruments on the left turn , while the - Touch "Adjust Look" to perform a ...center. ❒ Selecting Demo mode in a second). Touch one second (how far it has turned in the Settings menu enables you touch "Peak Hold Reset", the maxi- The + sign indicates a right turn . Slope : Displays the vehicle's vertical movement. Clock : Current time is complete, only the voltage...
...Displays the vehicle's turning angle over one of bars. The + side represents the rising angle, and the side the falling angle. Touch keys are reset. ❒ You cannot change the values displayed by the instruments on the left turn , while the - Touch "Adjust Look" to perform a ...center. ❒ Selecting Demo mode in a second). Touch one second (how far it has turned in the Settings menu enables you touch "Peak Hold Reset", the maxi- The + sign indicates a right turn . Slope : Displays the vehicle's vertical movement. Clock : Current time is complete, only the voltage...
Owner's Manual
Page 69
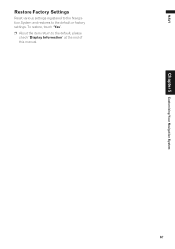
NAVI Chapter 5 Customizing Your Navigation System Restore Factory Settings Reset various settings registered to the Navigation System and restores to the default, please check "Display Information" at the end of this manual. 67 To restore, touch "Yes". ❒ About the item return to the default or factory settings.
NAVI Chapter 5 Customizing Your Navigation System Restore Factory Settings Reset various settings registered to the Navigation System and restores to the default, please check "Display Information" at the end of this manual. 67 To restore, touch "Yes". ❒ About the item return to the default or factory settings.
Owner's Manual
Page 115
... on the disc, the display returns to set from battery (or remove the battery itself), except for reaching the destination is erased by pushing the RESET button or disconnect yellow lead from the streets you are currently driving. In such a case, the current location of your vehicle approaches an unrecorded area...
... on the disc, the display returns to set from battery (or remove the battery itself), except for reaching the destination is erased by pushing the RESET button or disconnect yellow lead from the streets you are currently driving. In such a case, the current location of your vehicle approaches an unrecorded area...
Owner's Manual
Page 117
...of satellites relative to your vehicle is poor, causing reduced positioning accuracy. Action (See) Confirm once more that installed the system. Press RESET button. (➞ "Hardware Manual" and refer to distort positioning data for military reasons. Problems in an unsuita- Noise and other factors ... have problems operating your Navigation System, refer to your problem cannot be found here, contact your dealer or the nearest authorized Pioneer service facility. If necessary, consult the dealer that all connections are correct. Check that the navigation unit is in the screen...
...of satellites relative to your vehicle is poor, causing reduced positioning accuracy. Action (See) Confirm once more that installed the system. Press RESET button. (➞ "Hardware Manual" and refer to distort positioning data for military reasons. Problems in an unsuita- Noise and other factors ... have problems operating your Navigation System, refer to your problem cannot be found here, contact your dealer or the nearest authorized Pioneer service facility. If necessary, consult the dealer that all connections are correct. Check that the navigation unit is in the screen...
Owner's Manual
Page 118
... input lead (purple) is not displayed on the navigation unit. 116 Connect the speed pulse lead. If this does not solve the problem, press the RESET button on the Vehicle Dynamics screen. Adjusting the volume of navigation guidance and beep is selected. Slope is connected properly. (The Navigation System works properly...
... input lead (purple) is not displayed on the navigation unit. 116 Connect the speed pulse lead. If this does not solve the problem, press the RESET button on the Vehicle Dynamics screen. Adjusting the volume of navigation guidance and beep is selected. Slope is connected properly. (The Navigation System works properly...
Owner's Manual
Page 121
...pass through the Areas to some extent. • Drive your location. • Change the destination. • Clean the disc. • Consult the Pioneer Local dealer if this case, try the operation again. ing point. • Set one or more way points. If the current route is not desired...far. Change your vehicle to the next step without a ferry and the route calculation is too near. Or, proceed to an unrestricted area and reset the destination and way point(s). • Set a destination and way point(s) on the screen. NAVI/AV Appendix Message No XM signal. Please wait...
...pass through the Areas to some extent. • Drive your location. • Change the destination. • Clean the disc. • Consult the Pioneer Local dealer if this case, try the operation again. ing point. • Set one or more way points. If the current route is not desired...far. Change your vehicle to the next step without a ferry and the route calculation is too near. Or, proceed to an unrestricted area and reset the destination and way point(s). • Set a destination and way point(s) on the screen. NAVI/AV Appendix Message No XM signal. Please wait...
Installation Manual
Page 4
...manual 1 Terminology 1 Table of Contents 2 Important Safety Information 3 Notes Before Using the System and Additional Safety Information 4 Precaution 4 After-sales service for Pioneer products 6 Product registration 6 Upgrade DVD Map Disc 6 Playable discs 6 Features (Characteristics of this hardware) 6 About the WMA Logo 7 About the ...SAT RADIO READY Logo 7 About the XM NAVTRAFFIC Logo 8 To Protect the LCD Screen 8 For Viewing LCD Comfortably 8 Resetting the Microprocessor 8 Appendix 17 Troubleshooting 17 Handling and Care of the Disc 18 DVD Map Discs 18 DVD-ROM drive/CD drive and ...
...manual 1 Terminology 1 Table of Contents 2 Important Safety Information 3 Notes Before Using the System and Additional Safety Information 4 Precaution 4 After-sales service for Pioneer products 6 Product registration 6 Upgrade DVD Map Disc 6 Playable discs 6 Features (Characteristics of this hardware) 6 About the WMA Logo 7 About the ...SAT RADIO READY Logo 7 About the XM NAVTRAFFIC Logo 8 To Protect the LCD Screen 8 For Viewing LCD Comfortably 8 Resetting the Microprocessor 8 Appendix 17 Troubleshooting 17 Handling and Care of the Disc 18 DVD Map Discs 18 DVD-ROM drive/CD drive and ...
Installation Manual
Page 10
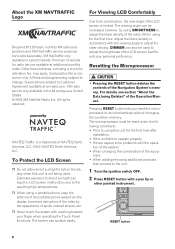
...unit for clear viewing. Extended exposure to direct sunlight can also be problems with anything besides your personal preference. Pressing RESET button lets you reset the microprocessor to adjust the black density of the video. All fees and programming subject to suit your finger when operating... adjust the brightness of NAVTEQ North America, LLC.-2004. Subscriptions subject to the unit. 1 Turn the ignition switch OFF. 2 Press RESET button with the viewing angle to its initial settings without changing the condition memory. About the XM NAVTRAFFIC Logo Required $12.95 basic ...
...unit for clear viewing. Extended exposure to direct sunlight can also be problems with anything besides your personal preference. Pressing RESET button lets you reset the microprocessor to adjust the black density of the video. All fees and programming subject to suit your finger when operating... adjust the brightness of NAVTEQ North America, LLC.-2004. Subscriptions subject to the unit. 1 Turn the ignition switch OFF. 2 Press RESET button with the viewing angle to its initial settings without changing the condition memory. About the XM NAVTRAFFIC Logo Required $12.95 basic ...

Installation Manual
Page 11
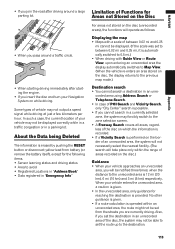
❒ If you have connected other equipment (for example, a TV tuner) to this Navigation System, be sure to reset that equipment too. ❒ After completing connections or when you want to erase all memorized settings or return the unit to its initial (factory) settings except for some navigation items, switch your engine ON or set the ignition switch to ACC ON before pressing RESET button. ➲ For details, refer to "About the Data being Deleted" in the the Operation Manual. 9
❒ If you have connected other equipment (for example, a TV tuner) to this Navigation System, be sure to reset that equipment too. ❒ After completing connections or when you want to erase all memorized settings or return the unit to its initial (factory) settings except for some navigation items, switch your engine ON or set the ignition switch to ACC ON before pressing RESET button. ➲ For details, refer to "About the Data being Deleted" in the the Operation Manual. 9
Installation Manual
Page 14
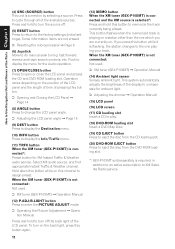
...When the XM tuner (GEX-P10XMT) is connected and the XM source is selected*: Press and hold this channel to assign preset. To turn off . (5) RESET button Press to return to the factory settings (initial settings). When the XM tuner (GEX-P10XMT) is not connected: Not used . ➲ XM tuner... and the length of time of pressing this button while it is flashing, the station changes to the one which you are not erased. ➲ Resetting the microprocessor ➞ Page 8 (6) Joystick Move to cycle through all of the available sources. When the XM tuner (GEX-P10XMT) is not connected:...
...When the XM tuner (GEX-P10XMT) is connected and the XM source is selected*: Press and hold this channel to assign preset. To turn off . (5) RESET button Press to return to the factory settings (initial settings). When the XM tuner (GEX-P10XMT) is not connected: Not used . ➲ XM tuner... and the length of time of pressing this button while it is flashing, the station changes to the one which you are not erased. ➲ Resetting the microprocessor ➞ Page 8 (6) Joystick Move to cycle through all of the available sources. When the XM tuner (GEX-P10XMT) is not connected:...

Installation Manual
Page 19
... is blown. Check the rear display and its connection. Clean disc. The fuse is loaded or not. The attenuator or mute is selected on . Press RESET button. (➞ Page 8) Adjust the volume level. Rear display picture disappears. Connect a parking brake cord, and apply the parking brake. This is inserted. The loaded...
... is blown. Check the rear display and its connection. Clean disc. The fuse is loaded or not. The attenuator or mute is selected on . Press RESET button. (➞ Page 8) Adjust the volume level. Rear display picture disappears. Connect a parking brake cord, and apply the parking brake. This is inserted. The loaded...
Other Manual
Page 27
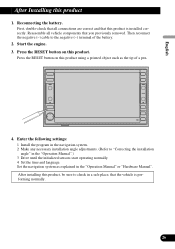
Then reconnect the negative (-) cable to check in a safe place, that you previously removed. Press the RESET button on this product using a pointed object such as explained in the "Operation Manual".) 3 Drive until the initialized sensors start operating ... Reconnecting the battery. Reassemble all connections are correct and that this product, be sure to the negative (-) terminal of a pen. 4. Press the RESET button on this product 1. Start the engine. 3. English Español Deutsch After Installing this product. First, double-check that all vehicle components...
Then reconnect the negative (-) cable to check in a safe place, that you previously removed. Press the RESET button on this product using a pointed object such as explained in the "Operation Manual".) 3 Drive until the initialized sensors start operating ... Reconnecting the battery. Reassemble all connections are correct and that this product, be sure to the negative (-) terminal of a pen. 4. Press the RESET button on this product 1. Start the engine. 3. English Español Deutsch After Installing this product. First, double-check that all vehicle components...


