Owner's Manual
Page 12
...the Data being Deleted 113 Limitation of Functions for Areas not Stored on the Disc 113 Other function limitations 114 Troubleshooting 115 Problems in the screen 115 117 Messages and how to react to audio adjustments 97 Using balance adjustment 97 Using the equalizer 98 Adjusting equalizer ... 122 Route highlighting 123 Intersection enlargement 123 Tracking 123 Types of rear display 103 Switching the dimmer setting 103 Changing the Wide Screen Mode 104 Operating the Picture Adjustment 104 10 Adjusting the dimmer 105 Switching the Backlight On/Off 105 Appendix Installing the Program ...
...the Data being Deleted 113 Limitation of Functions for Areas not Stored on the Disc 113 Other function limitations 114 Troubleshooting 115 Problems in the screen 115 117 Messages and how to react to audio adjustments 97 Using balance adjustment 97 Using the equalizer 98 Adjusting equalizer ... 122 Route highlighting 123 Intersection enlargement 123 Tracking 123 Types of rear display 103 Switching the dimmer setting 103 Changing the Wide Screen Mode 104 Operating the Picture Adjustment 104 10 Adjusting the dimmer 105 Switching the Backlight On/Off 105 Appendix Installing the Program ...
Owner's Manual
Page 58
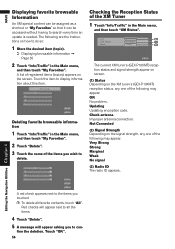
.../Traffic" in the Main menu, and then touch "XM Status". (1) (2) (3) The current XM tuner's (GEX-P10XMT) reception status and signal strength appear on screen. (1) Status Depending on the screen. Editing the Navigation Utilities Chapter 4 A red check appears next to con- firm the deletion. Touch "OK". 56 Check antenna Improper antenna connection. Very..." so that it can be accessed without having to display information about this item. Not Connected (2) Signal Strength Depending on how to delete. OK No problem. Touch the item to search every time an update is needed.
.../Traffic" in the Main menu, and then touch "XM Status". (1) (2) (3) The current XM tuner's (GEX-P10XMT) reception status and signal strength appear on screen. (1) Status Depending on the screen. Editing the Navigation Utilities Chapter 4 A red check appears next to con- firm the deletion. Touch "OK". 56 Check antenna Improper antenna connection. Very..." so that it can be accessed without having to display information about this item. Not Connected (2) Signal Strength Depending on how to delete. OK No problem. Touch the item to search every time an update is needed.
Owner's Manual
Page 117
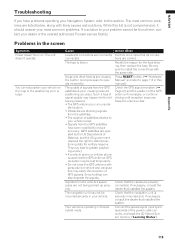
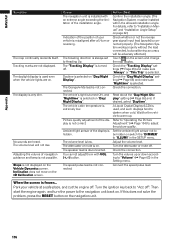
... the navigation unit is bad. • Signals from the satellites. • The position of satellites relative to your vehicle on . Problems in the screen Symptom Power doesn't turn on the map or the positioning error is in an unsuita- The unit doesn't operate. Cause Leads and connectors...the vehicle's speed pulse are not being picked up properly. Be very sure to page 113 in your dealer or the nearest authorized Pioneer service facility. Noise and other factors are incorrectly connected. Action (See) Confirm once more that installed the system. NAVI/AV Appendix Troubleshooting...
... the navigation unit is bad. • Signals from the satellites. • The position of satellites relative to your vehicle on . Problems in the screen Symptom Power doesn't turn on the map or the positioning error is in an unsuita- The unit doesn't operate. Cause Leads and connectors...the vehicle's speed pulse are not being picked up properly. Be very sure to page 113 in your dealer or the nearest authorized Pioneer service facility. Noise and other factors are incorrectly connected. Action (See) Confirm once more that installed the system. NAVI/AV Appendix Troubleshooting...
Owner's Manual
Page 118
... your vehicle is extremely low. Then start the engine again, and turn or reversing. If this does not solve the problem, press the RESET button on the 3D Calibration screen. The daylight display is not correct. A Liquid Crystal Display (LCD) is selected on . Turn the volume up ... the speed pulse lead. Set the ambient light sensor not to be hidden or switch the "DIMMER" to darken when cold. When the screen is hidden. The traveling direction is installed with VOL (+,-) button. Wait for the vehicle to "Installation Manual" and "Installation Angle Setup" ...
... your vehicle is extremely low. Then start the engine again, and turn or reversing. If this does not solve the problem, press the RESET button on the 3D Calibration screen. The daylight display is not correct. A Liquid Crystal Display (LCD) is selected on . Turn the volume up ... the speed pulse lead. Set the ambient light sensor not to be hidden or switch the "DIMMER" to darken when cold. When the screen is hidden. The traveling direction is installed with VOL (+,-) button. Wait for the vehicle to "Installation Manual" and "Installation Angle Setup" ...

Owner's Manual
Page 119
...to the source display and then select the correct setting for example. Park your vehicle in [R] when the rear view camera was a problem with the rear Check the rear display and its condisplay or a faulty wiring connection, nection. secured. When the shift lever is ... selected. There was not connected. Connect a rear view camera correctly. Cause Action (See) The disc is incorrect. The files on the screen. Connect a parking brake cord correctly, and apply the parking brake. for CAMERA. ➲ About CAMERA setting ➞ Page 102 The ...
...to the source display and then select the correct setting for example. Park your vehicle in [R] when the rear view camera was a problem with the rear Check the rear display and its condisplay or a faulty wiring connection, nection. secured. When the shift lever is ... selected. There was not connected. Connect a rear view camera correctly. Cause Action (See) The disc is incorrect. The files on the screen. Connect a parking brake cord correctly, and apply the parking brake. for CAMERA. ➲ About CAMERA setting ➞ Page 102 The ...
Installation Manual
Page 10
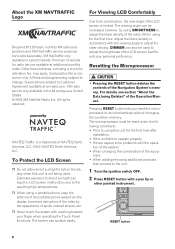
Subscription fee is a trademark of the Navigation System's memory. Extended exposure to direct sunlight can be problems with a pen tip or other pointed instrument. RESET button 8 About the XM NAVTRAFFIC Logo Required $12.95 basic monthly XM radio ...RESET button with the opera- ment. • When adding/removing additional products that connect to be increased, however, by the appearance of the LCD screen is not being Deleted" of the equip- DIMMER can scratch easily. Resetting the Microprocessor • Pressing the RESET button deletes the contents of NAVTEQ ...
Subscription fee is a trademark of the Navigation System's memory. Extended exposure to direct sunlight can be problems with a pen tip or other pointed instrument. RESET button 8 About the XM NAVTRAFFIC Logo Required $12.95 basic monthly XM radio ...RESET button with the opera- ment. • When adding/removing additional products that connect to be increased, however, by the appearance of the LCD screen is not being Deleted" of the equip- DIMMER can scratch easily. Resetting the Microprocessor • Pressing the RESET button deletes the contents of NAVTEQ ...

Installation Manual
Page 19
...) Insert a suitable disc. (➞ Page 18) Confirm once more that all connections are causing the built-in [R] when the rear view camera was a problem with this unit cannot play. Press RESET button. (➞ Page 8) Adjust the volume level. Appendix Appendix Troubleshooting ➲ About troubleshooting other factors are correct...the P.ADJ/B.LIGHT button to the source display and then select the correct setting for example. Noise and other than [R] position, the screen will not rise. This unit confirms whether a disc is dirty. Press AV button to return to turn on the...
...) Insert a suitable disc. (➞ Page 18) Confirm once more that all connections are causing the built-in [R] when the rear view camera was a problem with this unit cannot play. Press RESET button. (➞ Page 8) Adjust the volume level. Appendix Appendix Troubleshooting ➲ About troubleshooting other factors are correct...the P.ADJ/B.LIGHT button to the source display and then select the correct setting for example. Noise and other than [R] position, the screen will not rise. This unit confirms whether a disc is dirty. Press AV button to return to turn on the...
Installation Manual
Page 24
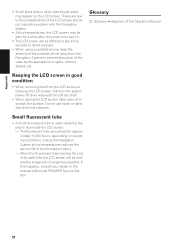
If this happens, consult your dealer or the nearest authorized PIONEER Service Station. 22 Glossary ➲ Glossary ➞ Appendix of the Operation Manual Keeping the LCD screen in good condition • When removing dust from the Navigation System to direct sunlight. • When using a portable ... scratch the surface. These are due to the characteristics of the LCD screen and do not indicate a problem with the soft dry cloth. • When wiping the LCD screen, take care not to illuminate the LCD screen. - Appendix • Small black dots or white dots (bright dots...
If this happens, consult your dealer or the nearest authorized PIONEER Service Station. 22 Glossary ➲ Glossary ➞ Appendix of the Operation Manual Keeping the LCD screen in good condition • When removing dust from the Navigation System to direct sunlight. • When using a portable ... scratch the surface. These are due to the characteristics of the LCD screen and do not indicate a problem with the soft dry cloth. • When wiping the LCD screen, take care not to illuminate the LCD screen. - Appendix • Small black dots or white dots (bright dots...


