Owner's Manual
Page 12
FUNCTION 4 94 Switching the automatic and manual function 95 AUX 95 Selecting AUX as the source 95 AV Input (AV) 95 Selecting AV as the source 95 Changing the wide screen mode ... controller 100 Switching the muting/attenuation 101 Changing the voice output of the navigation guidance 102 Switching the auto antenna setting 102 Other Functions 102 Setup adjustments 102 Setting the video input 102 Setting for rear view camera 102 Selecting the video of rear display 103 Switching the dimmer setting 103...
FUNCTION 4 94 Switching the automatic and manual function 95 AUX 95 Selecting AUX as the source 95 AV Input (AV) 95 Selecting AV as the source 95 Changing the wide screen mode ... controller 100 Switching the muting/attenuation 101 Changing the voice output of the navigation guidance 102 Switching the auto antenna setting 102 Other Functions 102 Setup adjustments 102 Setting the video input 102 Setting for rear view camera 102 Selecting the video of rear display 103 Switching the dimmer setting 103...
Owner's Manual
Page 94
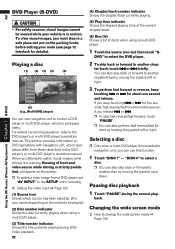
...- This section provides information on the media to watch a video image from those described in the SETUP menu correctly. ➲ Setting the video input ➞ Page 102 (1) Source icon Shows which...list Shows a list of front seat video source while driving is sold separately. Using the AV Source (Pioneer AV Equipment) Chapter 7 S-DVD AV DVD Player (S-DVD) • For safety reasons, visual images ...from a DVD player, set "AV INPUT" in the DVD player's or multi-DVD player's operation manual. ward by moving the joystick up or down. Selecting a disc ❒ Only when a multi-DVD...
...- This section provides information on the media to watch a video image from those described in the SETUP menu correctly. ➲ Setting the video input ➞ Page 102 (1) Source icon Shows which...list Shows a list of front seat video source while driving is sold separately. Using the AV Source (Pioneer AV Equipment) Chapter 7 S-DVD AV DVD Player (S-DVD) • For safety reasons, visual images ...from a DVD player, set "AV INPUT" in the DVD player's or multi-DVD player's operation manual. ward by moving the joystick up or down. Selecting a disc ❒ Only when a multi-DVD...
Owner's Manual
Page 107
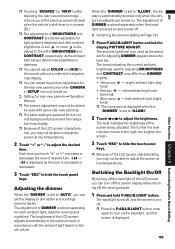
... the normal background picture and the navigation map display. ❒ Because of DIMMER is selected for the rear view camera only when CAMERA in SETUP menu is turned on the backlight, and the screen is displayed. 105 Other Functions Chapter 8 Customizing the Audio Source Setting AV When the "..." to hide the touch panel keys. ❒ Because of the LCD screen, you can turn on . ➲ Setting for rear view camera ➞ Operation Manual ❒ The picture adjustment may not be able to "ILLUMI", the display is set to "ILLUMI". 2 Touch 2 or 3 to dim as the standard for...
... the normal background picture and the navigation map display. ❒ Because of DIMMER is selected for the rear view camera only when CAMERA in SETUP menu is turned on the backlight, and the screen is displayed. 105 Other Functions Chapter 8 Customizing the Audio Source Setting AV When the "..." to hide the touch panel keys. ❒ Because of the LCD screen, you can turn on . ➲ Setting for rear view camera ➞ Operation Manual ❒ The picture adjustment may not be able to "ILLUMI", the display is set to "ILLUMI". 2 Touch 2 or 3 to dim as the standard for...
Owner's Manual
Page 118
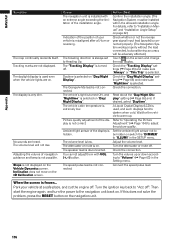
... Display" setting (➞ Page 65) and, if desired, select "Daytime". Turn the volume up . Turn the ignition key back to "Installation Manual" and "Installation Angle Setup" on . The display is frozen... Slope is extremely low. For details, refer to "Acc off . Turn the attenuator or mute off ". ...is selected. Inclination does not move on the navigation unit. 116 Daytime is always set to "Volume" (➞ Page 63) in the SETUP menu. Picture quality adjustment of the display is low. The volume level is not correct. The speaker lead is not possible. You cannot ...
... Display" setting (➞ Page 65) and, if desired, select "Daytime". Turn the volume up . Turn the ignition key back to "Installation Manual" and "Installation Angle Setup" on . The display is frozen... Slope is extremely low. For details, refer to "Acc off . Turn the attenuator or mute off ". ...is selected. Inclination does not move on the navigation unit. 116 Daytime is always set to "Volume" (➞ Page 63) in the SETUP menu. Picture quality adjustment of the display is low. The volume level is not correct. The speaker lead is not possible. You cannot ...
Owner's Manual
Page 120
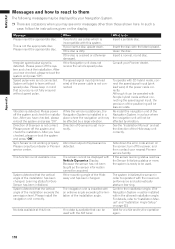
... hybrid mode without connecting the speed signal input, the precision of the Hide-away unit correctly. For details, refer to "Installation Manual" and "Installation Angle Setup" on page 62.) Wait for Gyro Sensor has been initialized. Speed pulse wire is incompatible with 3D hybrid mode, connect the...angle of the installation angle. NAVI/AV Appendix Messages and how to react to them The following messages may be displayed by your Pioneer dealer. Gyro Sensor is installed with the label upward. Irregular speed pulse signal is available that the vertical angle of the power ...
... hybrid mode without connecting the speed signal input, the precision of the Hide-away unit correctly. For details, refer to "Installation Manual" and "Installation Angle Setup" on page 62.) Wait for Gyro Sensor has been initialized. Speed pulse wire is incompatible with 3D hybrid mode, connect the...angle of the installation angle. NAVI/AV Appendix Messages and how to react to them The following messages may be displayed by your Pioneer dealer. Gyro Sensor is installed with the label upward. Irregular speed pulse signal is available that the vertical angle of the power ...

Other Manual
Page 16
... moved to REVERSE (R) position. USE INPUT ONLY FOR REVERSE OR MIRROR IMAGE REAR VIEW CAMERA. Be sure to "CAMERA" in "SETUP" when connecting the rear view camera. (For details, see the "Operation Manual") This product Extension lead (for checking the rear when the vehicle is moving forward. 5 m (16 ft. 5 in.) Violet/white...
... moved to REVERSE (R) position. USE INPUT ONLY FOR REVERSE OR MIRROR IMAGE REAR VIEW CAMERA. Be sure to "CAMERA" in "SETUP" when connecting the rear view camera. (For details, see the "Operation Manual") This product Extension lead (for checking the rear when the vehicle is moving forward. 5 m (16 ft. 5 in.) Violet/white...


