Owner's Manual
Page 12
... video input 102 Setting for rear view camera 102 Selecting the video of rear display 103 Switching the dimmer setting 103 Changing the Wide Screen Mode 104 Operating the Picture Adjustment 104 10 Adjusting the dimmer 105 Switching the Backlight On/Off 105 Appendix Installing the Program 107 Positioning ... of Functions for Areas not Stored on the Disc 113 Other function limitations 114 Troubleshooting 115 Problems in the screen 115 117 Messages and how to react to them 118 Understanding Built-in the Audio Screen 129 AUDIO menu 129 INITIAL menu 129 SET UP menu 129 FUNCTION menu 130 DVD Player...
... video input 102 Setting for rear view camera 102 Selecting the video of rear display 103 Switching the dimmer setting 103 Changing the Wide Screen Mode 104 Operating the Picture Adjustment 104 10 Adjusting the dimmer 105 Switching the Backlight On/Off 105 Appendix Installing the Program 107 Positioning ... of Functions for Areas not Stored on the Disc 113 Other function limitations 114 Troubleshooting 115 Problems in the screen 115 117 Messages and how to react to them 118 Understanding Built-in the Audio Screen 129 AUDIO menu 129 INITIAL menu 129 SET UP menu 129 FUNCTION menu 130 DVD Player...
Owner's Manual
Page 58
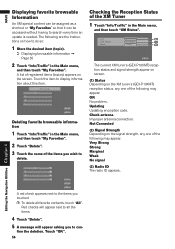
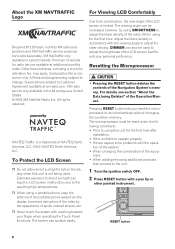
..., and then touch "XM Status". (1) (2) (3) The current XM tuner's (GEX-P10XMT) reception status and signal strength appear on screen. (1) Status Depending on the XM tuner's (GEX-P10XMT) reception status, any one of the following may appear. A list of... then touch "My Favorites". 2 Touch "Delete". 3 Touch the name of the following are the instructions on the screen. Not Connected (2) Signal Strength Depending on the signal strength, any one of the items you to con- Red checks... accessed without having to display information about this item. OK No problem. firm the deletion.
..., and then touch "XM Status". (1) (2) (3) The current XM tuner's (GEX-P10XMT) reception status and signal strength appear on screen. (1) Status Depending on the XM tuner's (GEX-P10XMT) reception status, any one of the following may appear. A list of... then touch "My Favorites". 2 Touch "Delete". 3 Touch the name of the following are the instructions on the screen. Not Connected (2) Signal Strength Depending on the signal strength, any one of the items you to con- Red checks... accessed without having to display information about this item. OK No problem. firm the deletion.
Owner's Manual
Page 117
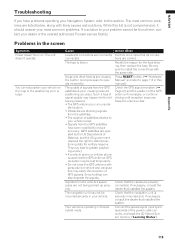
While this list is not comprehensive, it should answer your most common problems are properly connected. Problems in the screen Symptom Power doesn't turn on the map or the positioning error is bad. • Signals from the satellites. • The position of Defense,...here, contact your vehicle on . If necessary, consult the dealer that all connections are correct. You cannot position your dealer or the nearest authorized Pioneer service facility. The quality of the power cable correctly, and reset the 3D Hybrid Sensor memory ("Learning Status"). 115 Action (See) Confirm once ...
While this list is not comprehensive, it should answer your most common problems are properly connected. Problems in the screen Symptom Power doesn't turn on the map or the positioning error is bad. • Signals from the satellites. • The position of Defense,...here, contact your vehicle on . If necessary, consult the dealer that all connections are correct. You cannot position your dealer or the nearest authorized Pioneer service facility. The quality of the power cable correctly, and reset the 3D Hybrid Sensor memory ("Learning Status"). 115 Action (See) Confirm once ...
Owner's Manual
Page 118
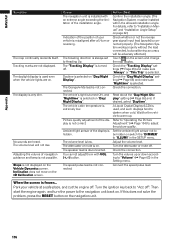
... set to "Volume" (➞ Page 63) in the SETUP menu. Ambient light sensor of the display is not displayed on the 3D Calibration screen. Check the "Tracking Display" settings (➞ Page 65) and make sure "Nighttime" is selected on the navigation unit. 116 Read about the... "Day/Night Display" setting (➞ Page 65) and, if desired, select "Daytime". If this does not solve the problem, press the RESET button on "Day/Night Display". The traveling direction is not connected. Daytime is selected. Check the connection. Refer to "Operating ...
... set to "Volume" (➞ Page 63) in the SETUP menu. Ambient light sensor of the display is not displayed on the 3D Calibration screen. Check the "Tracking Display" settings (➞ Page 65) and make sure "Nighttime" is selected on the navigation unit. 116 Read about the... "Day/Night Display" setting (➞ Page 65) and, if desired, select "Daytime". If this does not solve the problem, press the RESET button on "Day/Night Display". The traveling direction is not connected. Daytime is selected. Check the connection. Refer to "Operating ...

Owner's Manual
Page 119
... CD format cannot be played back. Rear View is turned off. Press AV button to return to "Handing and care of the disc" on the screen. When the shift lever is in [R], displays rear view camera images. (When "NAVI" is selected in REAR DISP menu.) Select SOURCE in the safe place... than Rear View. Rear display picture disappears. Park your vehicle in REAR DISP menu.(or when you move the shift lever other than [R] position, the screen will be returned to "Handing and care of the disc" on the back light. 117 The shift lever was placed in [R] when the rear view...
... CD format cannot be played back. Rear View is turned off. Press AV button to return to "Handing and care of the disc" on the screen. When the shift lever is in [R], displays rear view camera images. (When "NAVI" is selected in REAR DISP menu.) Select SOURCE in the safe place... than Rear View. Rear display picture disappears. Park your vehicle in REAR DISP menu.(or when you move the shift lever other than [R] position, the screen will be returned to "Handing and care of the disc" on the back light. 117 The shift lever was placed in [R] when the rear view...
Installation Manual
Page 10
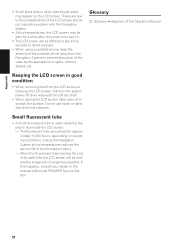
... settings without changing the condition memory. NAVTEQ North America, LLC. NAVTEQ Traffic- Premium Channels for clear viewing. All rights reserved. The screen can be problems with a pen tip or other pointed instrument. For Viewing LCD Comfortably Due to the unit. 1 Turn the ignition switch OFF. 2... Press RESET button with the opera- When using for the first time, adjust the black density in LCD screen malfunction due to the resulting high ...
... settings without changing the condition memory. NAVTEQ North America, LLC. NAVTEQ Traffic- Premium Channels for clear viewing. All rights reserved. The screen can be problems with a pen tip or other pointed instrument. For Viewing LCD Comfortably Due to the unit. 1 Turn the ignition switch OFF. 2... Press RESET button with the opera- When using for the first time, adjust the black density in LCD screen malfunction due to the resulting high ...

Installation Manual
Page 19
...and apply the parking brake. Rear display picture disappears. The parking brake is dirty. The disc is a type this system is on the screen. The loaded disc is cracked or otherwise damaged. Connect a parking brake cord, and apply the parking brake. Select view mode other than ...18) Insert a suitable disc. (➞ Page 18) Confirm once more that all connections are causing the built-in the Setting menu. There was a problem with a video. A disc which is incompatible with VOL (+,-) button. The attenuator or mute is inserted. Turn the volume up or CD playback is ...
...and apply the parking brake. Rear display picture disappears. The parking brake is dirty. The disc is a type this system is on the screen. The loaded disc is cracked or otherwise damaged. Connect a parking brake cord, and apply the parking brake. Select view mode other than ...18) Insert a suitable disc. (➞ Page 18) Confirm once more that all connections are causing the built-in the Setting menu. There was a problem with a video. A disc which is incompatible with VOL (+,-) button. The attenuator or mute is inserted. Turn the volume up or CD playback is ...
Installation Manual
Page 24
...consult your dealer or the nearest authorized PIONEER Service Station. 22 Glossary ➲ Glossary ➞ Appendix of the LCD screen and do not indicate a problem with the soft dry cloth. • When wiping the LCD screen, take care not to illuminate the LCD screen. - When the fluorescent tube reaches ...the end of its useful life, the LCD screen will be dark and the image...
...consult your dealer or the nearest authorized PIONEER Service Station. 22 Glossary ➲ Glossary ➞ Appendix of the LCD screen and do not indicate a problem with the soft dry cloth. • When wiping the LCD screen, take care not to illuminate the LCD screen. - When the fluorescent tube reaches ...the end of its useful life, the LCD screen will be dark and the image...


