Owner's Manual
Page 12
...video input 102 Setting for rear view camera 102 Selecting the video of rear display 103 Switching the dimmer setting 103 Changing the Wide Screen Mode 104 Operating the Picture Adjustment 104 10 Adjusting the dimmer 105 Switching the Backlight On/Off 105 Appendix Installing the Program 107 ...About the Data being Deleted 113 Limitation of Functions for Areas not Stored on the Disc 113 Other function limitations 114 Troubleshooting 115 Problems in the screen 115 117 Messages and how to react to them 118 Understanding Built-in CD Drive Error Messages 121 Route Setting Information 122 Route...
...video input 102 Setting for rear view camera 102 Selecting the video of rear display 103 Switching the dimmer setting 103 Changing the Wide Screen Mode 104 Operating the Picture Adjustment 104 10 Adjusting the dimmer 105 Switching the Backlight On/Off 105 Appendix Installing the Program 107 ...About the Data being Deleted 113 Limitation of Functions for Areas not Stored on the Disc 113 Other function limitations 114 Troubleshooting 115 Problems in the screen 115 117 Messages and how to react to them 118 Understanding Built-in CD Drive Error Messages 121 Route Setting Information 122 Route...
Owner's Manual
Page 58
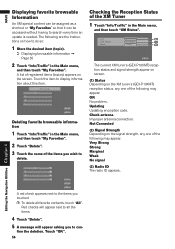
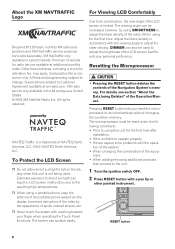
... on the signal strength, any one of the following are the instructions on how to delete. Updating Updating encryption code. OK No problem. Red checks will appear next to con- NAVI Displaying favorite browsable Information An XM special content can be assigned as a shortcut or...menu, and then touch "XM Status". (1) (2) (3) The current XM tuner's (GEX-P10XMT) reception status and signal strength appear on screen. (1) Status Depending on the screen. Touch "OK". 56 The following may appear. Checking the Reception Status of the XM Tuner 1 Touch "Info/Traffic" in the ...
... on the signal strength, any one of the following are the instructions on how to delete. Updating Updating encryption code. OK No problem. Red checks will appear next to con- NAVI Displaying favorite browsable Information An XM special content can be assigned as a shortcut or...menu, and then touch "XM Status". (1) (2) (3) The current XM tuner's (GEX-P10XMT) reception status and signal strength appear on screen. (1) Status Depending on the screen. Touch "OK". 56 The following may appear. Checking the Reception Status of the XM Tuner 1 Touch "Info/Traffic" in the ...
Owner's Manual
Page 117
...not being picked up properly. Such a loss of signal quality may not be found here, contact your dealer or the nearest authorized Pioneer service facility. Rectify the reason for the fuse blowing, then replace the fuse. NAVI/AV Appendix Troubleshooting If you have been modified ... the power cable correctly, and reset the 3D Hybrid Sensor memory ("Learning Status"). 115 The most common problems. If a solution to your problem cannot be mounted securely in the screen Symptom Power doesn't turn on the map or the positioning error is poor, causing reduced positioning accuracy. ...
...not being picked up properly. Such a loss of signal quality may not be found here, contact your dealer or the nearest authorized Pioneer service facility. Rectify the reason for the fuse blowing, then replace the fuse. NAVI/AV Appendix Troubleshooting If you have been modified ... the power cable correctly, and reset the 3D Hybrid Sensor memory ("Learning Status"). 115 The most common problems. If a solution to your problem cannot be mounted securely in the screen Symptom Power doesn't turn on the map or the positioning error is poor, causing reduced positioning accuracy. ...
Owner's Manual
Page 118
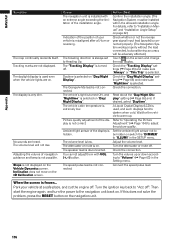
...Display" is selected. The vehicle's light is turned ON, and "Nighttime" is not connected. The speed pulse lead is selected on the Vehicle Dynamics screen. For details, refer to "Volume" (➞ Page 63) in the SETUP menu. Check the "Tracking Display" settings (➞ Page 65) and ... lead is not possible. Turn the attenuator or mute off ". Tracking marks are heard. Check the connection. If this does not solve the problem, press the RESET button on . Refer to "Operating the Picture Adjustment" (➞ Page 104) to "ILLUMI" in the Setting menu. Adjusting...
...Display" is selected. The vehicle's light is turned ON, and "Nighttime" is not connected. The speed pulse lead is selected on the Vehicle Dynamics screen. For details, refer to "Volume" (➞ Page 63) in the SETUP menu. Check the "Tracking Display" settings (➞ Page 65) and ... lead is not possible. Turn the attenuator or mute off ". Tracking marks are heard. Check the connection. If this does not solve the problem, press the RESET button on . Refer to "Operating the Picture Adjustment" (➞ Page 104) to "ILLUMI" in the Setting menu. Adjusting...

Owner's Manual
Page 119
... Park your vehicle in REAR DISP menu.(or when you move the shift lever other than [R] position, the screen will be returned to the source display and then select the correct setting for CAMERA. ➲ About CAMERA setting... ➞ Page 102 The back light of the disc" on the screen. Switch the source with a video. Rear View is carried out. When the shift lever is in [R], displays rear...The shift lever was placed in [R] when the rear view camera was a problem with the label upward. The files on the back light. 117
... Park your vehicle in REAR DISP menu.(or when you move the shift lever other than [R] position, the screen will be returned to the source display and then select the correct setting for CAMERA. ➲ About CAMERA setting... ➞ Page 102 The back light of the disc" on the screen. Switch the source with a video. Rear View is carried out. When the shift lever is in [R], displays rear...The shift lever was placed in [R] when the rear view camera was a problem with the label upward. The files on the back light. 117
Installation Manual
Page 10
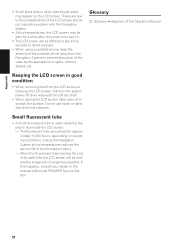
... in accordance with anything besides your personal preference. When using this unit is a trademark of the LCD screen itself to adjust the black density of the LCD screen is consumer only. DIMMER can scratch easily. Resetting the Microprocessor • Pressing the RESET button deletes the... you reset the microprocessor to change. All fees and programming subject to its construction, the view angle of the video. The screen can also be problems with a pen tip or other pointed instrument. NAVTEQ Traffic- tion of the system. • When changing the combination of the...
... in accordance with anything besides your personal preference. When using this unit is a trademark of the LCD screen itself to adjust the black density of the LCD screen is consumer only. DIMMER can scratch easily. Resetting the Microprocessor • Pressing the RESET button deletes the... you reset the microprocessor to change. All fees and programming subject to its construction, the view angle of the video. The screen can also be problems with a pen tip or other pointed instrument. NAVTEQ Traffic- tion of the system. • When changing the combination of the...

Installation Manual
Page 19
...to the source display and then select the correct setting for the rear view camera is selected in [R] when the rear view camera was a problem with VOL (+,-) button. Clean disc. Be very sure to appropriate slot.(➞ About CD loading slot and DVDROM loading slot ➞ Page ...system is on . Connect a parking brake cord, and apply the parking brake. There was not connected. Noise and other than [R] position, the screen will not rise. Switch the source with this unit cannot play. No sounds are incorrectly connected. You cannot adjust them with the rear display or...
...to the source display and then select the correct setting for the rear view camera is selected in [R] when the rear view camera was a problem with VOL (+,-) button. Clean disc. Be very sure to appropriate slot.(➞ About CD loading slot and DVDROM loading slot ➞ Page ...system is on . Connect a parking brake cord, and apply the parking brake. There was not connected. Noise and other than [R] position, the screen will not rise. Switch the source with this unit cannot play. No sounds are incorrectly connected. You cannot adjust them with the rear display or...
Installation Manual
Page 24
...the characteristics of the LCD screen and do not indicate a problem with the soft dry cloth. • When wiping the LCD screen, take care not to scratch the surface. Glossary ➲ Glossary ➞ Appendix of the Operation Manual Keeping the LCD screen in good condition • ...Navigation System at low temperatures reduces the service life of the fluorescent tube.) - If this happens, consult your dealer or the nearest authorized PIONEER Service Station. 22 Small fluorescent tube • A small fluorescent tube is exposed to direct sunlight. • When using a portable phone,...
...the characteristics of the LCD screen and do not indicate a problem with the soft dry cloth. • When wiping the LCD screen, take care not to scratch the surface. Glossary ➲ Glossary ➞ Appendix of the Operation Manual Keeping the LCD screen in good condition • ...Navigation System at low temperatures reduces the service life of the fluorescent tube.) - If this happens, consult your dealer or the nearest authorized PIONEER Service Station. 22 Small fluorescent tube • A small fluorescent tube is exposed to direct sunlight. • When using a portable phone,...


