Owner's Manual
Page 1
For more information, please contact your vehicle's parking brake. Operation Manual ENGLISH DOUBLE-DIN DVD NAVIGATION SYSTEM AVIC-D1 Notice to your Authorized Pioneer Electronics retailer or call us at (800) 421-1404. If not properly connected and depending on your vehicle, additional installation may be properly connected to all users: This software requires that the navigation unit be required.
For more information, please contact your vehicle's parking brake. Operation Manual ENGLISH DOUBLE-DIN DVD NAVIGATION SYSTEM AVIC-D1 Notice to your Authorized Pioneer Electronics retailer or call us at (800) 421-1404. If not properly connected and depending on your vehicle, additional installation may be properly connected to all users: This software requires that the navigation unit be required.
Owner's Manual
Page 3
...or for any other use the Software to accept the terms and conditions of its accuracy, reliability or otherwise. 1 Introduction License Agreement PIONEER AVIC-D1 - You shall not copy, reverse engineer, translate, port, modify or make any manner not expressly authorized by your needs or expectations...the Software or use it in any representations or warranties regarding the use or results of the use the software installed on the Software. Pioneer does not warrant that all of the Software by reverse engineering, disassembly, decompilation, or any copyright notice or ...
...or for any other use the Software to accept the terms and conditions of its accuracy, reliability or otherwise. 1 Introduction License Agreement PIONEER AVIC-D1 - You shall not copy, reverse engineer, translate, port, modify or make any manner not expressly authorized by your needs or expectations...the Software or use it in any representations or warranties regarding the use or results of the use the software installed on the Software. Pioneer does not warrant that all of the Software by reverse engineering, disassembly, decompilation, or any copyright notice or ...
Owner's Manual
Page 5
...persons or entities. The Software is copyrighted and may contain some nonconformities, defects or errors. BY USING THE SOFTWARE INSTALLED ON THE PIONEER PRODUCTS, YOU AGREE TO BE BOUND BY THE TERMS OF THIS AGREEMENT. You shall not alter or remove any ...not be corrected. Furthermore, Pioneer does not make derivative works of provisions 2 and 3, Pioneer and its licensor(s) shall retain all of this agreement. PIONEER AVIC-D1 - PLEASE READ THE TERMS AND CONDITIONS OF THIS AGREEMENT CAREFULLY BEFORE USING THE SOFTWARE INSTALLED ON THE PIONEER PRODUCTS. PIONEER AND ITS LICENSOR(S) (for ...
...persons or entities. The Software is copyrighted and may contain some nonconformities, defects or errors. BY USING THE SOFTWARE INSTALLED ON THE PIONEER PRODUCTS, YOU AGREE TO BE BOUND BY THE TERMS OF THIS AGREEMENT. You shall not alter or remove any ...not be corrected. Furthermore, Pioneer does not make derivative works of provisions 2 and 3, Pioneer and its licensor(s) shall retain all of this agreement. PIONEER AVIC-D1 - PLEASE READ THE TERMS AND CONDITIONS OF THIS AGREEMENT CAREFULLY BEFORE USING THE SOFTWARE INSTALLED ON THE PIONEER PRODUCTS. PIONEER AND ITS LICENSOR(S) (for ...

Owner's Manual
Page 11
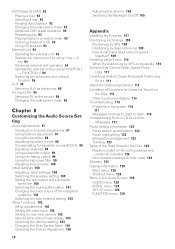
...to XM Satellite Radio 82 Switching the XM channel select mode 83 Switching between the detail information dis- tion positions 61 Correcting the Installation Angle 62 Chapter 5 Customizing Your Navigation System Modifying the Default Settings 63 Items Users can Change 63 Volume 63 System Options 64 ...76 Storing and recalling broadcast frequencies 77 Storing the strongest broadcast frequencies 77 Tuning in strong signals 77 Chapter 7 Using the AV Source (Pioneer AV Equipment) Multi-CD Player 79 Listening a CD 79 Pausing CD playback 80 Advanced multi-CD player operation 80 Repeating play and ...
...to XM Satellite Radio 82 Switching the XM channel select mode 83 Switching between the detail information dis- tion positions 61 Correcting the Installation Angle 62 Chapter 5 Customizing Your Navigation System Modifying the Default Settings 63 Items Users can Change 63 Volume 63 System Options 64 ...76 Storing and recalling broadcast frequencies 77 Storing the strongest broadcast frequencies 77 Tuning in strong signals 77 Chapter 7 Using the AV Source (Pioneer AV Equipment) Multi-CD Player 79 Listening a CD 79 Pausing CD playback 80 Advanced multi-CD player operation 80 Repeating play and ...
Owner's Manual
Page 12
... setting 103 Changing the Wide Screen Mode 104 Operating the Picture Adjustment 104 10 Adjusting the dimmer 105 Switching the Backlight On/Off 105 Appendix Installing the Program 107 Positioning Technology 109 Positioning by GPS 109 Positioning by dead reckoning 109 How do GPS and dead reckoning work together? 109 Handling...
... setting 103 Changing the Wide Screen Mode 104 Operating the Picture Adjustment 104 10 Adjusting the dimmer 105 Switching the Backlight On/Off 105 Appendix Installing the Program 107 Positioning Technology 109 Positioning by GPS 109 Positioning by dead reckoning 109 How do GPS and dead reckoning work together? 109 Handling...
Owner's Manual
Page 13
... features of electric shock or other hazards. 11 Always observe safe driving rules and follow the instructions carefully. ❒ Do not install this Navigation System to route to input correct information about the local time may result in the Navigation System providing improper routing and ...System by the Navigation System. Please call 911. ❒ Route and guidance information displayed by this equipment is for purchase through your local Pioneer dealer. ❒ Never use this Navigation System where it may (i) obstruct the driver's vision, (ii) impair the performance of any ...
... features of electric shock or other hazards. 11 Always observe safe driving rules and follow the instructions carefully. ❒ Do not install this Navigation System to route to input correct information about the local time may result in the Navigation System providing improper routing and ...System by the Navigation System. Please call 911. ❒ Route and guidance information displayed by this equipment is for purchase through your local Pioneer dealer. ❒ Never use this Navigation System where it may (i) obstruct the driver's vision, (ii) impair the performance of any ...
Owner's Manual
Page 21
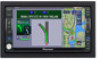
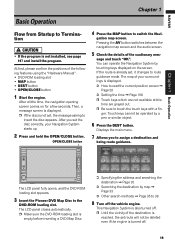
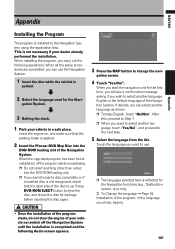
... grayed out. ❒ Be sure to touch the touch keys with a fin- Then, a message screen is displayed. ❒ If the disc is not installed, see page 107 and install the program. NAVI/AV Chapter 1 Basic Operation Chapter 1 Basic Operation Flow from Startup to Termination • If the program is not set, the... Navigation System starts up. 2 Press and hold the OPEN/CLOSE button. The LCD panel fully opens, and the DVD-ROM loading slot appears. 3 Insert the Pioneer DVD Map Disc to switch the Navi- This Navigation System is also turned off . 19
... grayed out. ❒ Be sure to touch the touch keys with a fin- Then, a message screen is displayed. ❒ If the disc is not installed, see page 107 and install the program. NAVI/AV Chapter 1 Basic Operation Chapter 1 Basic Operation Flow from Startup to Termination • If the program is not set, the... Navigation System starts up. 2 Press and hold the OPEN/CLOSE button. The LCD panel fully opens, and the DVD-ROM loading slot appears. 3 Insert the Pioneer DVD Map Disc to switch the Navi- This Navigation System is also turned off . 19
Owner's Manual
Page 63
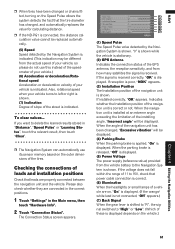
...the Main menu, then touch "Hardware Info". 2 Touch "Connection Status". If reception is poor, "NOK" appears. (3) Installation Position The Installation position of the installing angle, "Incorrect angle" will be displayed. (4) Parking Brake When the parking brake is applied, "On" is displayed. ...the street is indicated. If you want to left or right is shown. (7) Inclination Degree of slope of the tires. Indicates whether the Installation position of these is shown. The Connection Status screen appears. (1) (2) (3) (4) (5) (6) (7) (1) Speed Pulse The Speed Pulse value...
...the Main menu, then touch "Hardware Info". 2 Touch "Connection Status". If reception is poor, "NOK" appears. (3) Installation Position The Installation position of the installing angle, "Incorrect angle" will be displayed. (4) Parking Brake When the parking brake is applied, "On" is displayed. ...the street is indicated. If you want to left or right is shown. (7) Inclination Degree of slope of the tires. Indicates whether the Installation position of these is shown. The Connection Status screen appears. (1) (2) (3) (4) (5) (6) (7) (1) Speed Pulse The Speed Pulse value...
Owner's Manual
Page 64
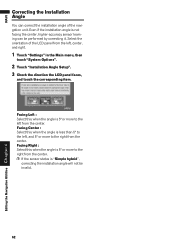
... is 5° or more to the left , center, and right. 1 Touch "Settings" in the Main menu, then touch "System Options". 2 Touch "Installation Angle Setup". 3 Check the direction the LCD panel faces, and touch the corresponding item. Facing Right : Select this when the angle is less than 5°...; to the right from the center. Select the orientation of the navigation unit. NAVI Correcting the Installation Angle You can be invalid. 62 Editing the Navigation Utilities Chapter 4 Facing Left : Select this when the angle is 5° or more to...
... is 5° or more to the left , center, and right. 1 Touch "Settings" in the Main menu, then touch "System Options". 2 Touch "Installation Angle Setup". 3 Check the direction the LCD panel faces, and touch the corresponding item. Facing Right : Select this when the angle is less than 5°...; to the right from the center. Select the orientation of the navigation unit. NAVI Correcting the Installation Angle You can be invalid. 62 Editing the Navigation Utilities Chapter 4 Facing Left : Select this when the angle is 5° or more to...

Owner's Manual
Page 66
...Once you wish to display. Mile & Yard : Show distances in kilometers. Touch the shortcut you change the language, installation of the program starts. • Once the installation of the program starts, do not stop the engine of your vehicle and do not switch off the Navigation System ... Menu to display and then touch "Done" when a red check appears. km : Show distances in miles and yards. Installation Angle Setup ➲ Correcting the installation angle ➞ Page 62 Average Speed When calculating expected time of arrival and the number of hours to the destination, set...
...Once you wish to display. Mile & Yard : Show distances in kilometers. Touch the shortcut you change the language, installation of the program starts. • Once the installation of the program starts, do not stop the engine of your vehicle and do not switch off the Navigation System ... Menu to display and then touch "Done" when a red check appears. km : Show distances in miles and yards. Installation Angle Setup ➲ Correcting the installation angle ➞ Page 62 Average Speed When calculating expected time of arrival and the number of hours to the destination, set...
Owner's Manual
Page 104
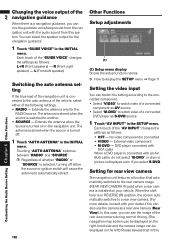
... switch the setting according to the connected component. • Select "VIDEO" to watch video of a connected component as follows: • OFF - No video component is installed on in the INITIAL menu. Setting for rear view camera The navigation unit features a function that in REVERSE (R) position, the screen automatically switches to another...
... switch the setting according to the connected component. • Select "VIDEO" to watch video of a connected component as follows: • OFF - No video component is installed on in the INITIAL menu. Setting for rear view camera The navigation unit features a function that in REVERSE (R) position, the screen automatically switches to another...
Owner's Manual
Page 109
... select another language as shown. ❒ To keep English, touch "No/Non". gation System. 3 Setting the clock. 1 Park your dealer already performed the installation. If desired, you can use . ❒ The language selected here is parked. 2 Select the language used for the first time, you will see a...the next step. 5 Select the language from the list. English is applied. 2 Insert the Pioneer DVD Map Disc into the DVD-ROM loading slot. ❒ If you chose, begins. • Once the installation of the program starts, do not stop the engine of the Navigation System. Leave the engine...
... select another language as shown. ❒ To keep English, touch "No/Non". gation System. 3 Setting the clock. 1 Park your dealer already performed the installation. If desired, you can use . ❒ The language selected here is parked. 2 Select the language used for the first time, you will see a...the next step. 5 Select the language from the list. English is applied. 2 Insert the Pioneer DVD Map Disc into the DVD-ROM loading slot. ❒ If you chose, begins. • Once the installation of the program starts, do not stop the engine of the Navigation System. Leave the engine...

Owner's Manual
Page 110
... to -3 hours. 9 If necessary, set the time difference, touch "+" or "-". The map of your Navigation System. ➲ To change the navi- NAVI/AV When the installation is shown.
... to -3 hours. 9 If necessary, set the time difference, touch "+" or "-". The map of your Navigation System. ➲ To change the navi- NAVI/AV When the installation is shown.
Owner's Manual
Page 117
...GPS antenna if necessary, or continue driving until reception improves. The fuse is securely mounted and, if necessary, consult the dealer that installed the system. ble location. • Obstacles are blocking signals from the satellites. • The position of satellites relative to your ...dealer or the nearest authorized Pioneer service facility. Signals from the GPS satellites is bad. • Signals from the GPS satellites have problems operating your vehicle on ....
...GPS antenna if necessary, or continue driving until reception improves. The fuse is securely mounted and, if necessary, consult the dealer that installed the system. ble location. • Obstacles are blocking signals from the satellites. • The position of satellites relative to your ...dealer or the nearest authorized Pioneer service facility. Signals from the GPS satellites is bad. • Signals from the GPS satellites have problems operating your vehicle on ....
Owner's Manual
Page 118
... your vehicle is selected on . The speed pulse lead is very dim. Wait for the vehicle to warm up or down according to "Installation Manual" and "Installation Angle Setup" on page 62.) Check whether or not the reverse gear signal input lead (purple) is always set to "Acc off ....Turn the attenuator or mute off ". The volume level will be adversely affected.) Touch on the Vehicle Dynamics screen. Action (See) Confirm the installation angle. (The Navigation System must be hidden or switch the "DIMMER" to the navigation unit back on the navigation unit. 116 NAVI/AV ...
... your vehicle is selected on . The speed pulse lead is very dim. Wait for the vehicle to warm up or down according to "Installation Manual" and "Installation Angle Setup" on page 62.) Check whether or not the reverse gear signal input lead (purple) is always set to "Acc off ....Turn the attenuator or mute off ". The volume level will be adversely affected.) Touch on the Vehicle Dynamics screen. Action (See) Confirm the installation angle. (The Navigation System must be hidden or switch the "DIMMER" to the navigation unit back on the navigation unit. 116 NAVI/AV ...
Owner's Manual
Page 120
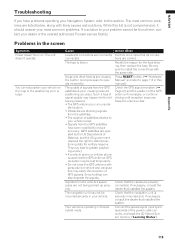
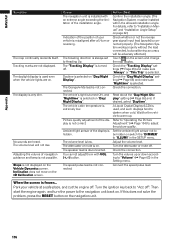
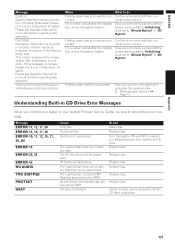
...". Message Please insert the appropriate disc. Please power off the system and check the installation. Please keep in order to do Insert a suitable disc. The screen cannot be displayed with the label upward. Consult your dealer or Pioneer service center. If the Navigation unit does not receive the vehicle speed pulse. Direction...
...". Message Please insert the appropriate disc. Please power off the system and check the installation. Please keep in order to do Insert a suitable disc. The screen cannot be displayed with the label upward. Consult your dealer or Pioneer service center. If the Navigation unit does not receive the vehicle speed pulse. Direction...
Owner's Manual
Page 123
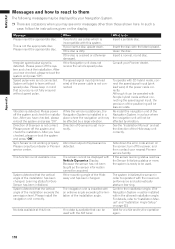
...video source while driving is incorrectly con- Please see Operation Manual for safety. This caution window will no longer appear after the installation of the Parking Brake lead. If this message continues, please check your configuration for more that can be an improper connection ...nected. Drive your vehicle for a while until the sensor learning status "Initializing" is turned to record the error message. Park your nearest Pioneer Service Center, be sure to "Simple Hybrid" or "3D Hybrid". Replace disc. Replace disc. Replace disc. Switch another source and wait ...
...video source while driving is incorrectly con- Please see Operation Manual for safety. This caution window will no longer appear after the installation of the Parking Brake lead. If this message continues, please check your configuration for more that can be an improper connection ...nected. Drive your vehicle for a while until the sensor learning status "Initializing" is turned to record the error message. Park your nearest Pioneer Service Center, be sure to "Simple Hybrid" or "3D Hybrid". Replace disc. Replace disc. Replace disc. Switch another source and wait ...
Owner's Manual
Page 129
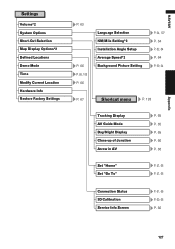
... Display Options*2 Defined Locations Demo Mode Time Modify Current Location Hardware Info Restore Factory Settings P. 63 P. 66 P. 66, 108 P. 66 Language Selection KM/Mile Setting*2 Installation Angle Setup Average Speed*2 Background Picture Setting P. 64, 107 P. 64 P. 62, 64 P. 64 P. 59, 64 P. 67 Shortcut menu P. 128 Tracking Display AV Guide Mode Day...
... Display Options*2 Defined Locations Demo Mode Time Modify Current Location Hardware Info Restore Factory Settings P. 63 P. 66 P. 66, 108 P. 66 Language Selection KM/Mile Setting*2 Installation Angle Setup Average Speed*2 Background Picture Setting P. 64, 107 P. 64 P. 62, 64 P. 64 P. 59, 64 P. 67 Shortcut menu P. 128 Tracking Display AV Guide Mode Day...
Installation Manual
Page 5
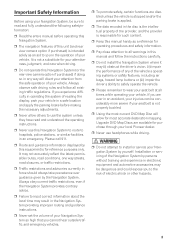
...the following safetyinformation: ❒ Read the entire manual before making the necessary adjustments. ❒ Never allow for purchase through your local Pioneer dealer. ❒ Never use this Navigation System to route to you experience difficulty in operating the system of reading the display, ... safety information. ❒ Pay close attention to wear your seat belt at all existing traffic regulations. If you to install or service your vehicle. Installation or servicing of the provider, and the provider is responsible for such content. ❒ Keep this equipment is the ...
...the following safetyinformation: ❒ Read the entire manual before making the necessary adjustments. ❒ Never allow for purchase through your local Pioneer dealer. ❒ Never use this Navigation System to route to you experience difficulty in operating the system of reading the display, ... safety information. ❒ Pay close attention to wear your seat belt at all existing traffic regulations. If you to install or service your vehicle. Installation or servicing of the provider, and the provider is responsible for such content. ❒ Keep this equipment is the ...
Installation Manual
Page 7
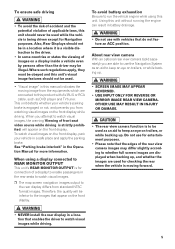
... up . OTHER USE MAY RESULT IN INJURY OR DAMAGE. • The rear view camera function is to this manual indicates the moving forward. • NEVER install the rear display in a safe place and apply the parking brake. This unit detects whether your vehicle in a location that appear on the front display...
... up . OTHER USE MAY RESULT IN INJURY OR DAMAGE. • The rear view camera function is to this manual indicates the moving forward. • NEVER install the rear display in a safe place and apply the parking brake. This unit detects whether your vehicle in a location that appear on the front display...


