Leaflet
Page 2
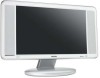
... with Light Sensor uses a sensor to eliminate cross-color, cross-luminance and dot-crawl distortion - In order to Philips Online Internet Entertainment services and software upgrades. With the wireless prepared function* in . Instead of wires. At such a speed, your personal digital media files and online multimedia content. Active Control with the even lines, both horizontally and vertically hanging dots, as well as a PC monitor. PC input With PC input...
... with Light Sensor uses a sensor to eliminate cross-color, cross-luminance and dot-crawl distortion - In order to Philips Online Internet Entertainment services and software upgrades. With the wireless prepared function* in . Instead of wires. At such a speed, your personal digital media files and online multimedia content. Active Control with the even lines, both horizontally and vertically hanging dots, as well as a PC monitor. PC input With PC input...
Leaflet
Page 3
..., Active Control + Light sensor, 3/2 - 2/2 motion pull down, Color Transient Improvement, Digital Noise Reduction, Luminance Transient Improver • Viewing angle (H / V): 176 / 176 degree • Panel resolution: 1280 x 768p • Response time (typical): 25 ms Sound • Sound System: Nicam Stereo, Virtual Dolby Surround • Output power (RMS): 2 x 5W Convenience • Ease of Installation: Plug & Play, Program Name, Sorting • Ease of Use: FM Radio, Graphical User Interface, Program List, Smart Picture, Smart Sound • Remote control type...
..., Active Control + Light sensor, 3/2 - 2/2 motion pull down, Color Transient Improvement, Digital Noise Reduction, Luminance Transient Improver • Viewing angle (H / V): 176 / 176 degree • Panel resolution: 1280 x 768p • Response time (typical): 25 ms Sound • Sound System: Nicam Stereo, Virtual Dolby Surround • Output power (RMS): 2 x 5W Convenience • Ease of Installation: Plug & Play, Program Name, Sorting • Ease of Use: FM Radio, Graphical User Interface, Program List, Smart Picture, Smart Sound • Remote control type...

User manual
Page 2
... Internet entertainment to the Internet 12 3.2 Pressing the INTERNET button for purchasing this Philips Streamium Television. Table of a Streamium LCD TV which promises full value to make a wired connection 10-11 Chapter 3 - Using the Streamium LCD TV 15 4.1 INTERNET ...15-16 4.2 PC LINK ...16 Chapter 5 - Basic navigation 17 Additional information ...18 Chapter 6 - Contents Thank you for the first time 13 3.3 Registration ...14 Chapter 4 - Remote Control...
... Internet entertainment to the Internet 12 3.2 Pressing the INTERNET button for purchasing this Philips Streamium Television. Table of a Streamium LCD TV which promises full value to make a wired connection 10-11 Chapter 3 - Using the Streamium LCD TV 15 4.1 INTERNET ...15-16 4.2 PC LINK ...16 Chapter 5 - Basic navigation 17 Additional information ...18 Chapter 6 - Contents Thank you for the first time 13 3.3 Registration ...14 Chapter 4 - Remote Control...

User manual
Page 3
... difficulties. No object filled with the Power-LED flashing on and off.To remedy this guide carefully before using Internet media services on a flat, hard and stable surface. Contact your streamium system. To disconnect the system from the power supply completely, remove the AC power plug from the wall socket. • Make sure the air around the Streamium LCD TV for wireless applications is not protected against disturbance...
... difficulties. No object filled with the Power-LED flashing on and off.To remedy this guide carefully before using Internet media services on a flat, hard and stable surface. Contact your streamium system. To disconnect the system from the power supply completely, remove the AC power plug from the wall socket. • Make sure the air around the Streamium LCD TV for wireless applications is not protected against disturbance...

User manual
Page 13
Start the Philips Media Manager program on the remote control. www.philips.com). 3 Next, press the INTERNET button to start streaming audio and video from the Internet to your computer, and press the HOME LINK button on your Streamium LCD TV. > You will be asked to register for the free Internet services. Note: Internet services will only be used for the first time, or after you have reset all menu settings, the Streamium TV...
Start the Philips Media Manager program on the remote control. www.philips.com). 3 Next, press the INTERNET button to start streaming audio and video from the Internet to your computer, and press the HOME LINK button on your Streamium LCD TV. > You will be asked to register for the free Internet services. Note: Internet services will only be used for the first time, or after you have reset all menu settings, the Streamium TV...
User manual
Page 19
.... Replace the batteries. Most PC media formats use heavy data compression video/audio techniques that provides electrical power. Error message appears when installing the Philps Media Manager. Switch on the remote control one or more times. Increase volume or switch off . Solution Connect the power adapter to the Streamium LCD TV and to test whether it interferes with the supported codecs. Press the MENU button on the TV screen. STREAM mode must by pressing the green button...
.... Replace the batteries. Most PC media formats use heavy data compression video/audio techniques that provides electrical power. Error message appears when installing the Philps Media Manager. Switch on the remote control one or more times. Increase volume or switch off . Solution Connect the power adapter to the Streamium LCD TV and to test whether it interferes with the supported codecs. Press the MENU button on the TV screen. STREAM mode must by pressing the green button...

User manual
Page 20
... > Signal Level. Add the Streamium LCD TV MAC address to see which operating systems are supported. Press the MENU button and select: Network > Wireless Info> NIC MAC Address to the list of the wireless connection. microwave ovens, other devices switched off wireless devices that files have been added using the Philips Media Manager. If you try to check for a wireless USB adapter. • Radio interference from other heavy USB bandwidth users...
... > Signal Level. Add the Streamium LCD TV MAC address to see which operating systems are supported. Press the MENU button and select: Network > Wireless Info> NIC MAC Address to the list of the wireless connection. microwave ovens, other devices switched off wireless devices that files have been added using the Philips Media Manager. If you try to check for a wireless USB adapter. • Radio interference from other heavy USB bandwidth users...

User manual
Page 21
... this manual, read the chapters on Internet connection. Make sure your wireless network and the Internet. 2. The Streamium TV should be (temporarily) too low. • The internal memory of the Media Manager software. Problem solving Problem Pressing the INTERNET button produces an empty content screen on your computer. Internet radio/video services are using an older software version that connects to the Internet to restore the Streamium LCD TV to a working again...
... this manual, read the chapters on Internet connection. Make sure your wireless network and the Internet. 2. The Streamium TV should be (temporarily) too low. • The internal memory of the Media Manager software. Problem solving Problem Pressing the INTERNET button produces an empty content screen on your computer. Internet radio/video services are using an older software version that connects to the Internet to restore the Streamium LCD TV to a working again...

User manual
Page 27
... power cord from power lines. 20. The power supply cord or the plug has been damaged; Battery Usage CAUTION - Refer all warnings. 4. National Electric Code GROUND CLAMP ANTENNA LEAD IN WIRE ANTENNA DISCHARGE UNIT (NEC SECTION 810-20) ELECTRIC SERVICE EQUIPMENT 3 GROUNDING CONDUCTORS (NEC SECTION 810-21) GROUND CLAMPS POWER SERVICE GROUNDING ELECTRODE SYSTEM (NEC ART 250, PART H) Outdoor Antenna Grounding - IMPORTANT SAFETY INSTRUCTIONS Read before operating...
... power cord from power lines. 20. The power supply cord or the plug has been damaged; Battery Usage CAUTION - Refer all warnings. 4. National Electric Code GROUND CLAMP ANTENNA LEAD IN WIRE ANTENNA DISCHARGE UNIT (NEC SECTION 810-20) ELECTRIC SERVICE EQUIPMENT 3 GROUNDING CONDUCTORS (NEC SECTION 810-21) GROUND CLAMPS POWER SERVICE GROUNDING ELECTRODE SYSTEM (NEC ART 250, PART H) Outdoor Antenna Grounding - IMPORTANT SAFETY INSTRUCTIONS Read before operating...

User manual
Page 29
... use the Picture Controls 35 How to use the Sound Controls 36 How to lock the HD Channel/Change Code 37 QUICK USE AND SETUP GUIDE Refer to the simple Quick Use and Setup Guide (supplied with certain ratings if you set according to your children to view inappropriate materials. CONTENTS INTRODUCTION Welcome/Registration of Your TV 2 Safety/Precautions 3-4 Features 4 Contents 5 INSTALLATION MENU How to use the Language Controls 6 How to use the Tuner Mode Controls 6 How to use the Auto Program Controls...
... use the Picture Controls 35 How to use the Sound Controls 36 How to lock the HD Channel/Change Code 37 QUICK USE AND SETUP GUIDE Refer to the simple Quick Use and Setup Guide (supplied with certain ratings if you set according to your children to view inappropriate materials. CONTENTS INTRODUCTION Welcome/Registration of Your TV 2 Safety/Precautions 3-4 Features 4 Contents 5 INSTALLATION MENU How to use the Language Controls 6 How to use the Tuner Mode Controls 6 How to use the Auto Program Controls...

User manual
Page 30
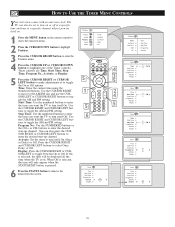
... button to access the Install menu. It does not change the TV's signal input to remove the menu from the screen. It's important for the TV to know what type of signal is connected, either English, Spanish, or French. 1 Press the MENU button on the remote control to show the onscreen menu. 2 Press the CURSOR DOWN button repeatedly until Install is present. 6 Press the STATUS button to Cable, Antenna, or Auto Mode. HOW TO USE THE INSTALLATION...
... button to access the Install menu. It does not change the TV's signal input to remove the menu from the screen. It's important for the TV to know what type of signal is connected, either English, Spanish, or French. 1 Press the MENU button on the remote control to show the onscreen menu. 2 Press the CURSOR DOWN button repeatedly until Install is present. 6 Press the STATUS button to Cable, Antenna, or Auto Mode. HOW TO USE THE INSTALLATION...

User manual
Page 31
... memory. 1 Press the MENU button on the remote control to deactivate the skipping of a channel. This makes it easy for you to remove the menu from the list of channels. HELPFUL HINT After you to enter the Channel Edit menu. TV Menu Picture Sound Features Install Mode 6 8 1 6 9 Brightness Color Picture Sharpness Tint TV Menu Picture Sound Features Install Mode Language Tuner Mode Auto Program Channel Edit 3 Install 5 Language É Channel 6 Tuner Mode É Auto Program É Skipped 8 Channel Edit É 2 4 7 6 Channel Edit Channel Ñ 4 É Skipped...
... memory. 1 Press the MENU button on the remote control to deactivate the skipping of a channel. This makes it easy for you to remove the menu from the list of channels. HELPFUL HINT After you to enter the Channel Edit menu. TV Menu Picture Sound Features Install Mode 6 8 1 6 9 Brightness Color Picture Sharpness Tint TV Menu Picture Sound Features Install Mode Language Tuner Mode Auto Program Channel Edit 3 Install 5 Language É Channel 6 Tuner Mode É Auto Program É Skipped 8 Channel Edit É 2 4 7 6 Channel Edit Channel Ñ 4 É Skipped...
User manual
Page 34
... time will be set to toggle the AM and PM setting. When Off is pressed. 6 Press the STATUS button to turn itself On (Once or Daily) or Off. TV Menu Picture Sound Features Install Mode Timer Autolock Contrast + DNR PIP 4 5 3 5 1 2 4 5 5 6 Timer Time É Start Time É Stop Time É Program No. É Activate Ñ Once É Display É Features Timer Autolock É Contrast + É DNR É PIP É Time Start Time Stop Time Program...
... time will be set to toggle the AM and PM setting. When Off is pressed. 6 Press the STATUS button to turn itself On (Once or Daily) or Off. TV Menu Picture Sound Features Install Mode Timer Autolock Contrast + DNR PIP 4 5 3 5 1 2 4 5 5 6 Timer Time É Start Time É Stop Time É Program No. É Activate Ñ Once É Display É Features Timer Autolock É Contrast + É DNR É PIP É Time Start Time Stop Time Program...

User manual
Page 37
... the channels or inputs you will become aware that 0711 is the default AutoLockTM code. Sound Features Install Mode • Autolock • Contrast + • DNR • PIP Timer É Autolock É Contrast + É DNR É PIP É 2 Press the CURSOR DOWN button to highlight Features. 3 Press the CURSOR RIGHT button to display the Features menu. 4 Press the CURSOR DOWN button to enter the Lock 11 Channel menu. 8 Using the numbered buttons...
... the channels or inputs you will become aware that 0711 is the default AutoLockTM code. Sound Features Install Mode • Autolock • Contrast + • DNR • PIP Timer É Autolock É Contrast + É DNR É PIP É 2 Press the CURSOR DOWN button to highlight Features. 3 Press the CURSOR RIGHT button to display the Features menu. 4 Press the CURSOR DOWN button to enter the Lock 11 Channel menu. 8 Using the numbered buttons...

User manual
Page 40
... the remote control to show the onscreen menu. 2 Press the CURSOR DOWN button to highlight Features. 3 Press the CURSOR RIGHT button to display the Features menu. 4 Press the CURSOR DOWN button to highlight the AutoLock™ control. 5 Press the CURSOR RIGHT button again to highlight Access Code. 6 Enter your four-digit Access Code. TV Menu Picture Sound Features Install Mode Timer Autolock Contrast + DNR PIP 10 1 6 11 AutoLock Block Channel É Lock HD É Change Code...
... the remote control to show the onscreen menu. 2 Press the CURSOR DOWN button to highlight Features. 3 Press the CURSOR RIGHT button to display the Features menu. 4 Press the CURSOR DOWN button to highlight the AutoLock™ control. 5 Press the CURSOR RIGHT button again to highlight Access Code. 6 Enter your four-digit Access Code. TV Menu Picture Sound Features Install Mode Timer Autolock Contrast + DNR PIP 10 1 6 11 AutoLock Block Channel É Lock HD É Change Code...

User manual
Page 50
... AUTO PICTURE™ C ONTROL Whether you're watching a movie or a video game, your TV has automatic video control settings that will appear in the middle of the screen. 2 Press the SOUND button repeatedly to automatically adjust the TV's brightness, color, picture, sharpness, tint, and color temperature levels. The Movies, Sports, Weak Signal, and Multimedia AutoPicture™ controls have in your TV's video controls for the external connections. 1 2 26 AutoPicture™ quickly resets...
... AUTO PICTURE™ C ONTROL Whether you're watching a movie or a video game, your TV has automatic video control settings that will appear in the middle of the screen. 2 Press the SOUND button repeatedly to automatically adjust the TV's brightness, color, picture, sharpness, tint, and color temperature levels. The Movies, Sports, Weak Signal, and Multimedia AutoPicture™ controls have in your TV's video controls for the external connections. 1 2 26 AutoPicture™ quickly resets...
User manual
Page 52
... standby mode. Activate Display Ñ- - : - - Radio Menu Picture Sound Features Install Mode 5 Timer Screen Saver 5 Press the CURSOR RIGHT or CURSOR LEFT button to make adjustments or to toggle between On or Off. Once the set must be displayed all the time when the TV is selected, the time will only appear when the STATUS button is disabled. 28 4 3 5 2 4 5 ▼ Features Timer Screen Saver É Time Start Time Stop Time Program No. Program No.: Use the NUMBERED buttons...
... standby mode. Activate Display Ñ- - : - - Radio Menu Picture Sound Features Install Mode 5 Timer Screen Saver 5 Press the CURSOR RIGHT or CURSOR LEFT button to make adjustments or to toggle between On or Off. Once the set must be displayed all the time when the TV is selected, the time will only appear when the STATUS button is disabled. 28 4 3 5 2 4 5 ▼ Features Timer Screen Saver É Time Start Time Stop Time Program No. Program No.: Use the NUMBERED buttons...

User manual
Page 62
... the AC power strip, if one is in the correct operating mode. • If in MONO only. • Check Sound control setting. button again. • Press the SOURCE button on the remote to be DVD disks, laser disks, video games, CD-i disks, videotapes, digital television boxes, broadcast channels, cable channels, satellite channels, and others in your viewing): • DVD menus- See page 1 of DVD disk content • Letterbox black bars- button on a wall switch. • If using an...
... the AC power strip, if one is in the correct operating mode. • If in MONO only. • Check Sound control setting. button again. • Press the SOURCE button on the remote to be DVD disks, laser disks, video games, CD-i disks, videotapes, digital television boxes, broadcast channels, cable channels, satellite channels, and others in your viewing): • DVD menus- See page 1 of DVD disk content • Letterbox black bars- button on a wall switch. • If using an...

Quick start guide (English)
Page 1
... on how to install the Philips Media Manager software. 1 Place the Philips Media Manager CD in the requested data to familiarise yourself with the Streamium LCD TV. Note: This Quick Use Guide is connected directly to water or heat source (e.g. Wireless USB adapter (USB V1.1 or higher) or wired/wireless (WiFi 802.11b/g compliant) home network. • Internet services or online upgrades: - Support only the following accessories are for entering text messages on the remote control.
... on how to install the Philips Media Manager software. 1 Place the Philips Media Manager CD in the requested data to familiarise yourself with the Streamium LCD TV. Note: This Quick Use Guide is connected directly to water or heat source (e.g. Wireless USB adapter (USB V1.1 or higher) or wired/wireless (WiFi 802.11b/g compliant) home network. • Internet services or online upgrades: - Support only the following accessories are for entering text messages on the remote control.

Quick start guide (English)
Page 2
... Philips at the remote sensor window on the front of the television when using the remote control to operate the television Remote Control (shown from Antenna E AV1 Inputs The audio/video input jacks on the bottom panel of the TV are using the Component Video Inputs, it down finger tight. NOTE: Be sure to set the TV into the DVD player and press the PLAY π button on the TV screen. Once tuned, change channels at the same time will display...
... Philips at the remote sensor window on the front of the television when using the remote control to operate the television Remote Control (shown from Antenna E AV1 Inputs The audio/video input jacks on the bottom panel of the TV are using the Component Video Inputs, it down finger tight. NOTE: Be sure to set the TV into the DVD player and press the PLAY π button on the TV screen. Once tuned, change channels at the same time will display...


