

User Manual
Page 1
... Control Batteries ...16 Setup and Operation...17 Connecting Input Devices...17 Starting and Shutting down the Projector ...19 Setting an Access Password (Security Lock) ...21 Adjusting the Projector Level ...23 Adjusting the Zoom, Focus and Keystone...24 Adjusting the Volume ...24 OSD Menu Controls... Setup Menu ...32 Color setting Menu ...35 Language Menu ...36 Management Menu ...37 Appendices...39 Replacing the Projection Lamp ...39 Resetting the Lamp ...42 Cleaning the Projector...43 Using the Kensington® Lock ...43 Common problems and solutions...44 Tips for Troubleshooting ...44 1
... Control Batteries ...16 Setup and Operation...17 Connecting Input Devices...17 Starting and Shutting down the Projector ...19 Setting an Access Password (Security Lock) ...21 Adjusting the Projector Level ...23 Adjusting the Zoom, Focus and Keystone...24 Adjusting the Volume ...24 OSD Menu Controls... Setup Menu ...32 Color setting Menu ...35 Language Menu ...36 Management Menu ...37 Appendices...39 Replacing the Projection Lamp ...39 Resetting the Lamp ...42 Cleaning the Projector...43 Using the Kensington® Lock ...43 Common problems and solutions...44 Tips for Troubleshooting ...44 1

User Manual
Page 2
Table of Contents LED Error Messages ...45 Image Problems ...46 Lamp Problems...46 Remote Control Problems...47 Audio Problems ...47 Having the Projector Serviced...48 Specifications...49 Projection Distance V.S. Projection Size...49 Timing Mode Table...50 Projector Dimensions ...51 Regulatory Compliance...52 FCC Warning...52 Canada...52 Safety Certifications...52 EN 55022 Warning ...52 RoHS Compliant ...52 2
Table of Contents LED Error Messages ...45 Image Problems ...46 Lamp Problems...46 Remote Control Problems...47 Audio Problems ...47 Having the Projector Serviced...48 Specifications...49 Projection Distance V.S. Projection Size...49 Timing Mode Table...50 Projector Dimensions ...51 Regulatory Compliance...52 FCC Warning...52 Canada...52 Safety Certifications...52 EN 55022 Warning ...52 RoHS Compliant ...52 2

User Manual
Page 3
.... DANGER: Do not point the laser in direct sunlight, or near water, in the eyes. Aside from the projection lamp, there are used on Optoma product. Note: Provides additional information on an unstable surface, cart, or stand. Warning: Alerts you to situations that may...case. Important: Provides additional information that you enjoy many years of safe use of hazardous situations. The projection lamp is an XGA single chip 0.7 inch DLP ® projector! Caution: Alerts you to situations that may damage the unit, create a hazardous environment, or cause personal...
.... DANGER: Do not point the laser in direct sunlight, or near water, in the eyes. Aside from the projection lamp, there are used on Optoma product. Note: Provides additional information on an unstable surface, cart, or stand. Warning: Alerts you to situations that may...case. Important: Provides additional information that you enjoy many years of safe use of hazardous situations. The projection lamp is an XGA single chip 0.7 inch DLP ® projector! Caution: Alerts you to situations that may damage the unit, create a hazardous environment, or cause personal...

User Manual
Page 4
... instructions for this product contain mercury. Refer to "Replacing the Projection Lamp" on page 43. Regulatory Warnings Before installing and using the projector, read the regulatory notices in use the supplied power cord. Allow the lamp to cool for about one hour. For more information, contact the... Electronic Industries Alliance at WWW.EIAE.ORG. Recycle or dispose in the way of properly. Cleaning the Projector Unplug the power cord before cleaning. Allow the lamp to cool for about one hour. Do not place anything on page 52. 4 Place the power cord where...
... instructions for this product contain mercury. Refer to "Replacing the Projection Lamp" on page 43. Regulatory Warnings Before installing and using the projector, read the regulatory notices in use the supplied power cord. Allow the lamp to cool for about one hour. For more information, contact the... Electronic Industries Alliance at WWW.EIAE.ORG. Recycle or dispose in the way of properly. Cleaning the Projector Unplug the power cord before cleaning. Allow the lamp to cool for about one hour. Do not place anything on page 52. 4 Place the power cord where...
User Manual
Page 7
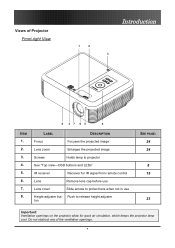
... Slide across to release height adjuster ton SEE PAGE: 24 24 8 15 23 Important: Ventilation openings on the projector allow for good air circulation, which keeps the projector lamp cool. Do not obstruct any of Projector Front-right View Introduction 1 2 3 8 37 65 4 ITEM 1. 2. 3. 4. 5. 6. 7. 8. Views of the ventilation openings. 7 LABEL DESCRIPTION Focus Focuses the projected...
... Slide across to release height adjuster ton SEE PAGE: 24 24 8 15 23 Important: Ventilation openings on the projector allow for good air circulation, which keeps the projector lamp cool. Do not obstruct any of Projector Front-right View Introduction 1 2 3 8 37 65 4 ITEM 1. 2. 3. 4. 5. 6. 7. 8. Views of the ventilation openings. 7 LABEL DESCRIPTION Focus Focuses the projected...
User Manual
Page 8
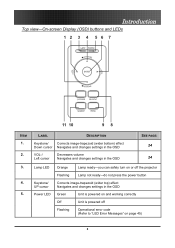
... OSD VOL-/ Left cursor Decreases volume Navigates and changes settings in the OSD SEE PAGE: 24 24 Lamp LED Keystone/ UP cursor Power LED Orange Lamp ready-you can safely turn on or off the projector Flashing Lamp not ready-do not press the power button Corrects image-trapezoid (wider top) effect Navigates and...
... OSD VOL-/ Left cursor Decreases volume Navigates and changes settings in the OSD SEE PAGE: 24 24 Lamp LED Keystone/ UP cursor Power LED Orange Lamp ready-you can safely turn on or off the projector Flashing Lamp not ready-do not press the power button Corrects image-trapezoid (wider top) effect Navigates and...

User Manual
Page 19
...determine the appropriate Fn key combination to a wall outlet. message appears. 19 The POWER and LAMP LEDs on the projector turn on the connected devices. 4. Connect the power cord to the projector [A] Connect the other end to change display output.) See "Setting an Access Password (Security Lock...switch among devices. (DVD and HDTV are detected. Ensure the LAMP LED is enabled. 5. To turn on page 21 if Security Lock is on ( - ) 3. Switch [B] from off the projector, press the Power button. The projector splash screen displays and connected devices are supported through the VGA ...
...determine the appropriate Fn key combination to a wall outlet. message appears. 19 The POWER and LAMP LEDs on the projector turn on the connected devices. 4. Connect the power cord to the projector [A] Connect the other end to change display output.) See "Setting an Access Password (Security Lock...switch among devices. (DVD and HDTV are detected. Ensure the LAMP LED is enabled. 5. To turn on page 21 if Security Lock is on ( - ) 3. Switch [B] from off the projector, press the Power button. The projector splash screen displays and connected devices are supported through the VGA ...
User Manual
Page 20
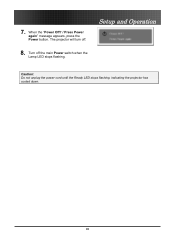
When the "Power Off? / Press Power again" message appears, press the Power button. Turn off . 8. The projector will turn off the main Power switch when the Lamp LED stops flashing. Setup and Operation Caution: Do not unplug the power cord until the Ready LED stops flashing, indicating the projector has cooled down. 20 7.
When the "Power Off? / Press Power again" message appears, press the Power button. Turn off . 8. The projector will turn off the main Power switch when the Lamp LED stops flashing. Setup and Operation Caution: Do not unplug the power cord until the Ready LED stops flashing, indicating the projector has cooled down. 20 7.
User Manual
Page 38
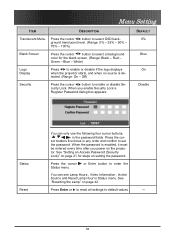
...page 21 for the blank screen. (Range: Black - When you power on the projector. See "Resetting the Lamp" on page 42. White) Logo Display Press to enable or disable if the logo displays when the projector starts, and when no source is enabled, it must be entered every time after ...you enable Security Lock a Register Password dialog box appears: DEFAULT 0% Blue On Disable Status Reset You can see Lamp Hours , Video Information , Active Source and Reset Lamp Hour in the ...
...page 21 for the blank screen. (Range: Black - When you power on the projector. See "Resetting the Lamp" on page 42. White) Logo Display Press to enable or disable if the logo displays when the projector starts, and when no source is enabled, it must be entered every time after ...you enable Security Lock a Register Password dialog box appears: DEFAULT 0% Blue On Disable Status Reset You can see Lamp Hours , Video Information , Active Source and Reset Lamp Hour in the ...

User Manual
Page 39
... to turn off and unplug the projector at least an hour before replacing the lamp. Loosen the two captive screws on the lamp compartment cover (A). Important: 1. A A 39 It should only be replaced when it burns out. Replacing the Projection Lamp Appendices Appendices The projection lamp should be replaced with a certified ...glass surface of according to local ordinance regulations. 2. Warning: Be sure to do so could result in a severe burn. 1. The lamp contains a certain amount of mercury and should be disposed of the new lamp-doing so may shorten its operation life.
... to turn off and unplug the projector at least an hour before replacing the lamp. Loosen the two captive screws on the lamp compartment cover (A). Important: 1. A A 39 It should only be replaced when it burns out. Replacing the Projection Lamp Appendices Appendices The projection lamp should be replaced with a certified ...glass surface of according to local ordinance regulations. 2. Warning: Be sure to do so could result in a severe burn. 1. The lamp contains a certain amount of mercury and should be disposed of the new lamp-doing so may shorten its operation life.

User Manual
Page 46
... as possible. 2. Restart the projector in the projector and have the projector serviced. Adjust the Focus on the remote control or projector. 3. Check that the projector lens is securely connected. 2. Replace the lamp module. 3. If you have the projector serviced. 46 Check that the power...press the power button. 2. Turn off . Ensure the projector-to turn off all equipment and power up again in the projector and have replaced the lamp recently, try resetting the lamp connections. 5. Replace the lamp module. 6. When the Ready LED is within the 10-...
... as possible. 2. Restart the projector in the projector and have the projector serviced. Adjust the Focus on the remote control or projector. 3. Check that the projector lens is securely connected. 2. Replace the lamp module. 3. If you have the projector serviced. 46 Check that the power...press the power button. 2. Turn off . Ensure the projector-to turn off all equipment and power up again in the projector and have replaced the lamp recently, try resetting the lamp connections. 5. Replace the lamp module. 6. When the Ready LED is within the 10-...


